

What a FluentBoards Task Can Actually Do (And How to Create Your First One)


You create a task, type a title, hit enter, and move on. That’s a reasonable way to get started, and plenty of boards never need more than that.
But a FluentBoards task is a complete unit of work rather than a label on a card. Every task holds:
- A description with built-in AI assistance
- Labels, priority levels, and start and due dates
- Multiple assignees and watchers
- A comment thread and a full activity log
Pro adds subtasks, custom fields, attachments, time tracking, and reminders on top.
This post covers what’s inside a task and walks you through creating your first one properly. You’ll need a board set up before any of it makes sense, so open one now and follow along.
What a FluentBoards Task Actually Contains
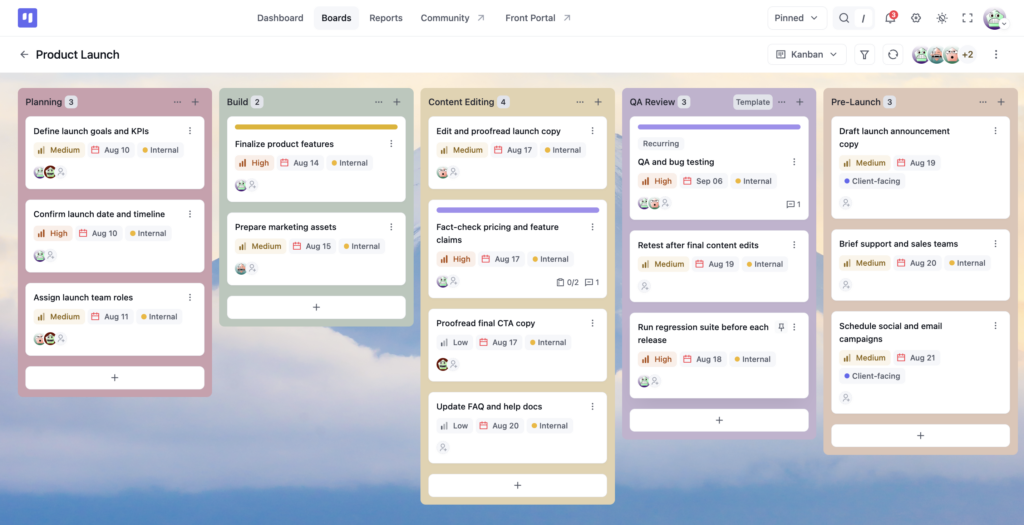
A task in FluentBoards is not a card. It’s a full-detail window that holds every piece of information your team needs to get that work done without hunting across other tools.
Here’s what’s inside every task, broken down by availability-
The Free fields (available on every plan)
Title: The name of the task. Keep it action-oriented: “Write landing page copy” beats “Landing page.”
Description: A full-text field with markdown support: headings, bullet points, checklists, bold, code blocks. Type / anywhere in the description to access slash commands for quick formatting. Or let the AI writing assistant draft it from a short prompt, rewriting, summarizing, shortening, or expanding from a single line of context.
Labels: Color-coded tags you define at the board level. Use them to categorize tasks by type, team, or stage, whatever makes your board scannable at a glance.
Priority: Four levels: Low, Medium, High, and Urgent. The priority badge shows directly on the task card in Kanban and List view, so your team knows what needs attention without opening every task.
Due Date: Set a start date, a due date, or both. Tasks with a due date plot correctly in Calendar View and Table View, both Pro views, so filling this in now pays off as your workflow grows.
Assignees: Add one or more team members. There’s no seat limit, so assign as many people as the task needs. Every assigned person gets notified, and the task shows up in their My Tasks dashboard.
Watchers: Anyone can watch a task to get notified when something changes, without being assigned to it. Access it from the three-dot menu inside the task and click Watching. Useful for managers or stakeholders who need visibility but aren’t doing the work.
Card Cover: Set a color or upload an image as the task card’s cover. It appears as a colored header on the task card in Kanban view, making boards scannable at a glance. Open the cover panel from the image icon in the top bar of the task. Nine preset colors are available on Free. Advanced gradient covers require Pro.
Clone Task: Duplicate any task with one click from the three-dot menu. The structure, fields, and description carry over, so you change the title and details rather than rebuilding.
Comments and Activity Log: Leave updates, ask questions, and share feedback directly on the task. Tag a teammate with @ and they get notified instantly. Every change is recorded in the activity log automatically, including who moved the task, who changed the priority, and who left a comment. No chasing updates through Slack.
Ask AI: Open the Ask AI menu inside a task to summarize it and its comment thread, or get a suggested label and priority. Handy when you’re picking up someone else’s task.
Manage Every Project
With Total Control
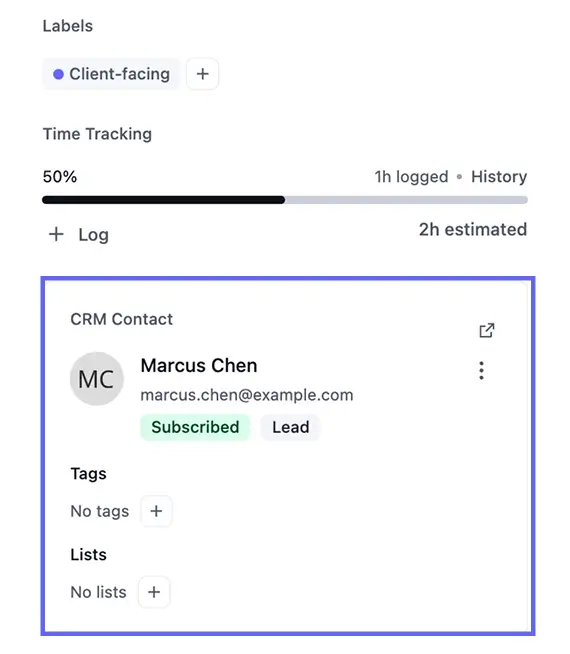
CRM Contact: See who a task is for without switching tools. Link a FluentCRM contact from the Properties sidebar and their details travel with the task.
Move, Pin Task, and Copy Task Link: Three more three-dot menu actions. Move sends the task elsewhere, Pin keeps it visible at the top of its column, Copy Task Link gives you a shareable link. Full walkthrough further down.
Archive, Delete, and Leave Task: Also in the three-dot menu. Archive removes it from view but keeps it restorable, Delete removes it for good, Leave Task takes you off without touching other assignees.
Comment images and replies: Drop a screenshot into the comment box with the image icon, and reply to a specific comment instead of the bottom of the thread.
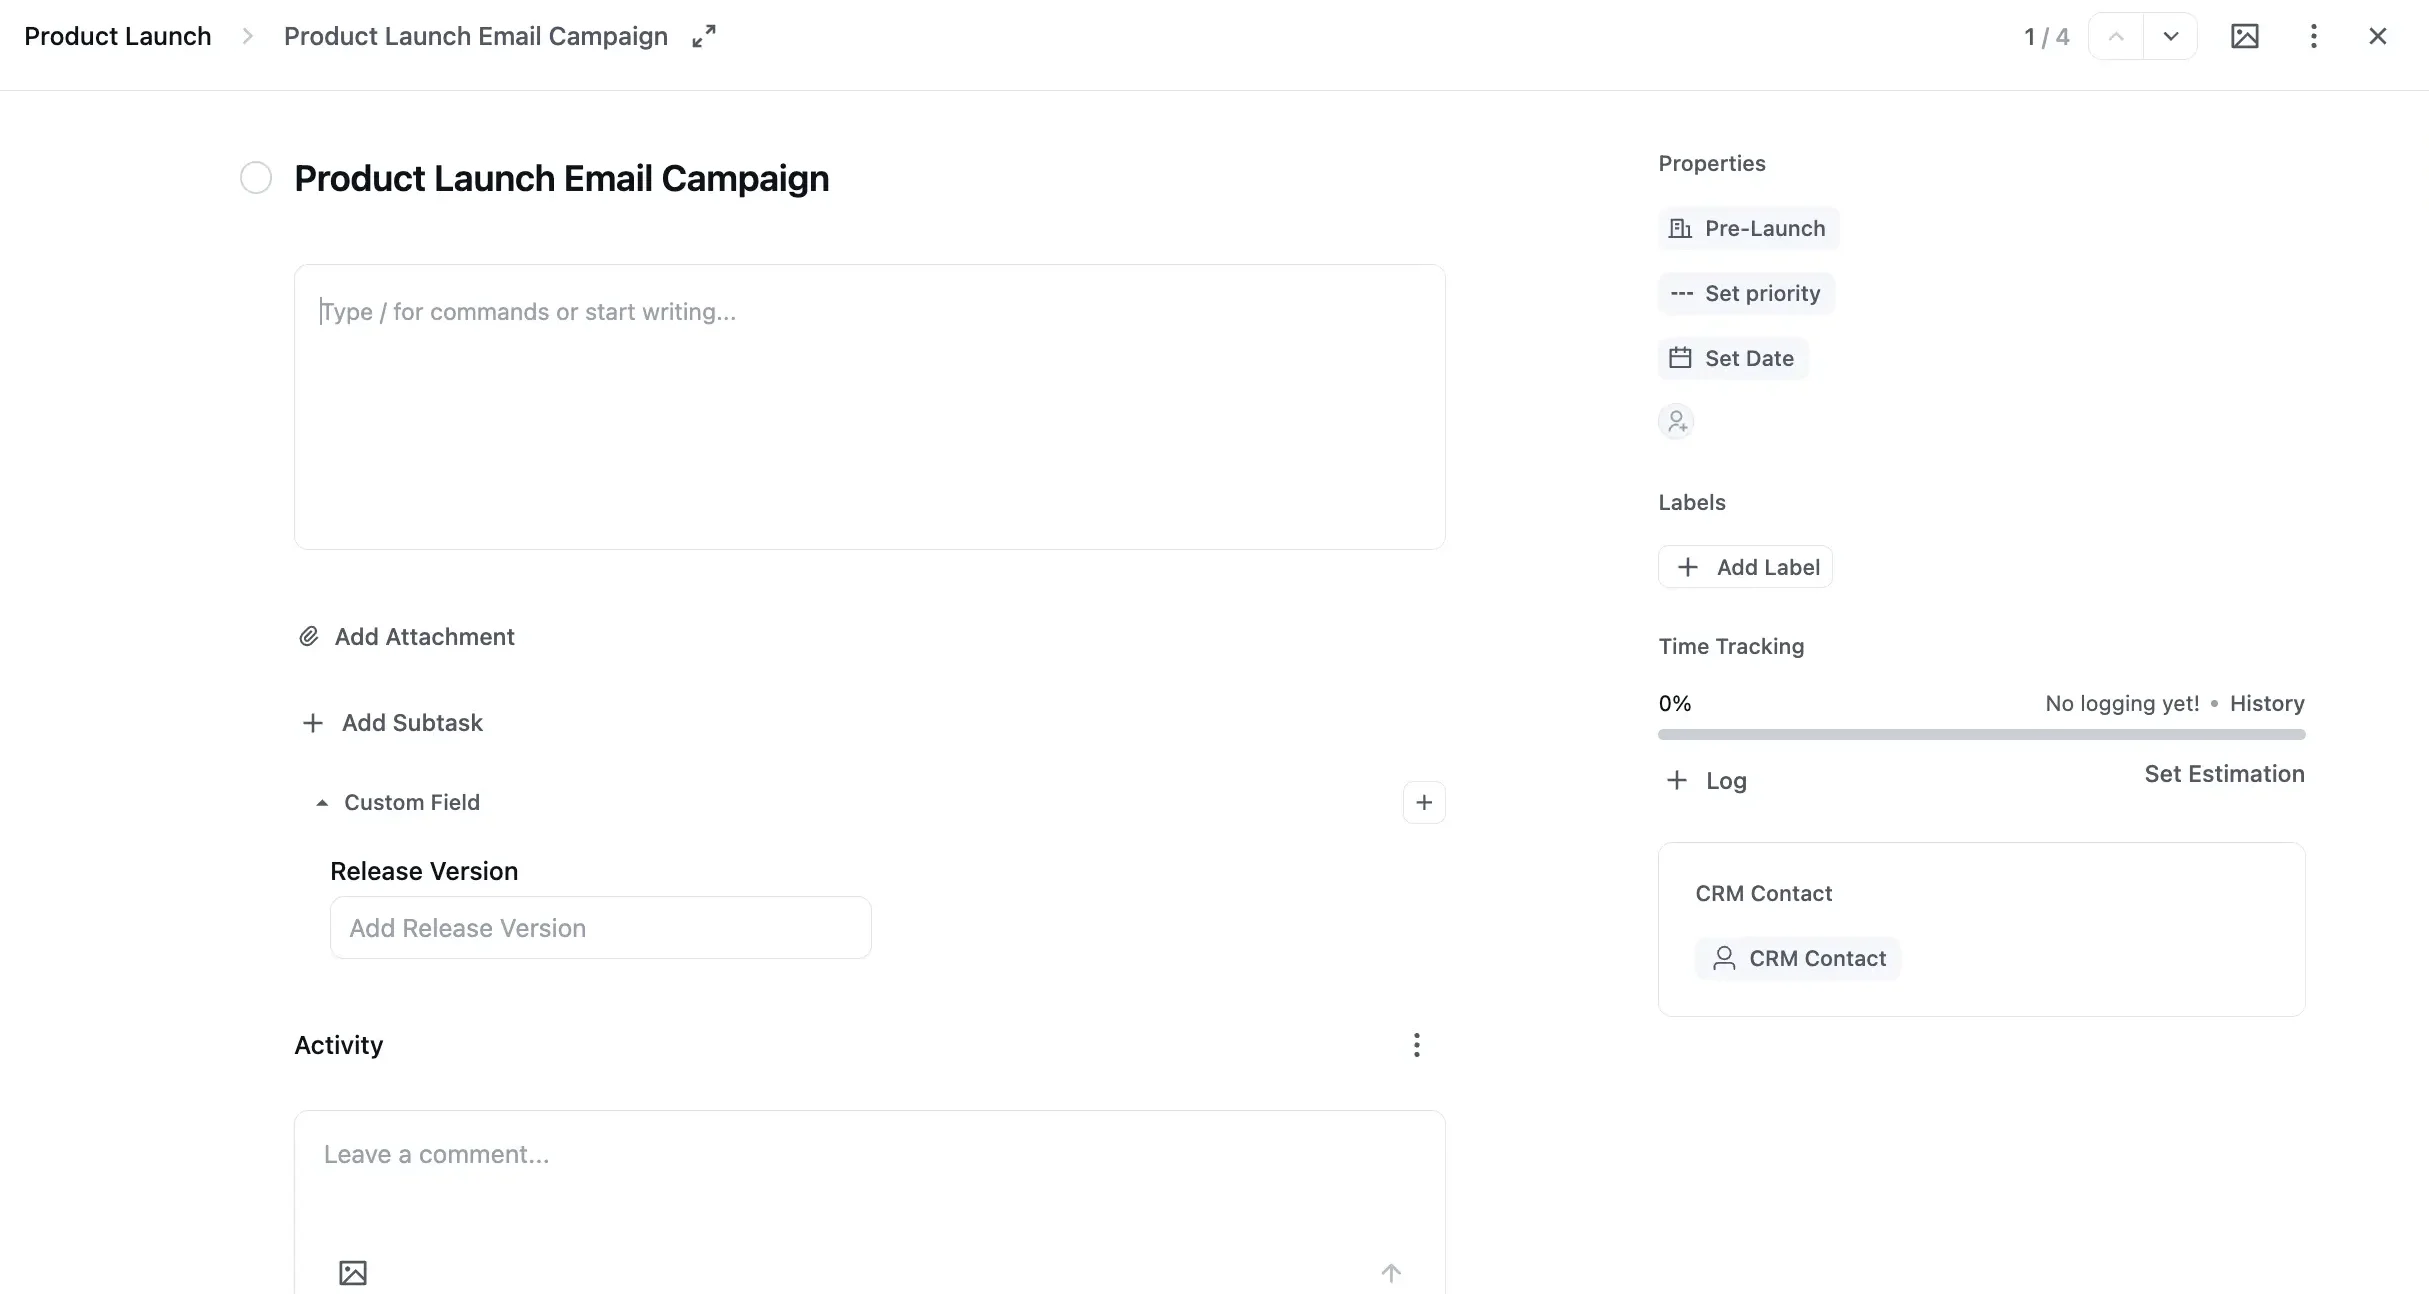
Next/Previous Task, Fullscreen, and breadcrumb: The counter, like 1/3, moves you through the stage without closing the task. The expand icon opens it full width, and the breadcrumb shows the board it’s on.
Change Stage (quick): Click the stage badge in Properties for a one-click stage change or Change Board option, faster than opening Move from the three-dot menu.
The Pro fields
Subtasks and Subtask Groups: Break a complex task into smaller steps. Organize subtasks into named groups, assign each one to a different person, and set individual due dates. The parent task shows a completion percentage based on how many subtasks are done.
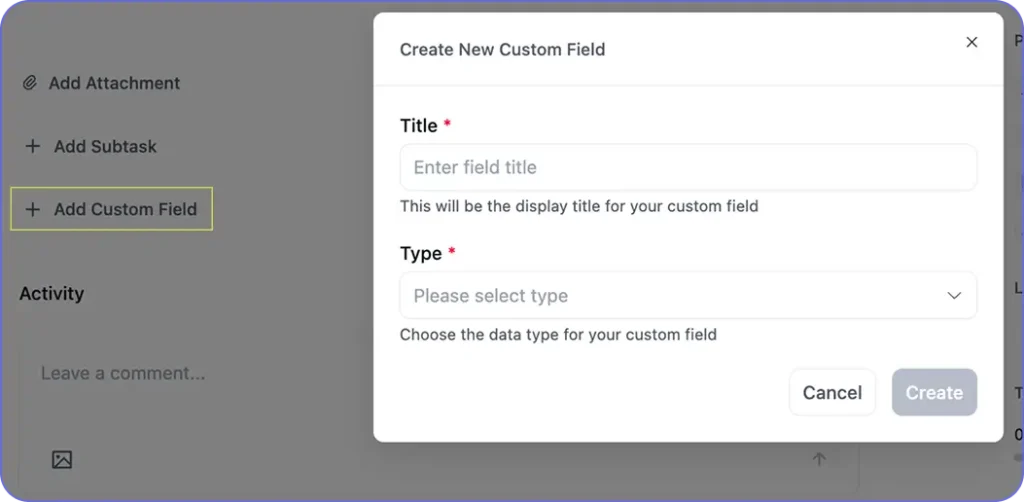
Custom Fields: Add fields that match how your team actually works:
- Text
- Number
- Select
- Multi Select
- Date
- Checkbox
A “Contract Value” number field, a “Client Tier” dropdown, a “Delivery Format” tag, if your team needs it on a task, you can add it. Fields are defined once at the board level, then show up on every task on that board, sitting empty until you fill them in per task.
Attachments: Upload files directly to a task. No more “check the Slack thread from Tuesday.” The files are right there, attached to the work.
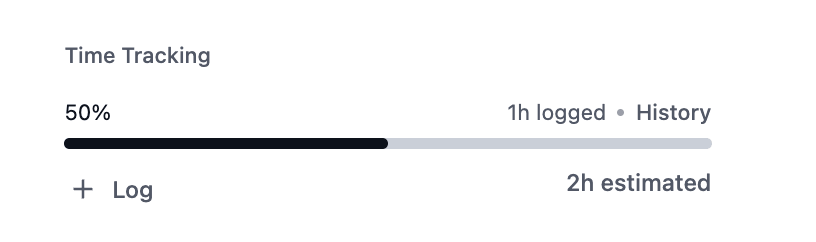
Time Tracking and Estimation: Set an estimated duration, then log hours against it manually as you work. Compare the estimate against actuals over the life of the task. Feeds into the timesheet report for billing and capacity planning.
Recurring Task: Set a task to repeat daily, weekly, monthly, or yearly, with a repeat interval, a time, and the stage the new one lands in. Two toggles change how it behaves: repeat only once the current task closes, or spawn a fresh task each cycle instead of reusing the same one.
Convert to Subtask: Turn a standalone task into a subtask of another. Pick the parent, optionally pick who it goes to, and it moves. Useful when work you scoped separately turns out to belong inside something bigger.
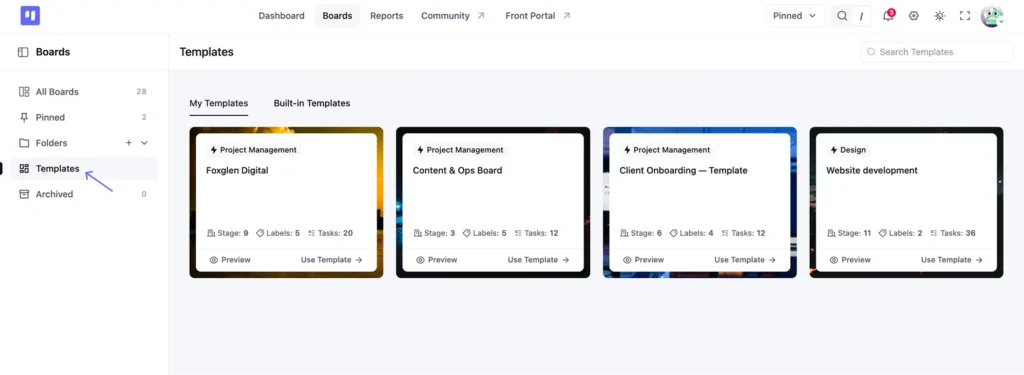
Make Template: Save the task as a reusable template from the three-dot menu, and it lands in My Templates ready to pull into any board.
Generate Subtasks: Ask AI to break the description into a set of subtasks instead of writing each one out, which is Pro because subtasks are Pro.
Task Dependency: Link a task to the one it waits on so the order of work is recorded on the task itself, set by connecting the two bars in Gantt Chart View.
Stage Default Assignee: Set a stage to assign its own owner automatically, so anything landing there already has someone on it.
Bulk actions: Select several tasks in Table View and move them, archive them, change their priority, assign members, or add labels in one go instead of opening each one.
Reminders: Set a reminder on any task and get notified before the deadline hits.
See what else Pro unlocks: free vs Pro comparison
How to Create Your First Task (Step by Step)
Creating a task in FluentBoards takes under a minute.
Note: Every view has its own inline Add Task control, so you can create a task from wherever you’re already working, whether that’s Kanban, List, Table, Calendar, or Gantt.
Step 1: Open your board
Navigate to FluentBoards from the WordPress admin sidebar and open the board you want to work in. You’ll see your stages as columns in Kanban view.
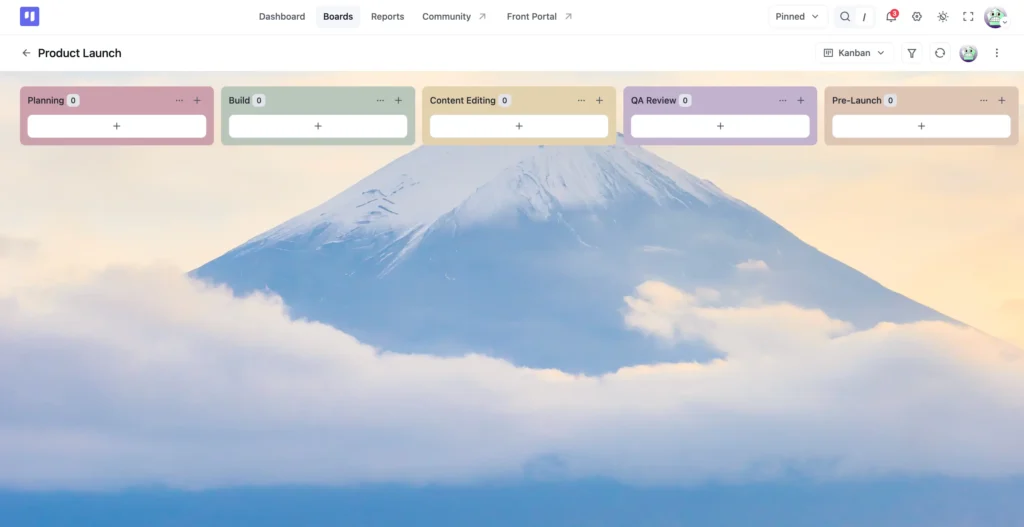
No board yet? Set up your first Kanban board and come back.
Step 2: Create the task
Click “+ Add Task” at the bottom of the stage where this task belongs. A quick-entry field appears. Type your task title and press Enter.
The task card appears immediately, title only, nothing else yet. That’s fine, you’ll fill in the rest in the next step.
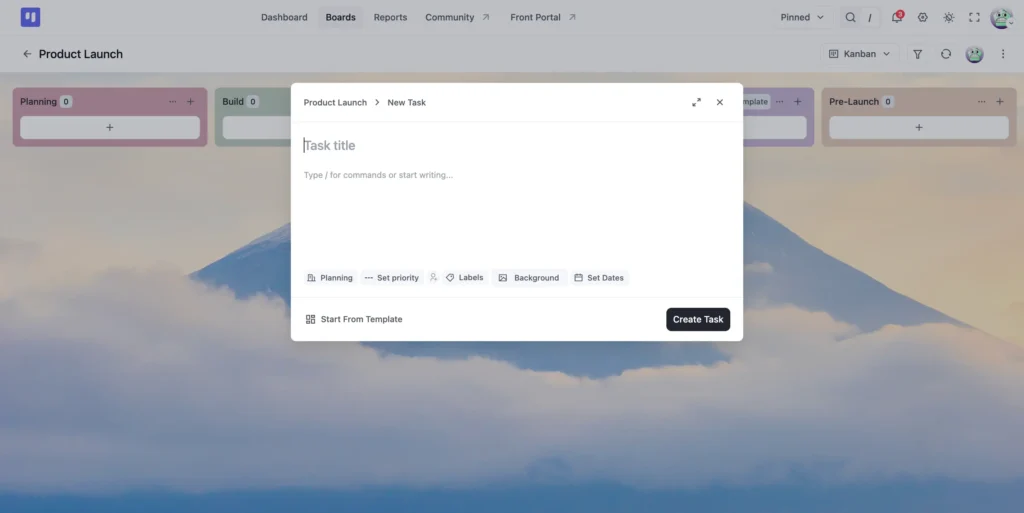
Step 3: Open the task detail
Click the task card you just created. The full task detail opens. This is where the task lives, and every field, comment, and update from this point happens here.
Step 4: Write a description
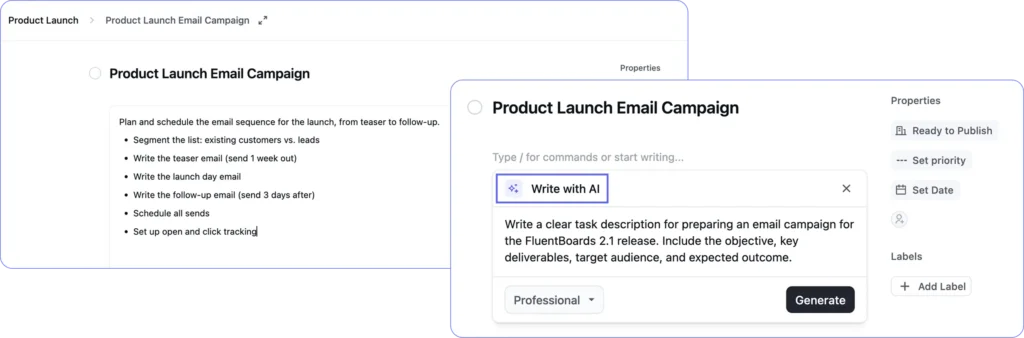
Click inside the Description field. Write your task brief. Use markdown to structure it, since a checklist works well for tasks with multiple steps.
If you want AI help, click the AI Assistant button inside the description field. Type one line describing the task, something like “Write a brief for setting up the homepage hero section,” and it generates a draft. Edit from there.
FluentBoards doesn’t charge extra for it and it works on Free, but it does need an AI provider connected first, which is a one-time admin job.
Step 5: Set the priority
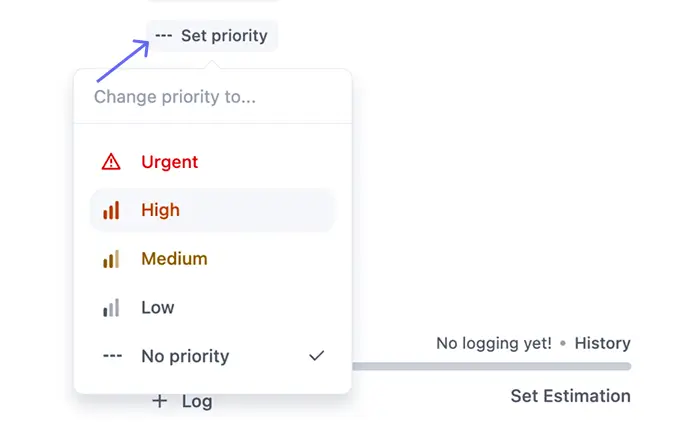
Click Set priority in the right Properties sidebar. Choose Low, Medium, High, or Urgent. The badge shows on the task card once you close the task, so your team sees it without opening anything.
Step 6: Add a due date
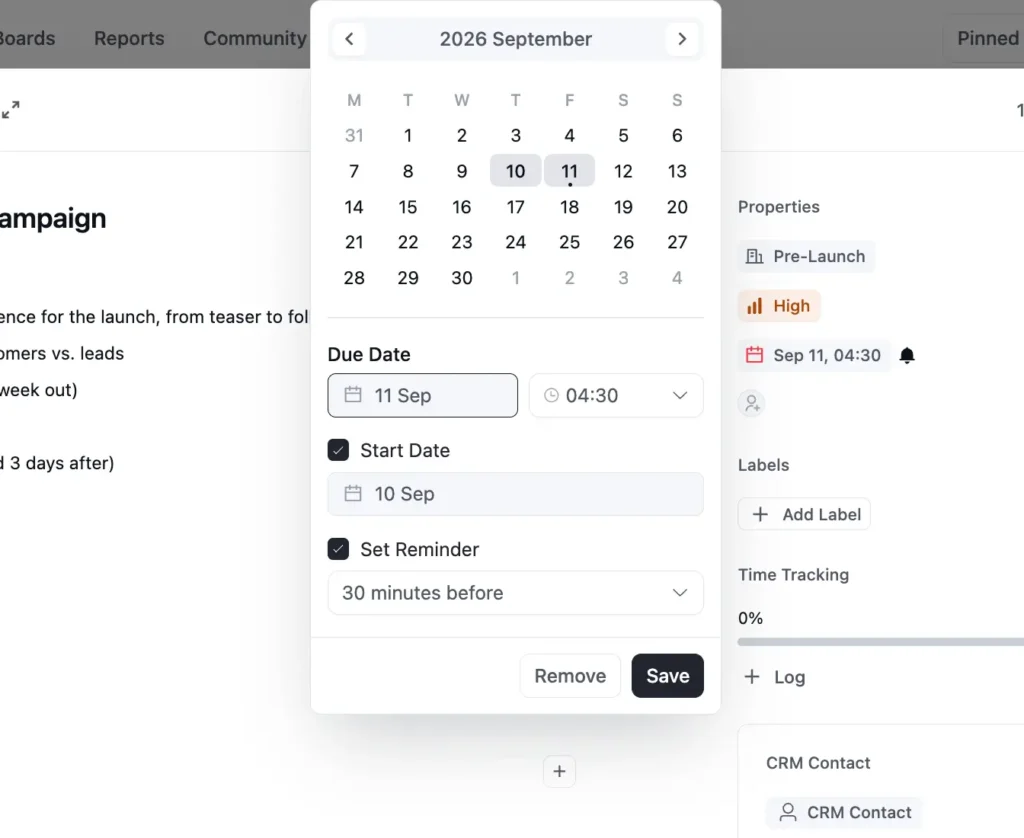
Click Set Date. Pick the due date and time from the calendar, check Start Date if the task begins on a specific day, and check Set Reminder if you want a nudge before it’s due, choosing 30 minutes, 1 hour, 2 hours, 1 day, 2 days, or 1 week before.
Once set, a bell icon shows next to the due date chip in the Properties sidebar. Tasks with due dates appear on the Calendar View plotted by their deadline, so this step pays off the moment your team switches views.
Step 7: Assign team members
Click the assignee icon, the person icon below Set Date in the Properties sidebar. Search by name and add whoever owns this task. Add multiple people if needed. Each one gets a notification and sees the task in their personal dashboard.
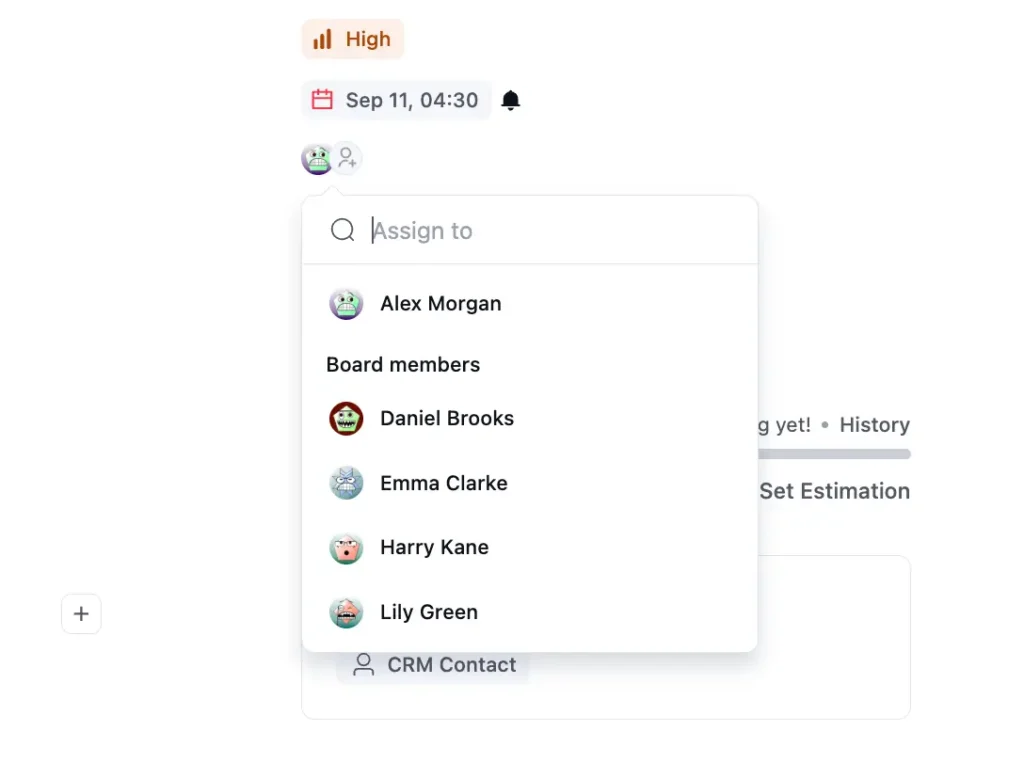
FluentBoards has no limit on tasks or assignees, so add as many team members as the project actually needs
Step 8: Add labels
Click + Add Label and select from your board’s label set, or create a new one. Labels let you filter tasks across the board in seconds, by type, team, or whatever categorization your project needs.
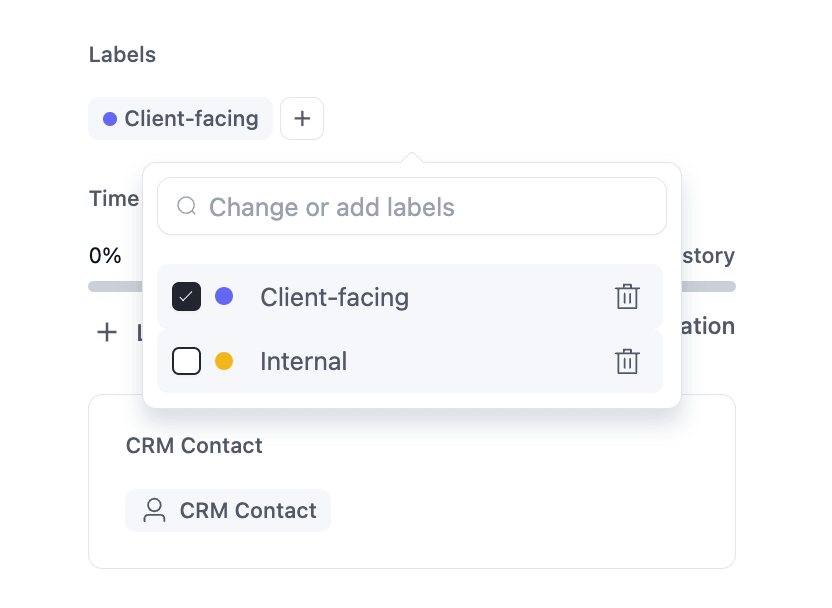
Step 9: Close and confirm
When you’re done, close it: click Close Modal in the top corner, or click anywhere outside the modal, or press Escape. The task saves automatically, there’s no save button, everything you filled in is live on the card immediately.
What You Can Do From Inside a Task
Once the task exists, it becomes the workspace for the life of that task. A few things worth knowing beyond the basics.
Break it into subtasks
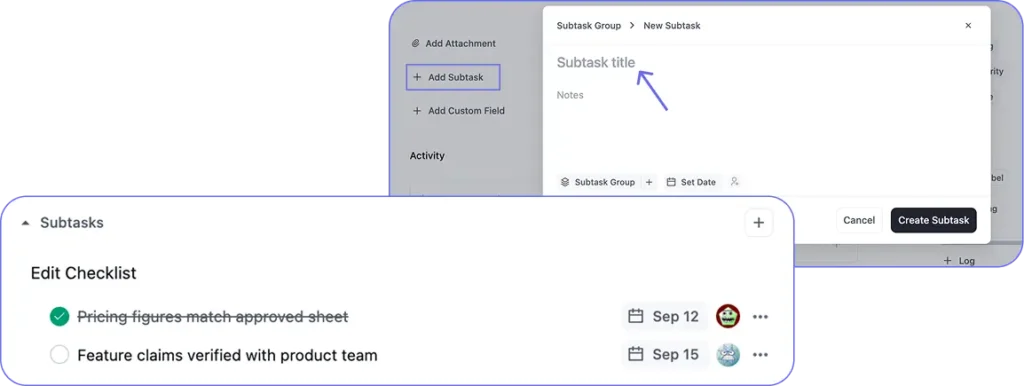
Click the + on the Subtasks header to create a group, then add each subtask under it, making every piece more achievable and manageable.
Assign each one to a different team member, set its own due date, and tick it off when it’s done.
Move the task without leaving it
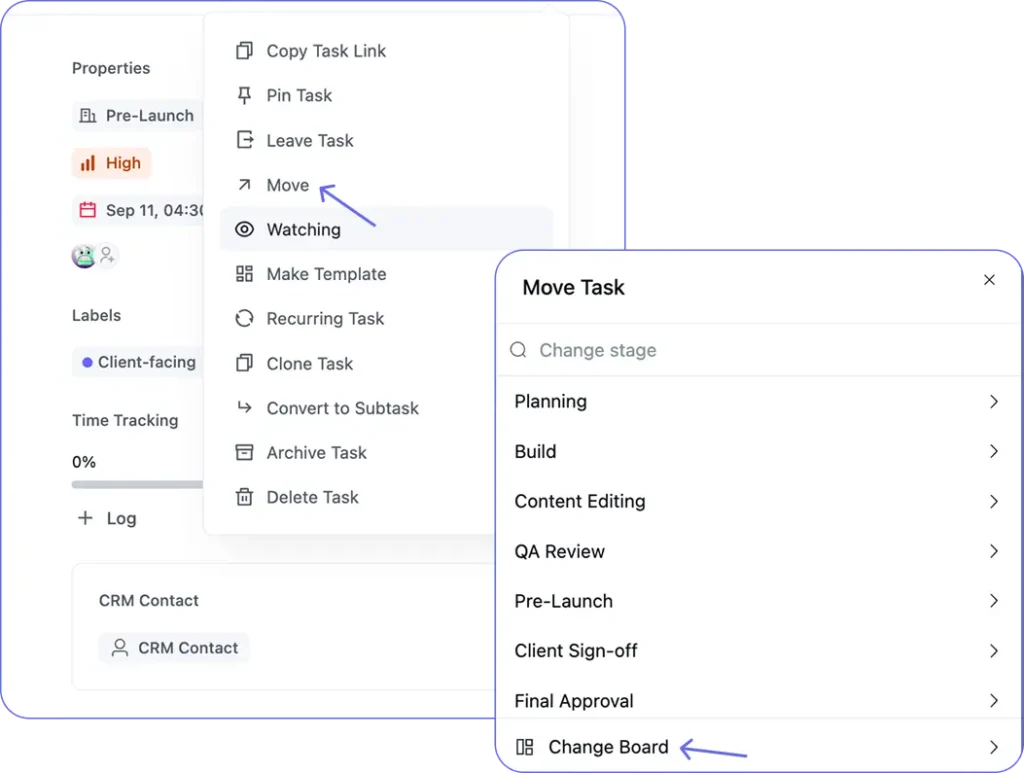
Click the three-dot menu (⋮) in the top bar and select Move. Change the stage or move the task to an entirely different board. No drag and drop required.
Pin a task
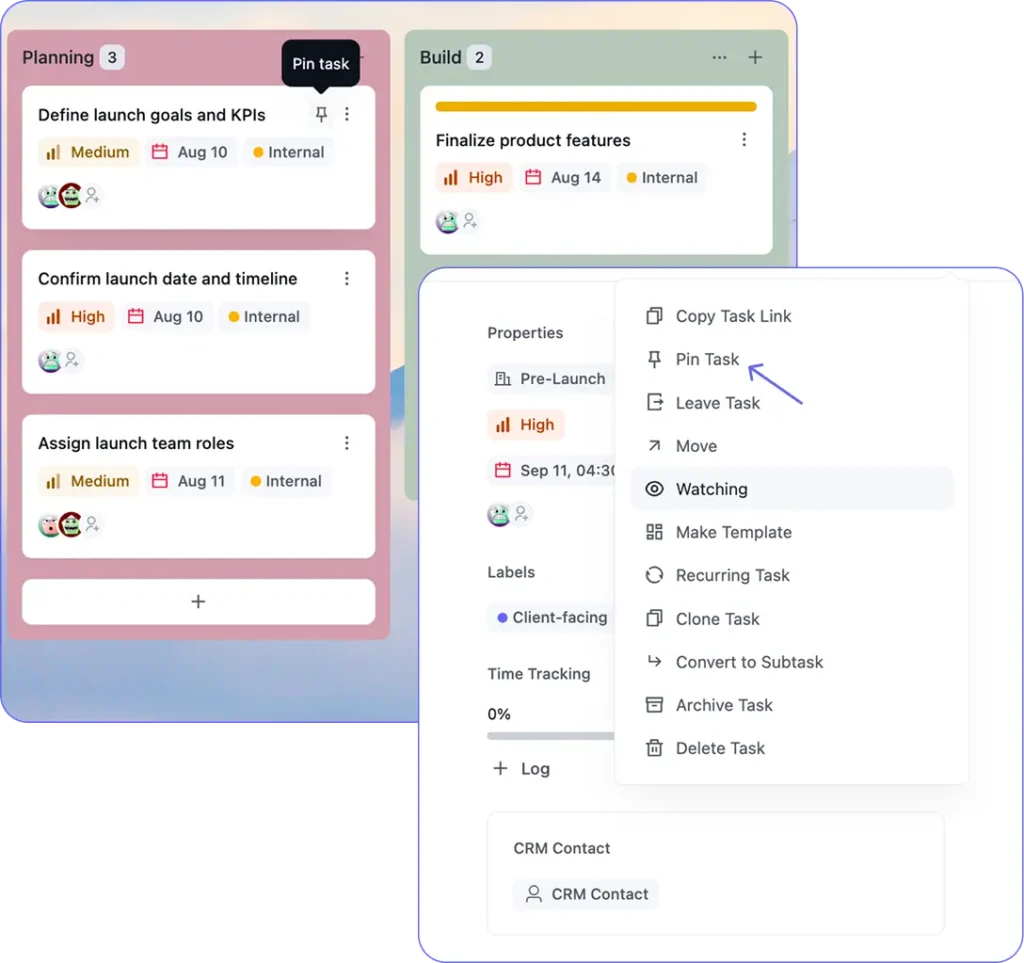
From the same three-dot menu, click Pin Task. Pinned tasks stay visible at the top of their stage column so critical work doesn’t get buried as the board fills up. You can also pin a task right from its card on the Kanban board.
Set the task to recur
Open Recurring Task from the three-dot menu, pick Daily, Weekly, Monthly, or Yearly, set the repeat interval and time, and choose the stage the new task starts in, so a weekly client report lands in Planning every Monday before anyone remembers to ask for it.
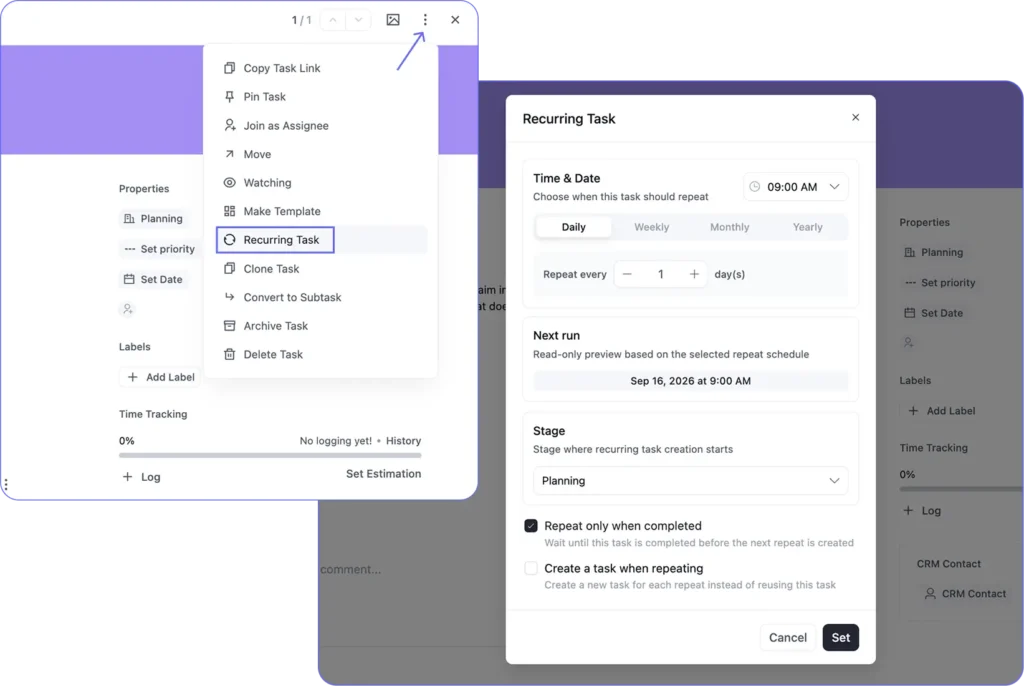
Two toggles decide how it behaves: wait until the current task is completed before the next one appears, or create a fresh task each repeat instead of reusing this one.
Add attachments
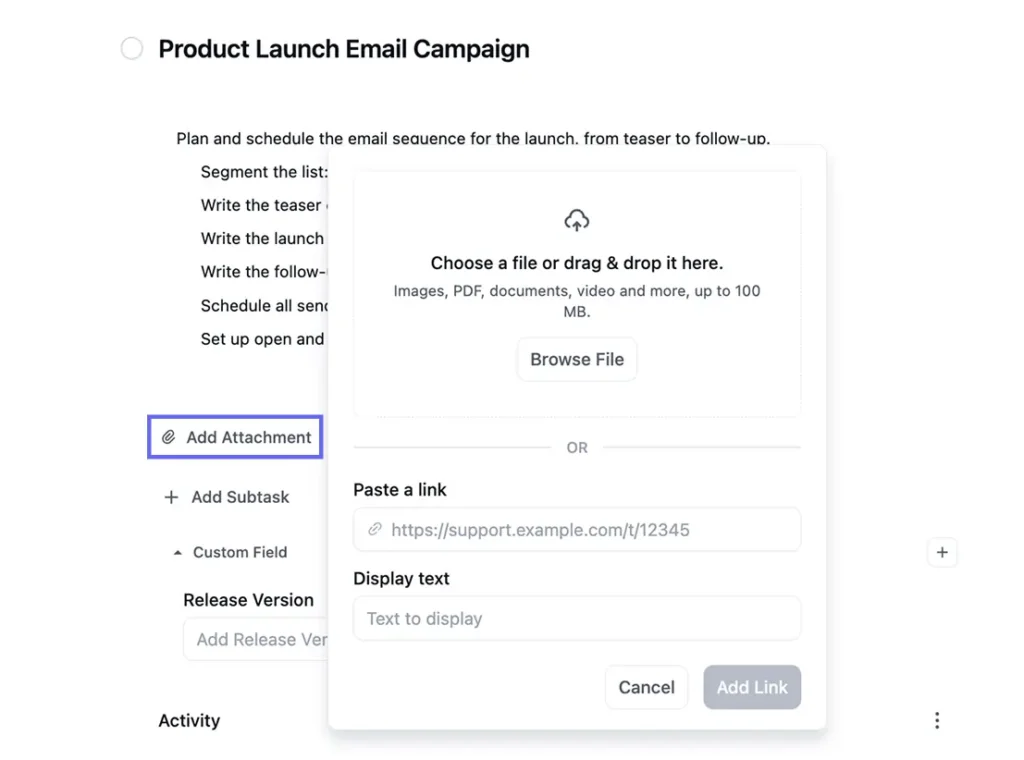
Click Add Attachment under the description. Drag in the brief, the design file, or whatever the task depends on, or paste a link instead.
Everything needed to start the work sits inside the task, so there’s no switching platforms to find it.
Navigate between tasks
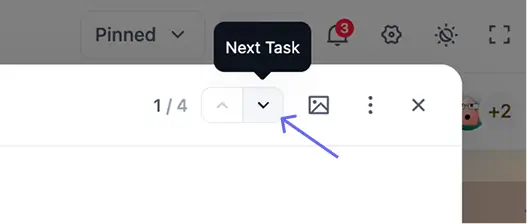
Use the arrow buttons at the top, shown as 1/1 when there’s one task in the stage, to move to the next or previous task without closing and reopening anything. Useful for triaging a full column quickly before a standup.
Copy the task link
Click Copy Task Link in the same three-dot menu. Paste it into Slack, an email, or a comment, and your teammate lands on the exact task without searching. Fluent Forms can also create tasks from submissions automatically so incoming requests turn into tasks without anyone touching FluentBoards.
Link a CRM contact
If your team uses FluentCRM, you can add a contact to the task and see who the work is for without leaving FluentBoards. Their full details and history come with it and can add tags or lists to that contact right from the task.
Make it a template (Pro)
Save the task as a reusable template via the three-dot menu. It lands under My Templates in the FluentBoards template gallery, ready to pull into any future board without rebuilding from scratch.
One more way in: Connect MCP and you can create tasks by asking your AI agent, without opening the board at all. Claude, Cursor, and OpenAI Codex each get a ready-made snippet, and there’s a generic option for any other MCP client.
Fill in custom fields
Click Add Custom Field to create one, a Release Version field, a Client Tier dropdown, whatever the board needs to track, and pick its type from Text, Number, Select, Multi Select, Date, or Checkbox.
Defined once at the board level, then it’s sitting there ready on every task in it.
Time Tracking
Click Set Estimation in the sidebar, then Log to record hours as you work. The bar fills as logged time approaches the estimate, History shows every entry, and it all feeds the timesheet report.
Useful for agencies billing clients by the hour, or any team that wants to know if their estimates actually match reality.
Leave the first comment
Type in the comment box under Activity and tag someone with @ to notify them. The image icon drops a screenshot straight in, and Add a reply keeps a back and forth together instead of scattered down the thread.
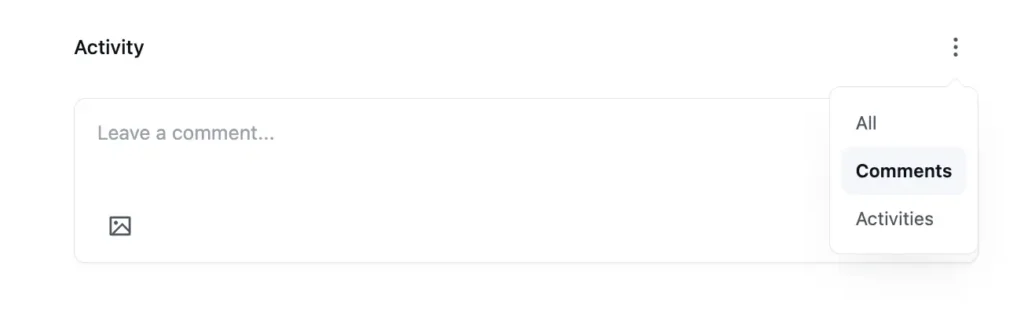
Activity: The same feed logs every change on the task, and the three-dot menu switches it between All, Comments, and Activities.
Task Management: Free vs Pro
| Feature | Free | Pro |
| Unlimited Tasks | Included | Included |
| Assignees (no seat limit) | Included | Included |
| Due Dates (start + end) | Included | Included |
| Labels and Priority | Included | Included |
| Comments and Activity Log | Included | Included |
| Watchers | Included | Included |
| Card Cover (preset colors) | Included | Included |
| Stage and Change Board | Included | Included |
| Move Task | Included | Included |
| Archive and Delete Task | Included | Included |
| Leave Task | Included | Included |
| Next and Previous Task Navigation | Included | Included |
| CRM Contact on Tasks | Included | Included |
| AI Writing Assistant | Included | Included |
| Ask AI (Summary, Label and Priority Suggestions) | Included | Included |
| Copy Task Link | Included | Included |
| Pin Task | Included | Included |
| Clone Task | Included | Included |
| Subtasks and Subtask Groups | No | Included |
| AI Subtask Generation | No | Included |
| Custom Fields | No | Included |
| Attachments | No | Included |
| Time Tracking and Estimation | No | Included |
| Recurring Tasks | No | Included |
| Task Reminders | No | Included |
| Task Templates | No | Included |
| Convert to Subtask | No | Included |
| Task Dependency | No | Included |
| Stage Default Assignee | No | Included |
| Bulk Actions | No | Included |
The biggest gap between Free and Pro at the task level is subtasks and time tracking. If your work involves multi-step deliverables or client billing by the hour, those two features alone make the upgrade worth evaluating.
Create the First Task Before You Set Up Anything Else
The setup here is about two minutes. Open your board, hit “+ Add Task,” write a title, and fill in the fields that matter for that task: Set priority, Set Date, assignee.
The rest comes from using it. Once you have a few tasks on the board, you’ll see which fields your team actually relies on and which Pro features would remove the most friction from your workflow.
The fastest thing to try first: open any task, click AI Assistant, type one line about what the task is, and see what it generates for the description. It’s a genuine time-saver, not a showcase feature.
When you’re ready to see all your work in one place, the My Tasks dashboard pulls every task assigned to you, across every board, into a single view sorted by status. That’s where task management starts feeling like a real system rather than a scattered list of cards.
Thanks for reading. Create one task properly, all the way through, and you’ll know within a minute which fields your team is going to live in.
Let’s redefine project management with FluentBoards!

Follow:


Get Tips, Tricks, & Updates
We won’t send you spam.



Leave a Reply