


Calendar View in FluentBoards: Plan Projects by Deadline, Filter by What Matters, Miss Nothing


Kanban answers one question really well: what stage is this task in?
It does not answer:
- What’s due this Friday?
- Which tasks are overdue right now?
- What’s the workload spread across the next three weeks?
For those questions, you’re scrolling through cards, opening tasks one by one, and guessing. That’s not a planning workflow. That’s a search operation.
Calendar View in FluentBoards fixes this. Every task with a due date appears as a block on the calendar, plotted by its deadline. You open the view, and you see the whole picture: all due dates, all tasks, across the month or the week. The deadline management layer your Kanban board was always missing.
Here’s how it works.
What Calendar View Actually Shows You
Calendar View does one thing Kanban cannot: it plots your tasks by when they are due, not by where they sit in the workflow. The same task that sits in the “In Review” column on your Kanban board appears on a specific date in Calendar View, because that is its deadline. Two completely different pictures of the same work.
This is the shift that matters. Kanban is organized around workflow state, while Calendar View is organised around time. Both views look at the same tasks, but they answer different questions.
Tasks appear by due date, not by workflow stage
Every task with a due date shows up on the calendar on the day it is due. Open month view and you see your entire project’s deadline spread across the grid. Open week view and you see what is due on each day of the current week. The task card shows the task name and a priority indicator if one is set.
Tasks without due dates don’t appear
If a task has no due date, it does not show up on the calendar. That is not a bug, because Calendar View only surfaces tasks with a deadline and that is the whole point. Everything without a due date lives in your Kanban or List View.
Month View and Week View: Two Lenses on the Same Deadlines
Calendar View has two layout options: Month and Week. The toggle sits at the top left of the calendar, next to the date label and the Today button. Switch between them with one click. Same tasks, same data, completely different resolution.
Month view: the full deadline landscape
Month view shows the entire calendar month as a grid, with the days of the week across the top and the weeks running down the page. Each task appears as a block on its due date. You can scan your entire project’s deadline distribution without opening a single task.
This is the right view for planning sessions, sprint kick-offs, and capacity reviews. A content team sees publish dates spread across the month. A project manager spots deadline clusters before they become crises. A team lead identifies weeks where the load is too heavy before those weeks arrive. Month view makes the macro picture visible.
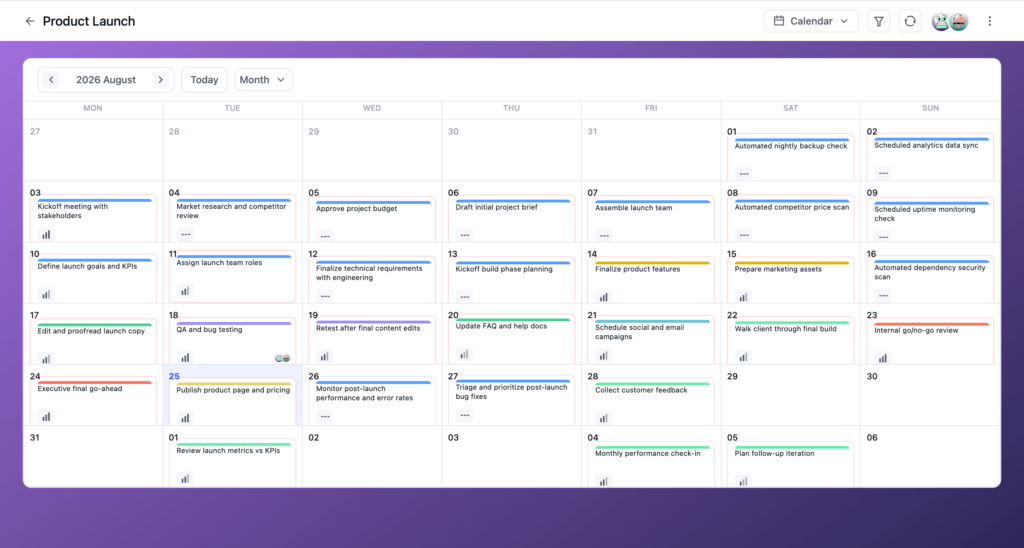
Heads up: When several tasks land on the same date, the cell stays compact so the whole month stays scannable. Scroll inside that day to see everything due on it.
Week view: the day-by-day operational picture
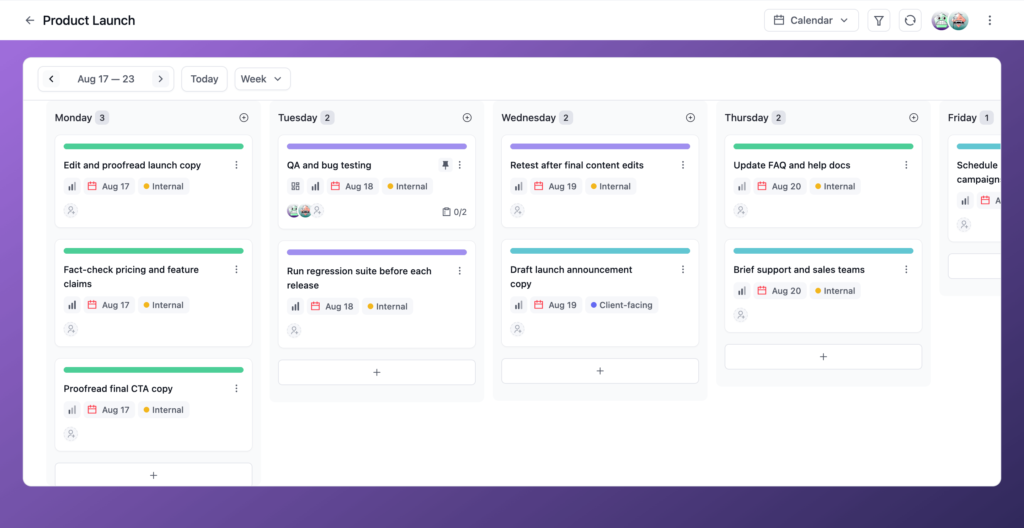
Week view breaks the week into individual day columns. Each column header shows the day name and a task count badge, for example “Monday 3”, and lists the tasks due that day.
Navigate forward or backward with the arrow buttons. The date range in the header updates to reflect the active week (“Aug 17 — 23”).
This is the right view for daily stand-ups and weekly check-ins. You see what’s due each specific day. If three things are due on Wednesday and nothing is due Thursday, that’s visible immediately. The day-column layout makes load imbalance obvious before the week starts, not after it ends.
Adding Tasks Directly from the Calendar
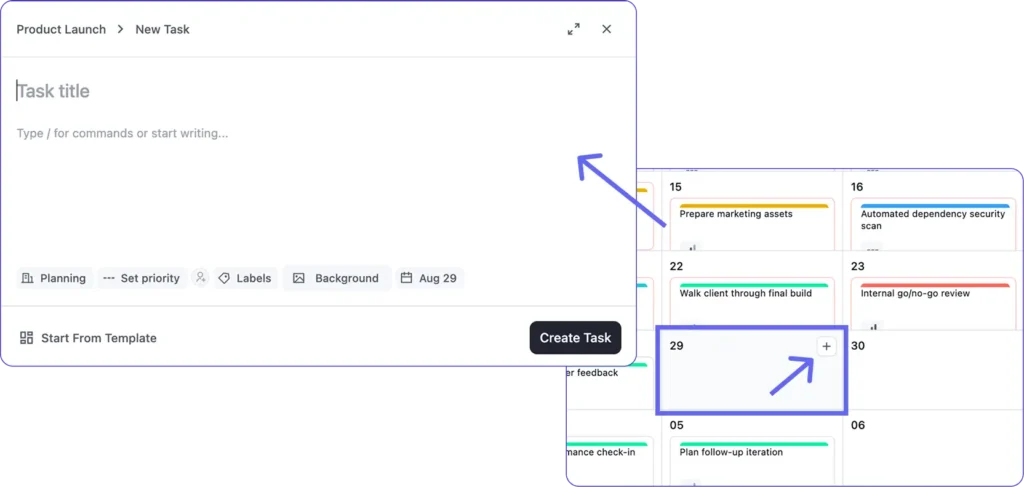
You don’t have to leave Calendar View to add a new task with a due date. Hover over any date in month view and a “+” button appears. Click “Add Task” and a task creation modal opens, with the due date already set to the day you clicked.
Fill in the task title. Set the stage, assignee, priority, and labels from the same modal. Click “Create Task.” The task appears on the calendar immediately.
This is useful during planning sessions where the calendar is your working surface. You see a gap, you fill it, you stay in the view. No switching back to Kanban to create the task and then returning to Calendar to check the placement.
Note: Both layouts navigate the same way. Use the arrows either side of the date label to move forward or backward one period at a time, or click “Today” to jump straight back to the current one.
The Filter Panel: More Power Than You’d Expect
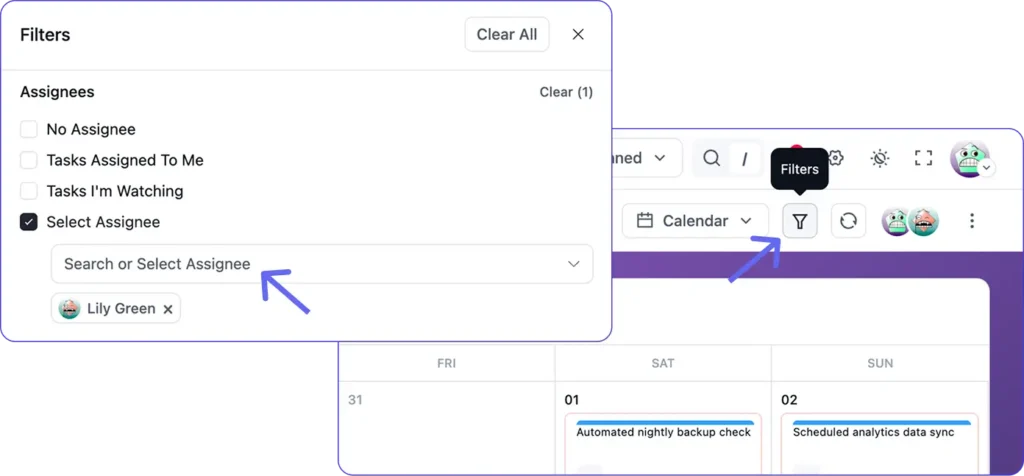
Open the filter panel with the filter icon in the top navigation bar. It doesn’t just filter by assignee. It has six sections, and the combination of them is where Calendar View becomes a real planning tool.
Filter by assignee
The Assignees section has four options: No Assignee, Tasks Assigned To Me, Tasks I’m Watching, and Select Assignee (pick a specific team member by name).
Select a team member and the calendar narrows to only their tasks. Before a one-on-one, filter to that person’s tasks. You see exactly what they have coming due across the month, with no other board noise. It takes ten seconds and gives you a more accurate picture than asking “what are you working on this week?”
For workload management across the team, filter to each person in sequence and compare the spread.
Filter by due date status
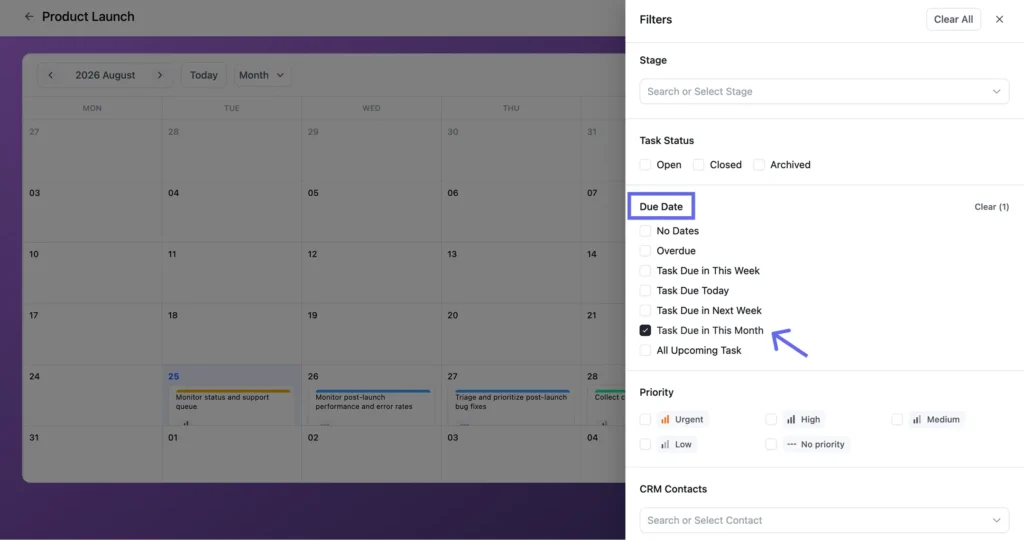
The Due Date section has six preset filters: Overdue, Task Due Today, Task Due in This Week, Task Due in Next Week, Task Due in This Month, and All Upcoming Task.
These are pre-built reports. “Overdue” shows everything that missed its deadline. “Task Due in This Week” is your action list for the week. “Task Due in Next Week” is your preparation view. You’re not building these manually. You’re selecting them from a dropdown.
Select “Task Due in This Month” and the calendar narrows to only what’s due before the month ends, whatever stage those tasks are sitting in. It’s the fastest way to see your full month-end workload on one screen.
For anyone tracking project management KPIs like overdue rate or deadline concentration: these filters surface the data in seconds. No spreadsheet required.
Filter by stage, status, priority, and label
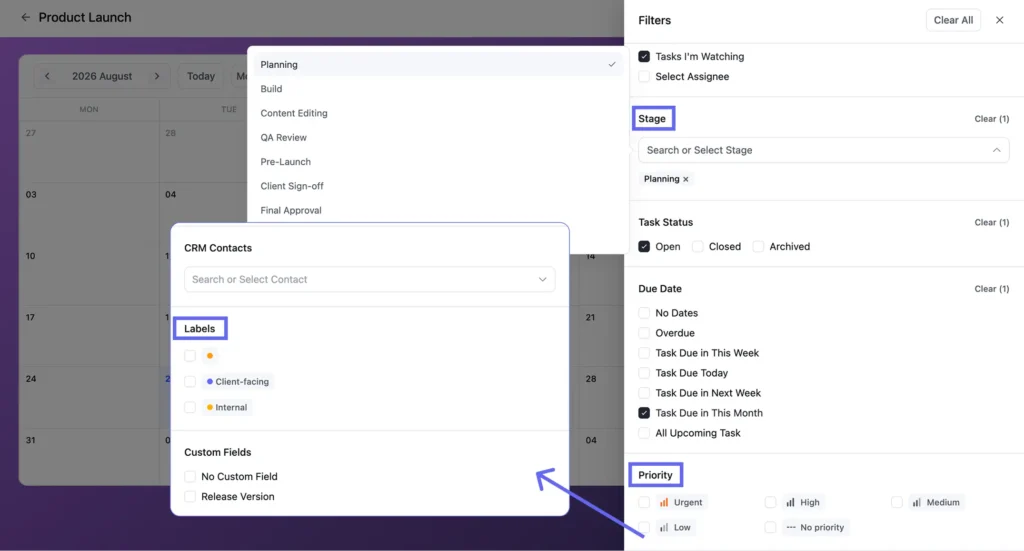
The remaining sections cover Stage (search or select), Task Status (Open / Closed / Archived), and Priority (Urgent / High / Medium / Low / No priority). Scroll down and you’ll also find Labels, CRM Contacts, and any Custom Fields your board has set up.
Each one narrows the calendar a different way.
- Stage shows only the tasks sitting at a particular step, so you can see everything waiting on client sign-off without the rest of the board in the way.
- Task Status keeps the view honest: leave it on Open and closed or archived work stops crowding the calendar.
- Priority pulls the urgent items forward.
- Labels separate work by type, so client-facing tasks and internal ones stop competing for the same space.
- CRM Contacts narrows to a single client’s work, and Custom Fields filters on whatever your board tracks that the defaults don’t cover.
Combine these with the date filters for targeted views. “Urgent” priority plus “Task Due in This Week” gives you your escalation list, and a specific label plus “Overdue” shows which content type or project phase is running behind. These combinations replace manual project status reporting in most routine check-ins.
Calendar View Stays Put Once You Switch to It
Switch a board to Calendar View and it stays in Calendar View. It won’t reset to Kanban the next time someone opens the board. If a board is used exclusively for content scheduling or event management, switch it to Calendar View once and leave it there. Every board member who opens it after that lands directly in Calendar View, with nothing to configure and no one needing to remember to switch.
This holds per board, not across your whole workspace. Your content board can sit in Calendar View while your sprint board stays in Kanban. Each board simply keeps whichever view you last left it on.
When Calendar View Is the Right Choice
Use Calendar View when the primary question is “what’s due when.” Content schedules, event timelines, campaign launches, and sprint cycles all work here, because dates are the organizing principle rather than stages.
It is not the right view when task sequence matters more than timing. If your work moves through approval stages and what you need to know is whether a task reached “client review,” that is still Kanban territory. But if your team is consistently missing project deadlines and no one has a clear picture of what’s coming due, Calendar View is one of the fastest fixes available.
The simplest integration: use Kanban for daily operations, Calendar View for weekly planning. Check Kanban board in the morning to see what needs to move. Open Calendar at the start of each week to see what’s due and whether the workload is balanced. Both views are on the same board. It’s one click to switch.
For teams with a project management workflow that includes weekly planning meetings or sprint reviews, Calendar View is where those sessions should happen, not in a separate Google Calendar or a spreadsheet, but directly on the board where the work lives.
Frequently Asked Questions About Calendar View
A few things teams ask most often when they first open Calendar View.
Is Calendar View available in FluentBoards Free?
No. Calendar View is a Pro feature. FluentBoards Free includes Kanban View and List View, and Calendar, Table, and Gantt views come with Pro. The free vs Pro comparison has the full breakdown.
How is Calendar View different from Gantt Chart View?
Calendar View plots tasks on the day they are due, which answers what is due when. Gantt Chart View shows how tasks stretch across time and how they depend on each other, which answers how the timeline fits together. Both are Pro features, and most teams end up using both on the same board.
Does Calendar View show tasks from more than one board?
No. Calendar View is scoped to the board you are on. To see what is due to you across every board at once, use the My Tasks dashboard instead.
Can I see my task data in a spreadsheet layout instead?
Yes, that is what Table view for projects is for. It shows tasks in rows with columns for title, stage, priority, status, dates, and assignees, which makes it the better choice when you need to sort or scan many fields at once. Like Calendar View, it is a Pro feature.
Start Using Calendar View This Week
Calendar View is already on your board. Switch to it from the board navigation by clicking the “Calendar” dropdown at the top of any board.
Start in month view and look at the current month. If you cannot immediately see where your deadline load is heaviest, your team cannot see it either, and that is the problem Calendar View solves in the first ten seconds you use it.
Then open the filter panel and select “Overdue”. If anything appears, that is your first action. After that, select “Task Due in This Week” for your planning view for the week ahead. Two filter selections and about thirty seconds give you a clearer picture of your project’s deadline health than most teams get from a full status meeting.
If you are about to onboard a new team member, this is also the fastest way to show them what is coming due before they open their first task.
Thanks for reading. Open Calendar View on your busiest board this week and see which deadlines you did not know were coming.
Let’s redefine project management with FluentBoards!

Follow:


Get Tips, Tricks, & Updates
We won’t send you spam.





Add your first comment to this post