

How to Share Live Projects With Clients Using the Front Portal in FluentBoards


It’s 9:14 pm when the WhatsApp message lands: “Hey, any update on the logo?”
The answer is already on your board. The logo sits in Client Review with the revision attached and a Thursday due date, but your client can’t see any of it, and handing them a WordPress admin login is not an option.
The FluentBoards Front Portal fixes exactly that. It puts your live project board on a page of your own website, behind the client’s own login, so they check progress themselves instead of waiting for you to type it out from memory.
Here’s how to set one up for your first client.
What the Front Portal Does
The Front Portal loads FluentBoards on the front end of your website. Clients open a page on your domain, log in, and see the boards they’ve been added to without ever touching /wp-admin.
It isn’t a copy, either. When your designer moves the logo task to Done, the client sees it in Done, because they’re looking at the same board your team works in.
The portal is built for one job: giving clients a logged-in view of real project work. For most agencies, that’s the job behind the 9 pm messages.
Still deciding whether clients should see your boards at all? Our guide to managing external stakeholders covers that decision.
Before You Start: Decide What Each Client Should See
Two decisions shape the whole setup, so make them before you touch any settings-
Give each client their own board
Access in FluentBoards works at the board level. A client sees only the boards they’re a member of, so other clients’ boards stay private. On a board they can access, they see every task, comment, and attachment.
That leads to one simple rule: give each client their own board, and keep internal work (pricing discussions, team chatter, notes about the client) on a separate internal board. If you already use a standard project structure, you can start each board from a template so every client gets the same clean layout.
Choose the client’s role
The second decision is how much the client can do on their board:
| Role | What the client can do | Best for |
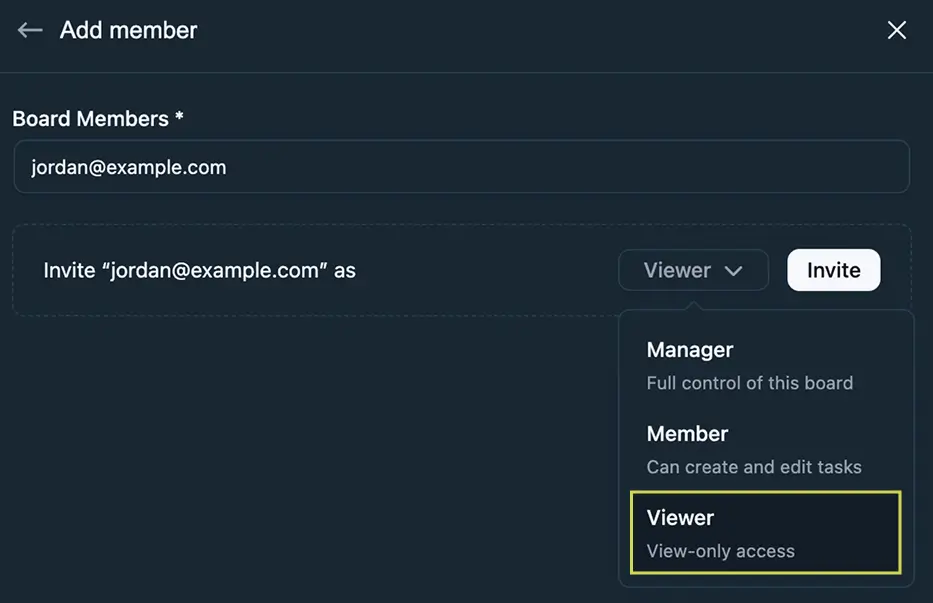
| Viewer | See tasks, stages, due dates, comments, and attachments. Read-only, so they can’t comment, upload, move, or edit anything | Clients who want status, not a seat at the table |
| Member | Everything a Viewer can see, plus comment, upload files, create tasks, and move or edit tasks | Clients who actively give feedback and approvals |
Viewer is the safe default, and it turns the portal into a live status page. Member turns the portal into a collaboration space, but it also lets the client drag a task to Done. If you choose Member, tell the client on day one how you’d like them to use the board, such as commenting on a task instead of moving it.
For a full breakdown of every role, see how to manage board member roles
How to Set Up a Client Portal in FluentBoards (Step by Step)
The setup has two parts.
Steps 1 and 2 turn the portal on for your whole site, and you only do them once. Steps 3 to 6 are what you repeat for every new client.
Step 1: Turn on the Front Portal module
Go to FluentBoards → Settings → Features & Modules, find the Front Portal module, switch it on, and choose Manage.
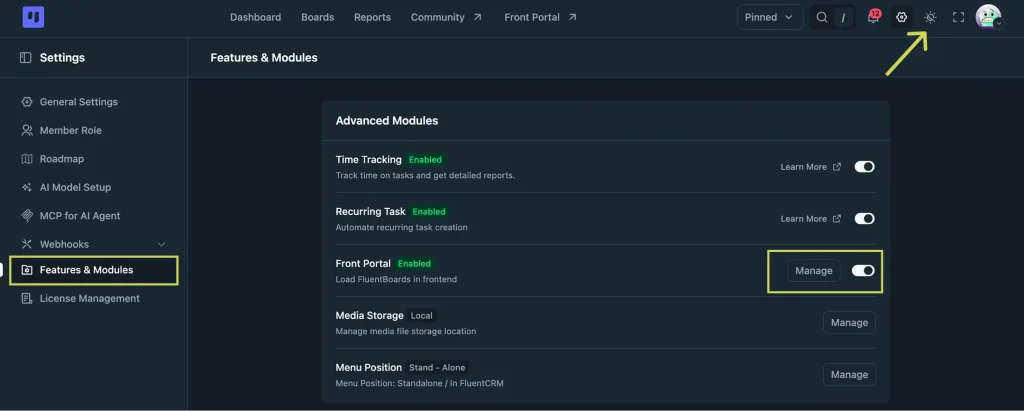
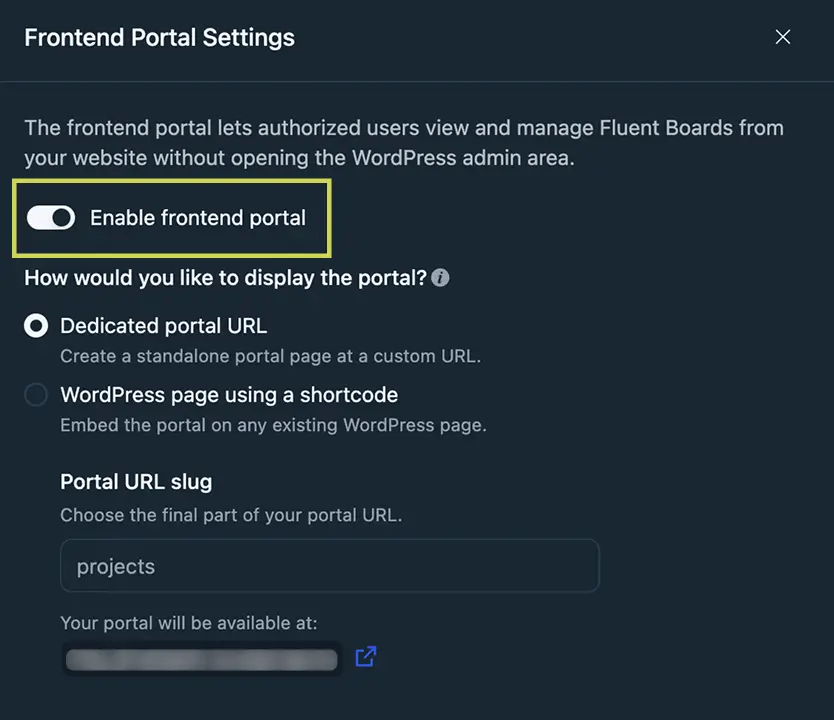
In the Front Portal Settings panel that opens, make sure Enable frontend portal is on.
Step 2: Choose how the portal is displayed
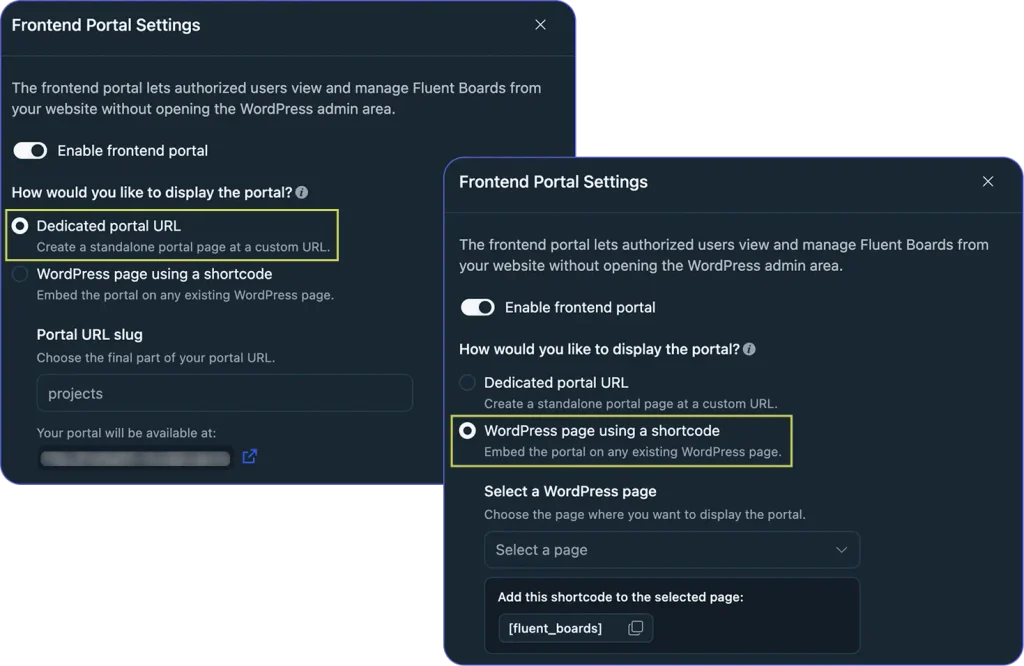
You can show the portal in two ways.
Dedicated portal URL: This creates a standalone portal at a custom address. Enter a slug in Portal URL slug (the default is projects), and the portal lives at yoursite.com/projects. This mode leaves out your theme, so the portal looks like a focused app instead of a blog page.
WordPress page using a shortcode: This places the portal inside a page you already have. Pick the page, then add this shortcode to it:
[fluent_boards]Use this mode if you want the portal wrapped in your site’s header, footer, and navigation.
Tip: Not sure which to pick? Go with the dedicated URL. It’s one field, and clients get a clean, distraction-free screen.
Save your settings. With the dedicated URL, you also get a Visit FluentBoards Portal link under your site name in the WordPress admin.
Step 3: Create the client’s board
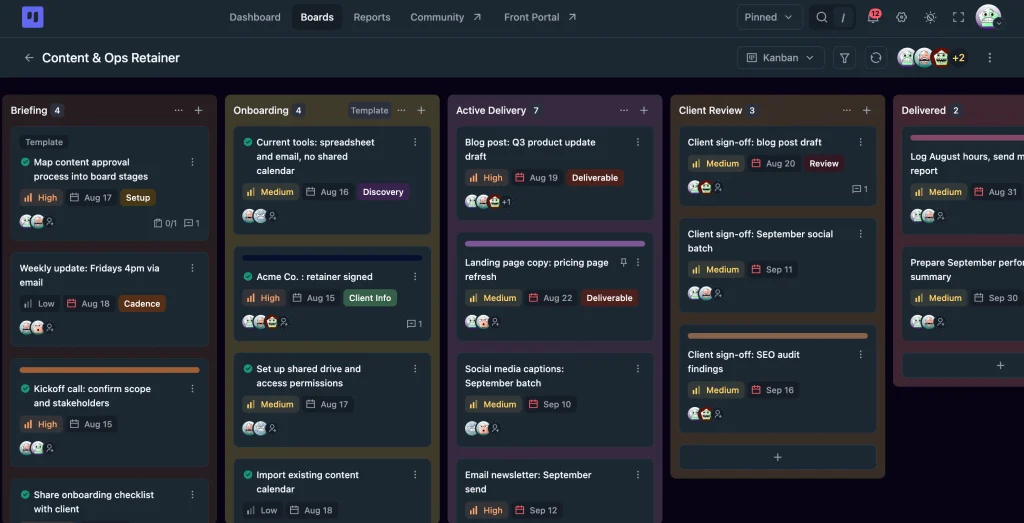
Create a new board for the client or open an existing one. Name it the way the client would recognize it, like “Content & Ops Retainer” instead of “Project 0142.”
Use stage names the client can read at a glance. “Briefing → In Progress → Client Review → Approved → Delivered” tells a client exactly where their work stands, while internal shorthand like “QA-2” doesn’t.
Step 4: Invite your client
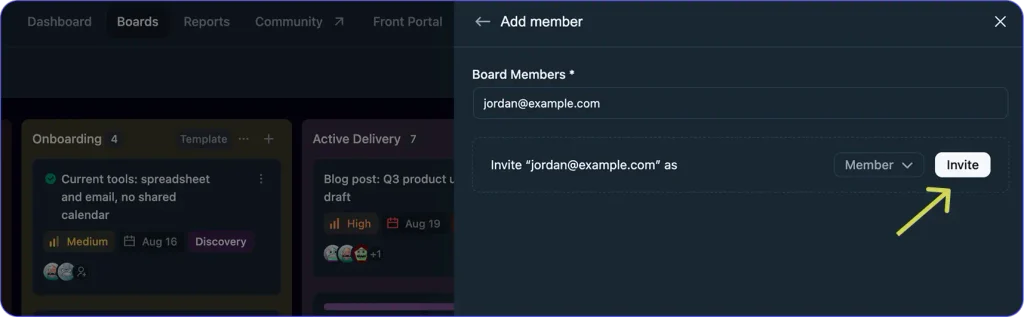
Open the board, go to Board Menu → Board Members, and enter your client’s email address in the search field.
- If the client is new to your site, choose Invite. They get an email with a link, add their name and a password, and FluentBoards creates a WordPress account with the Subscriber role. They get no admin access and go straight to their board in the portal.
- If the client already has an account, they appear in the search results. Pick their role, then choose Add member.
Worth knowing: Invitation links expire after 48 hours, so send the invite when the client is expecting it.
Step 5: Confirm the client’s role
Once the client accepts the invite, reopen Board Menu → Board Members, find them in the list, and check their role.
Clients who join through an email invite are added as Members. To make them read-only, switch them to Viewer here. If you want them commenting and approving, keep them as a Member.
Heads up: Don’t skip this step. It’s the only way to make sure an invited client has the access you intended.
Step 6: Test it like a client
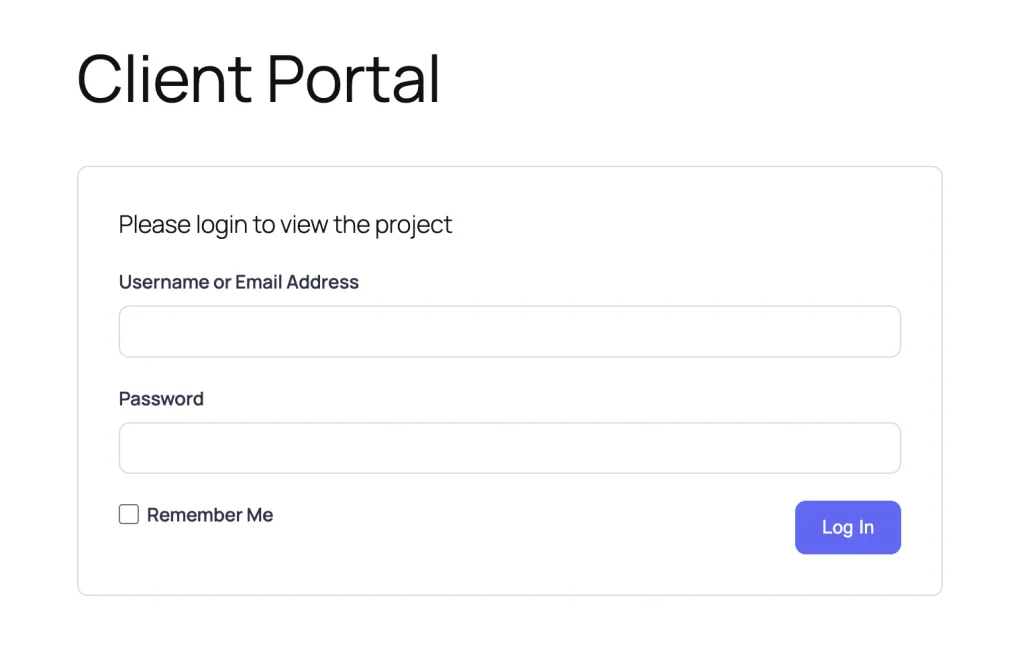
Open your portal URL in a private browser window, and you’ll land on the portal login screen. If you use FluentAuth, its custom login form appears here instead of the default WordPress one.
Log in with a test account that has the same role you gave the client, and check three things:
- Only the client’s board appears
- Nothing on that board is something the client shouldn’t read
- The role behaves the way you expect, so a Viewer can’t comment
Then send the client the portal link.
What Your Client Sees When They Log In
After logging in, the client lands on the FluentBoards interface on your domain, with your site’s logo in the corner. The portal uses the logo from your theme’s Site Identity settings, so set your logo there.
The client sees only the boards they’re assigned to, and what they can do there depends on their role.
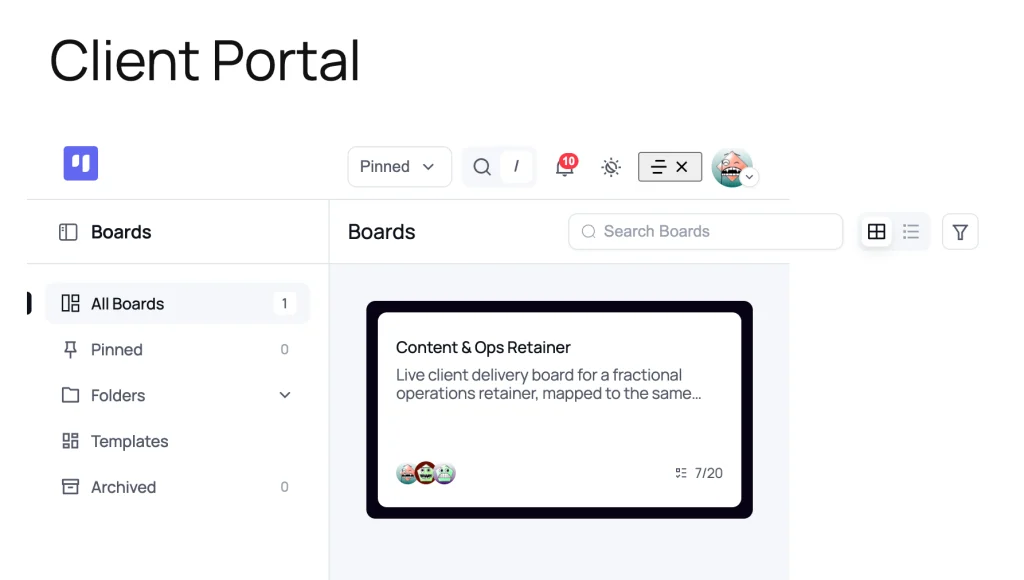
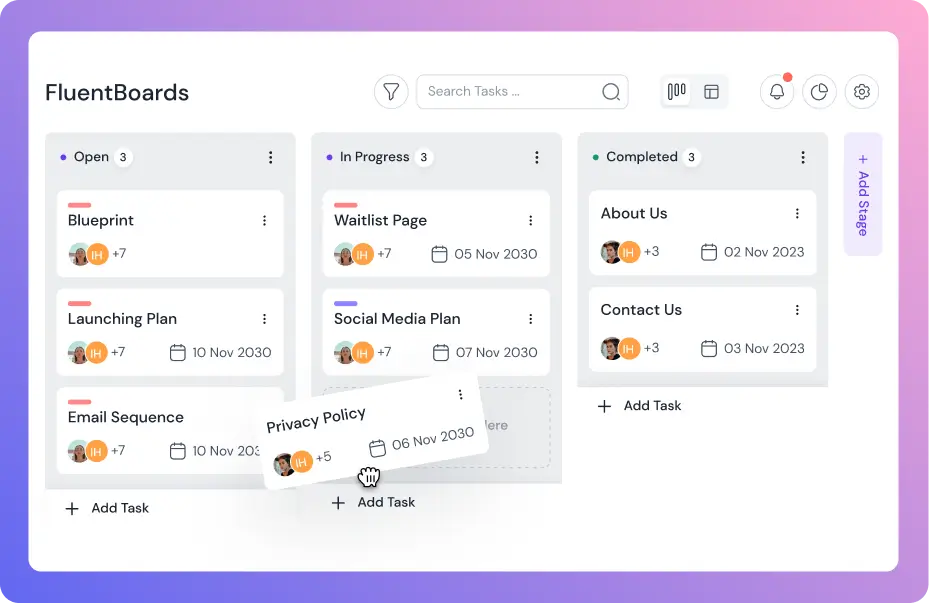
Their view is the board itself: stages as columns, tasks as cards, due dates, assignees, attachments, and the full comment history on every task. They can switch between board views the same way your team does.
Everything else stays private, including other clients’ boards, your internal boards, FluentBoards settings, and the WordPress dashboard.
What You Can Actually Do With a Client Portal
A client portal earns its place when it replaces a message, a meeting, or a file you’d otherwise send by hand.
Stop the “any update?” messages
Most status questions come from a client checking that work is moving. With the portal, that answer is one click away and always current, so your team stops writing status emails and the client stops waiting for them. For bigger milestones, pair it with a plan to automate project status updates.
Collect feedback and approvals where the work lives
Give an actively involved client the Member role, and their feedback lands as a comment on the exact task it’s about, not in “see my email from Tuesday.”
Add a Client Review stage, and when a deliverable lands there, the client knows it’s their turn. They comment “Approved,” your team moves the task forward, and the approval stays on the task with a timestamp.
To formalize the process, see how to turn client feedback into tasks
Hand off projects cleanly
At the end of a project, the portal becomes the handoff record. Every deliverable, approval, and file lives on one board the client can revisit anytime.
Learn how to deliver a completed project with the portal as the final step
Onboard new clients faster
Add the portal link to your welcome email, and the client’s first interaction with you is a live board with their project already in motion. That’s a stronger first impression than a PDF timeline, and it fits right into your client onboarding workflow.
Who Can Set Up and Access the Portal?
FluentBoards admins control the portal itself. They turn the Front Portal module on or off, choose the display mode, and set the URL slug or page.
Board managers control who gets in. Anyone who manages a board can invite people and change their role, so your account managers can onboard their own clients without asking an admin. Clients only get in once they’ve been added to at least one board.
Heads up: Clients see everything on their board. Keep budget talks, scope risks, and internal notes on a separate internal board.
Front Portal: Free vs. Pro
| Capability | Free | Pro |
|---|---|---|
| Front Portal (dedicated URL or shortcode) | No | Included |
| Invite clients to a board by email | No | Included |
| Viewer and Manager board roles | No | Included |
See what else Pro unlocks: free vs Pro comparison
Front Portal vs. a Shared Trello Board
Many agencies start with the same workaround: a separate Trello board shared with the client. Here’s how that compares with the Front Portal.
| What to compare | Shared Trello board | FluentBoards Front Portal |
| Boards to maintain | Two, your team’s board and the client copy | One, the board your team already works in |
| Keeping it updated | Someone has to copy changes over by hand | Changes show up as soon as your team makes them |
| What the client sees | Can go stale when someone forgets to update it | Always the current status |
| Duplicate data entry | Yes | No |
| Where it lives | Trello | Your own domain |
If you’re weighing the two tools more broadly, see our FluentBoards vs Trello comparison
Frequently Asked Questions About the Client Portal
Quick answers to the questions agencies ask most when setting up a client portal.
Do clients need a WordPress account?
Yes, the portal sits behind a WordPress login. The email invite creates the account for them with the Subscriber role, so they get no access to your dashboard.
Why can a client I invited as a Viewer edit tasks?
Clients who join through an email invite are added as Members. Open Board Menu → Board Members and switch them to Viewer, and always confirm the role after the client accepts.
Why does my client see an empty portal after logging in?
They haven’t been added to a board yet, or they were removed from one. Add them to their board from Board Members.
Why does my portal URL show a 404 or a regular theme page?
First, check that Enable frontend portal is on. Next, open Settings → Permalinks in WordPress, since the dedicated URL needs a permalink structure other than “Plain.” Finally, pick a slug that isn’t already used by a page on your site, because the portal takes over that address.
How long does a client invitation stay valid?
Invitations stay valid for 48 hours. If a link expires, send a new invite from Board Members.
Send Your First Client Their Portal Link This Week
Turn on the Front Portal module, pick a URL, give your client their own board, invite them, and confirm their role. Your client now has a live window into their project, on your domain, without ever seeing the WordPress admin.
Start with your most communicative client, the one who sends the most “quick update?” messages. Give them Viewer access for two weeks and count how many of those messages you still get. That number is the real test of whether the portal is working.
Running an agency on WordPress? See how FluentBoards fits the rest of your workflow on our project management for agencies page.
Thanks for reading. Your most communicative client is the best place to start.
Let’s redefine project management with FluentBoards!

Follow:


Get Tips, Tricks, & Updates
We won’t send you spam.



Add your first comment to this post