

How to Set Up Your First Kanban Board in FluentBoards


You installed FluetBoards. You clicked around. And then you stared at a blank screen.
Nobody told you how to structure it. Nobody said what to name your stages, which fields to set up from the start, or whether to use labels or priorities to keep tasks scannable.
So you improvised, and it felt off. The board sat there half-built.
That’s the real Day 1 problem. Not the setup itself. The lack of a playbook.
This post is the playbook. By the end, you’ll have a working Kanban board (built correctly) whether you’re starting from nothing, loading a template, or migrating from another tool.
New to Kanban as a concept? This guide assumes you know what a Kanban board is and focuses entirely on setting one up inside FluentBoards. If you want the concept first, read how Kanban works for project management and come back when you’re ready to build.
Three Ways to Build Your First Board
FluentBoards gives you three starting points. Which one is right depends on where you’re coming from.
- From scratch: you have a project in mind and want to build the board around it from the ground up
- From a template: FluentBoards ships pre-built board structures for common project types; load one and adjust it
- From a migration: you have an existing board in Trello, Asana, or a spreadsheet and want to move it over
Pick your path below.
Build It From Scratch
The right path if you’ve never tracked this project in a tool before, or if your previous system was broken enough to start clean. Walk through all four steps below before adding a single task.
Step 1: Create your board
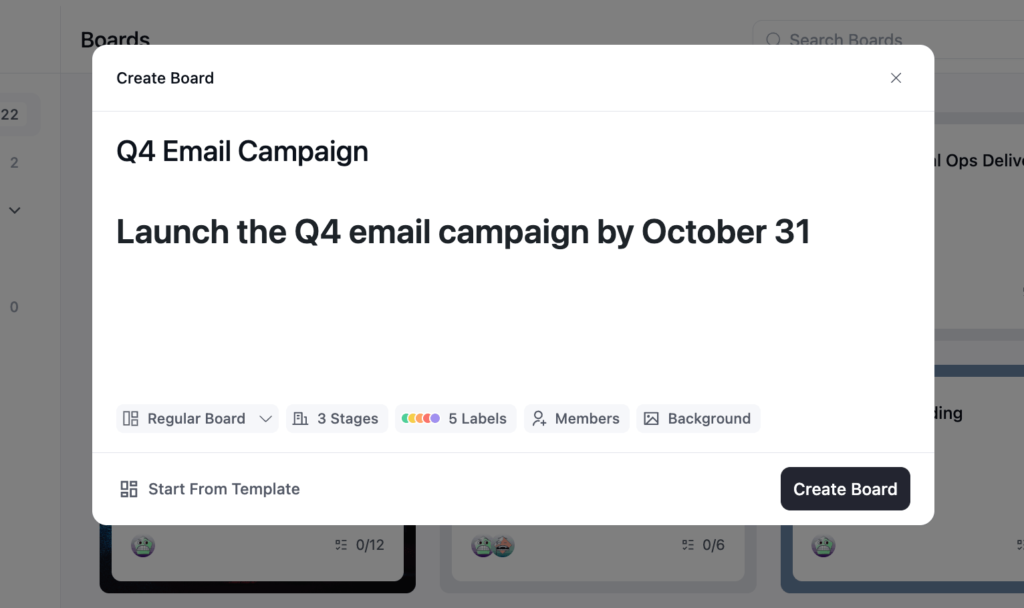
In your WordPress admin, open FluentBoards from the left sidebar and click Add Board. Give it a name that describes the project. Not “New Board,” not “Project 1.” Your team will see this name every time they open it.
In the description field, write the project goal in one sentence. “Launch the Q4 email campaign by October 31.” Short and specific. When you add new members later, they open the board and immediately know what they’re working toward. No onboarding call required.
Step 2: Set up your stages (This is the most important step)
Here’s where most teams go wrong. The default stages in a new board are generic: To Do, In Progress, Done. Fine for a demo. Useless for real work.
Your stages should reflect how tasks actually move through your project, not the idealized version. Here’s one rule that cuts through the blank-stage paralysis: if you can’t describe what it means for a task to enter that stage, the stage doesn’t belong on your board.
Some examples of real-world stage sets:
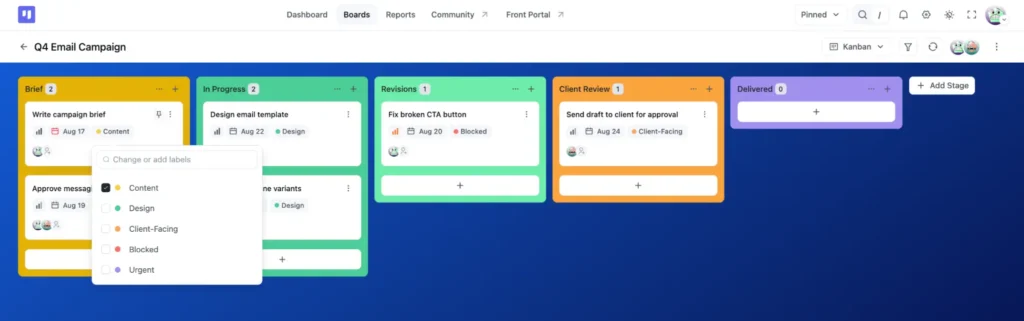
Agency managing client deliverables: Brief → In Progress → Client Review → Revisions → Delivered
Content team: Idea → Writing → Editor Review → Design → Scheduled → Published
Dev team: Backlog → In Development → Code Review → QA → Done
Notice what’s missing from all three: an “In Progress” column doing all the work. “In Progress” tells you nothing about where the bottleneck is, what kind of work is stuck, or who owns what. Rename your active stages to reflect the actual steps.
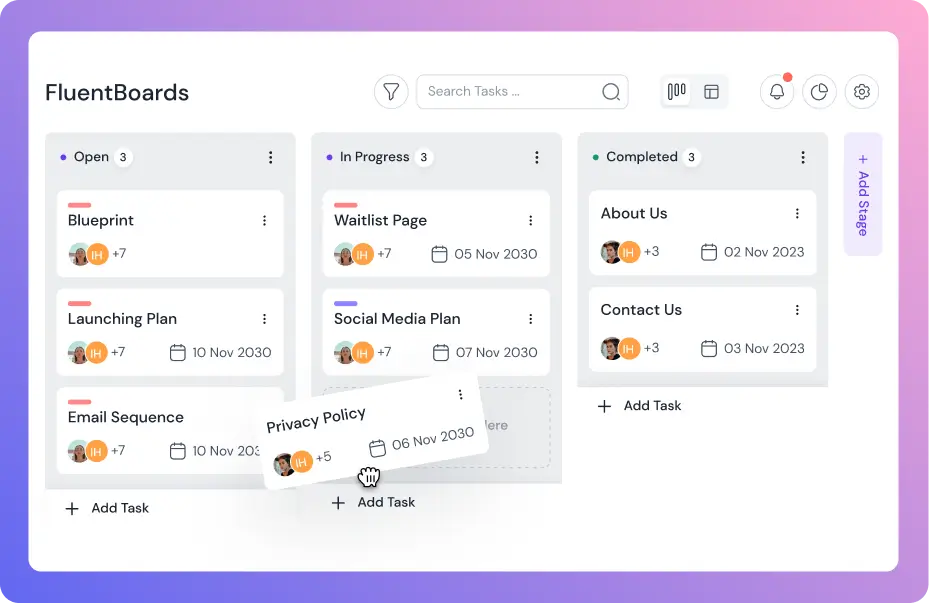
In FluentBoards, click the stage name to rename it. You can add new stages, drag them to reorder, and delete the ones you don’t need. Start with five to seven. Add more only when your process genuinely demands it.
Step 3: Add task fields from day one
Don’t add tasks with just a title and nothing else. Half the tasks will be missing assignees, due dates won’t be set, and filtering will return junk results. Set the fields on each task as you create it, not after.
When you add a task, set:
Assignee: every task needs one person, not a team
Due date: required, no exceptions. A task without a due date is a wish, not a task
Priority: set one so nothing enters the board as “unknown”
Labels: set these up in Step 4 below
If you’re on Pro, you can also set default assignees per stage. Open the stage’s “…” menu, click Set Default, and add a person under Default Assignees. Tasks that land in that stage pick up that person automatically. The brief stage can default to the PM, development to the lead dev, client review to the account manager.
Step 4: Set up your label system
Labels are the most underused feature on Kanban boards and the thing that makes a board genuinely scannable once it fills up.
The best label systems have two layers:
Type labels: what kind of work is it? Examples: Design, Development, Content, Client-Facing, Internal
Status labels: is anything special about this task right now? Examples: Blocked, Urgent, Waiting on Client, Needs Decision
In FluentBoards, create your labels from the board’s “…” menu → Board Labels. Rename each default color swatch to whatever you need (Blocked, Design, Waiting on Client, etc.) and assign a distinct color to each one. When your board has 30+ cards, you’ll spot all the blocked tasks in two seconds from a color scan. That’s the point of labels. Not categorization for its own sake, but instant visual triage.
Start From a Template
Templates in FluentBoards are a Pro feature. If you’re on Pro and running a project type that comes up repeatedly, this is worth using.
There are two sources:
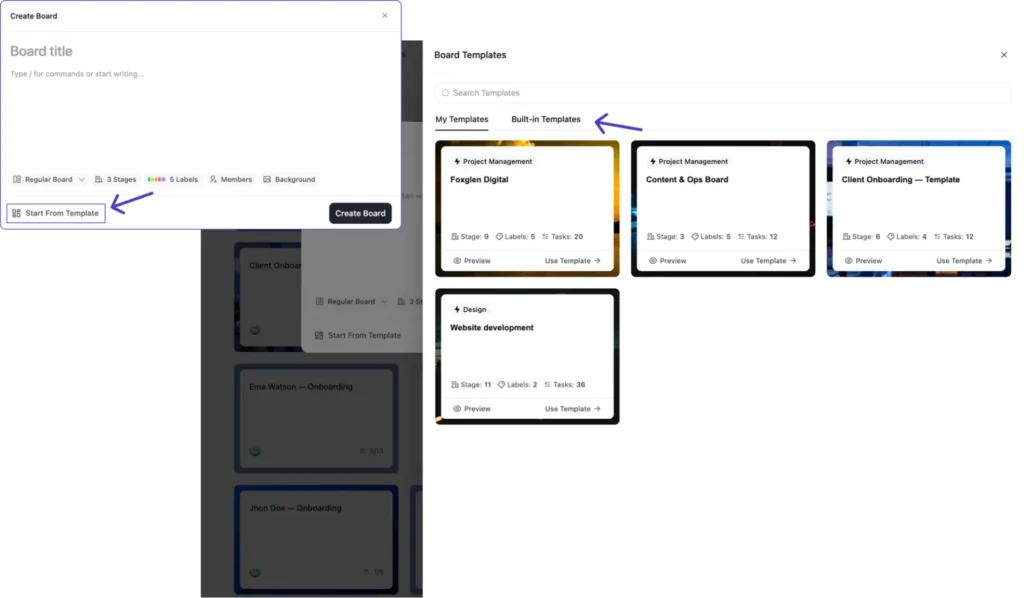
- Built-in Templates: curated structures organized by category (Design, Development, HR, Marketing, Project Management, Sales, and more)
- My Templates: built from your own boards, saved from any board’s “…” menu
Templates aren’t just empty boards with pre-named stages. They come with the stage structure, labels, and example tasks already set up for that project type.
To load one: click Add Board, then click Start From Template at the bottom of the Create Board modal. Pick a tab, My Templates or Built-in Templates, and choose the one closest to your project type.
After loading the template, go through Steps 2-4 from Path 1 anyway. Rename any stages that don’t match your actual workflow. Add or remove labels. The template gives you a structure. You adjust it to match reality.
Get the full picture of templates with our, complete FluentBoards Templates guide
Migrate From Another Tool
Moving from Trello, Asana, Monday.com, or a spreadsheet? One rule before you touch the import: don’t recreate the old system exactly. Recreating a broken system in a new tool gives you the same problems with a different interface.
Step into the Future of Project Management!
Use the migration as an audit. Before you import anything, go through your old boards and apply a simple filter: has this task moved in the last 30 days? If a card has been sitting in “In Progress” for two months with no activity, it’s not a task. It’s a wish item. Remove it before it comes over.
For the actual import: click Import next to Add Board. Trello and Asana have direct importers, Import From Trello and Import From Asana, so you can pull boards straight over without an export step. For Monday.com or a spreadsheet, use Import From CSV: export your tasks from the old tool in CSV format and upload it.
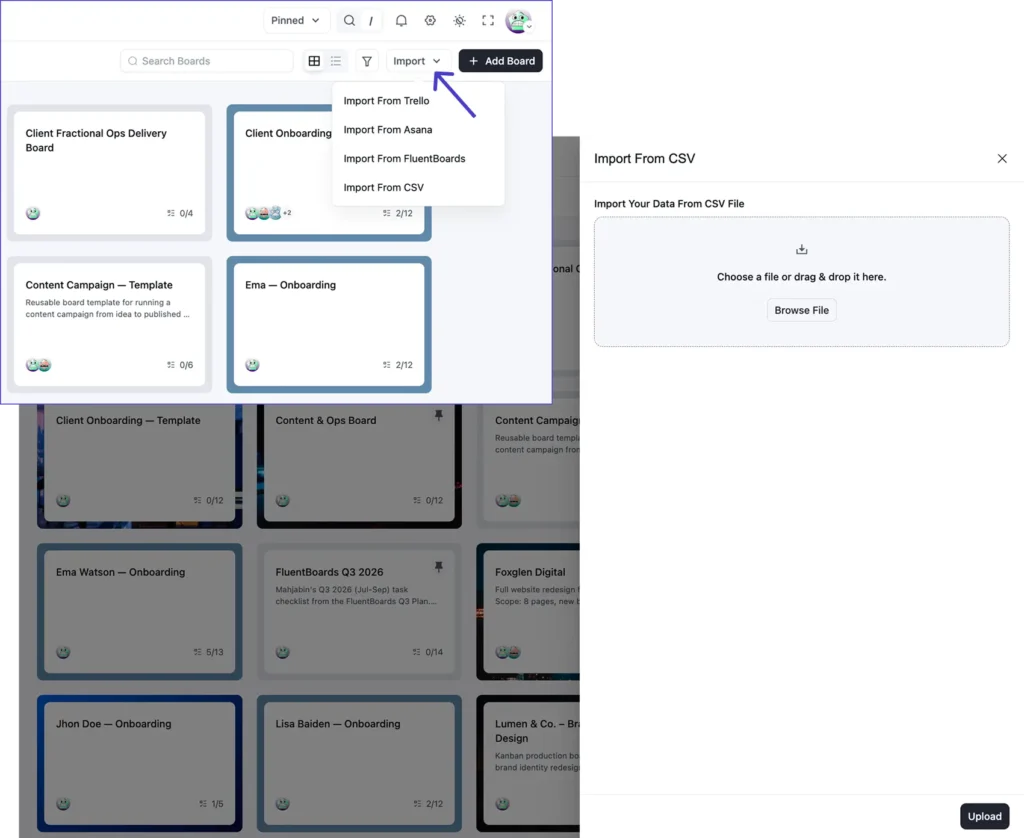
After the import, run through the stage setup from Path 1, Step 2. Most tools use generic stage names. Now is when you rename them to match how your team actually works.
And if your team routes new task requests through contact or intake forms, Fluent Forms connects directly to FluentBoards and creates tasks.
Making the Board Work Every Day
The setup is done. Three things make it actually run.
Drag-and-drop to move tasks between stages: Grab a card and drag it to the next column. FluentBoards logs the move with a timestamp in the task’s activity feed. You’ll always know when a task moved and who moved it. No asking required.
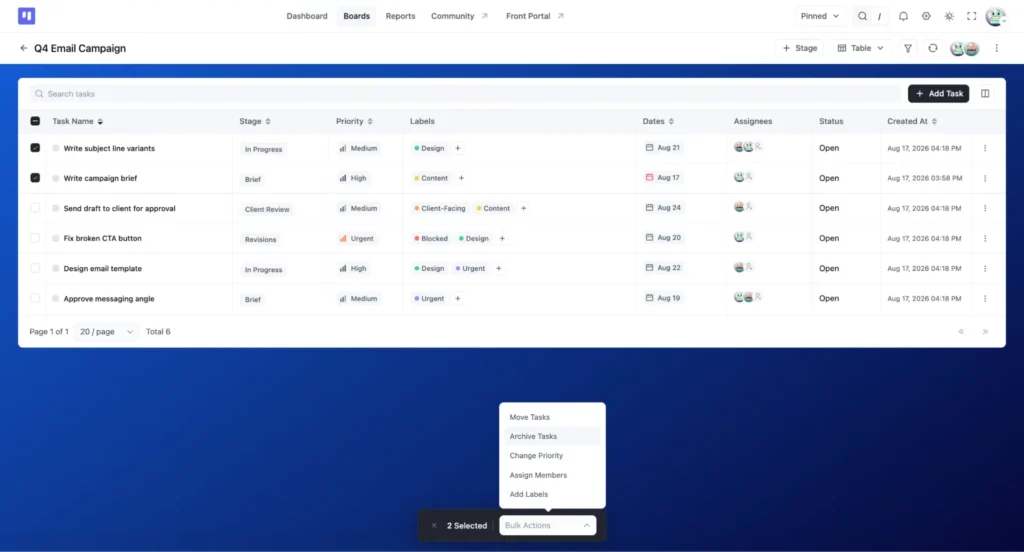
Bulk actions for updates that hit multiple tasks at once: Switch to Table view, select several tasks with the checkboxes, and reassign them, change their priority, or update due dates in a single action. Most useful at sprint start when you’re distributing a batch of new tasks to the team.
Card covers for instant visual scanning: Open a task and click the cover icon to add a color or image cover. When your board has 40 cards, color-coded covers let you distinguish design tasks from dev tasks from client tasks at a glance, without reading every title.
What a Working Board Looks Like After a Week
Here’s what you’re building toward.
After a week of active use, a healthy board looks a little messy. Cards in different stages. Different assignees on different cards. A card or two with a “Blocked” label waiting on something external. One card dragged back from “Client Review” to “In Progress” because feedback came in.
That’s not disorganization. That’s a board reflecting reality.
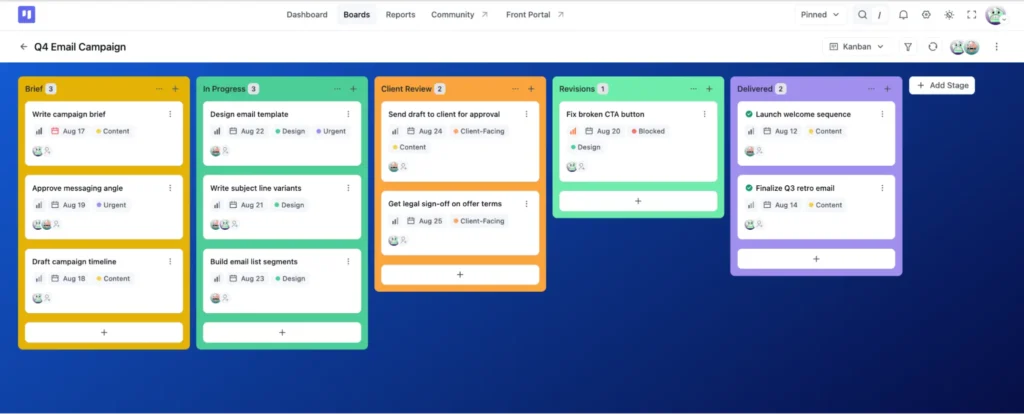
A board that’s too clean (everything sitting in “To Do,” nothing moving) is a board nobody is actually working from. Cards in every stage means the team is using the board to run the project. That’s the goal.
What’s Next After Your First Board
Your Kanban board is the foundation. Here’s where to build from it.
List View (Free)
FluentBoards has a second free view that shows the same tasks as a clean scrollable list instead of columns of cards. Some people find it easier to scan, especially when sorting by due date or priority.
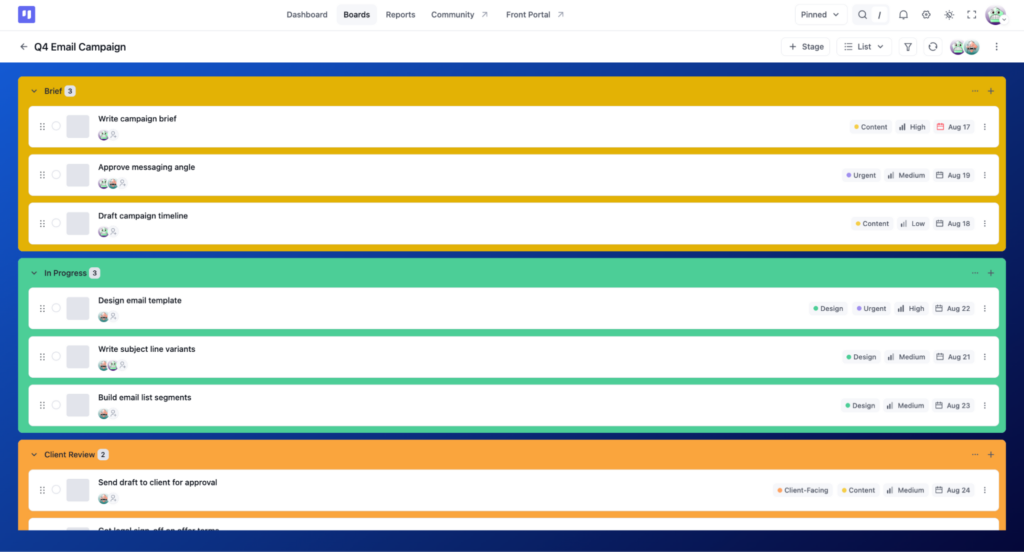
Read: List View for Project Management
Calendar View, Table View, and Gantt Chart (Pro)
Once your board is running, you may want to see tasks plotted against time or in a spreadsheet layout. Calendar View maps tasks to their due dates. Best for content schedules or event-driven projects.
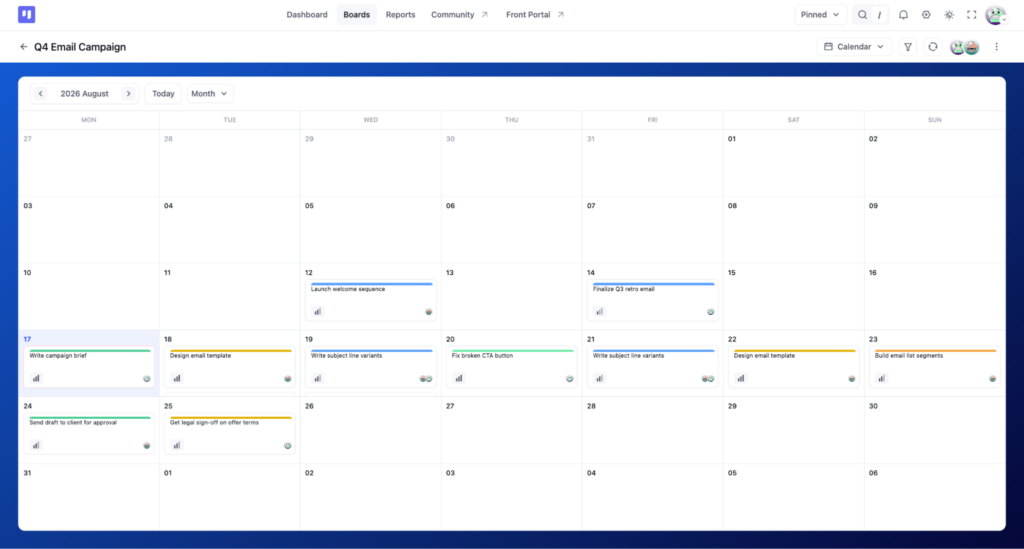
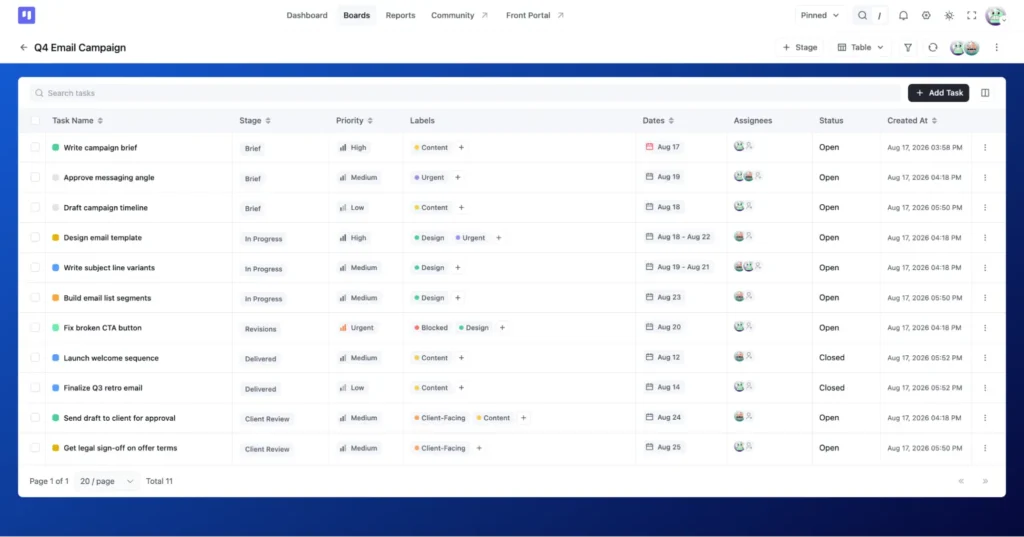
Table View turns your board into a sortable, filterable table, which works well if you’re used to Excel-style tracking.
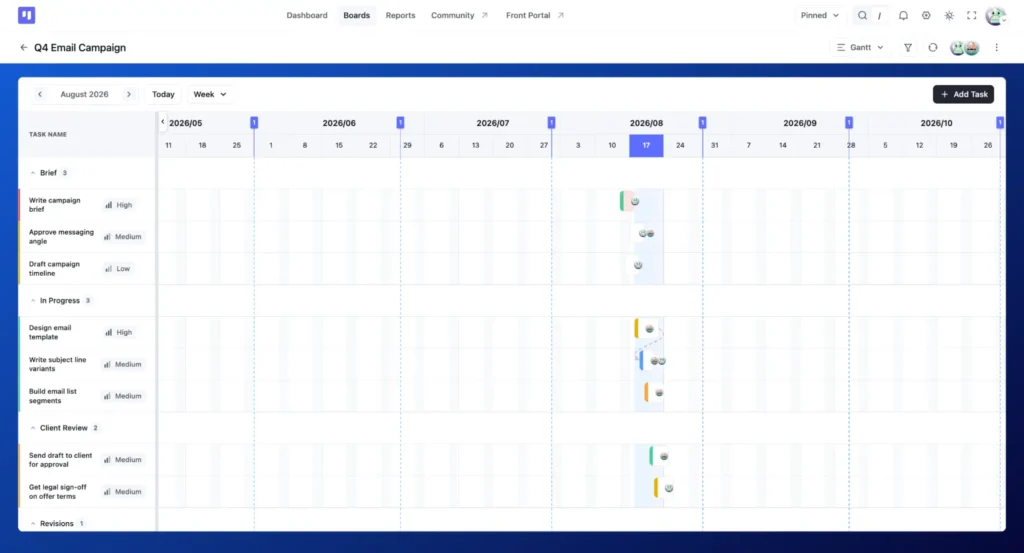
Gantt View shows task timelines and dependencies together so you can see whether a project is on schedule.
Read more: Calendar View for project management | Table View for project management
Two automation features that make sense once your board is set up
These are Pro, but worth knowing now so you see the upgrade path clearly.
Stage Default Assignee: routes tasks to the right person the moment they enter a specific stage (already shown on the In Progress stage in Step 3). No manual reassignment. The task goes where it should go automatically.
Recurring Tasks: let standing work (weekly reviews, monthly reports, regular client check-ins) generate itself on schedule. You configure it once. The task appears when it’s due.
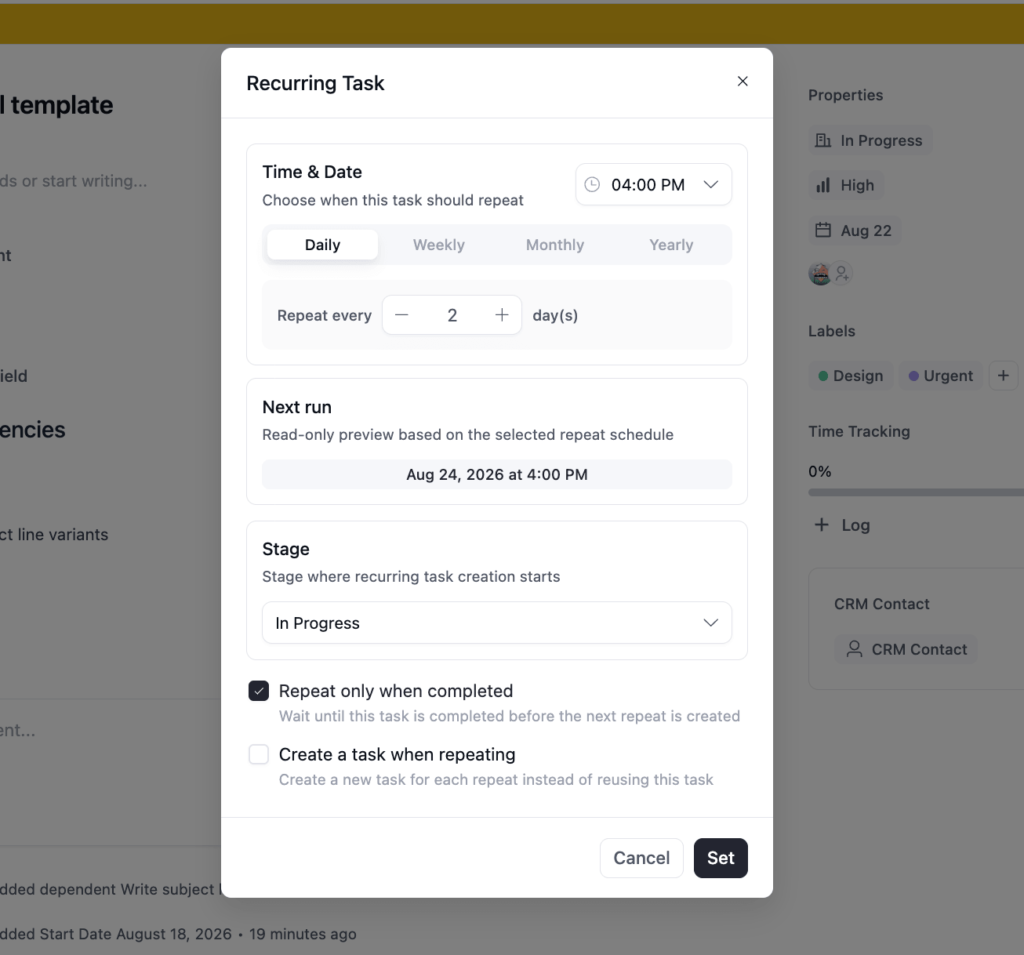
Both features remove the most repetitive manual work from a running board. Once you’ve run your first project for a couple of weeks, you’ll know exactly which stages and which recurring items are worth automating.
Kanban View: Free vs. Pro
| Capability | Free | Pro |
| Create Kanban boards | ✓ | ✓ |
| Custom stage setup and naming | ✓ | ✓ |
| Drag-and-drop task management | ✓ | ✓ |
| Card labels and covers | ✓ | ✓ |
| Bulk task actions | No | ✓ |
| Board templates | No | ✓ |
| CSV import | ✓ [VERIFY] | ✓ |
| Stage Default Assignee | No | ✓ |
| Recurring Tasks | No | ✓ |
| Calendar, Table, Gantt views | No | ✓ |
The Kanban board itself is fully functional on Free. Stage Default Assignee is the one Pro capability that connects directly to how you set up the board in this guide. If your workflow has clear handoff points between stages, it’s worth knowing that feature exists.
For the full feature breakdown, see FluentBoards Free vs. Pro.
Build the Board. Then Run It.
The blank screen is gone. You have a board with stages that reflect real work, fields configured from day one, and a label system that keeps the board readable even when it’s full.
What happens next isn’t more setup. It’s running the board on a real project for two weeks and seeing what needs to change. A stage nobody moves cards into. A label that’s too vague to be useful. Due dates that were too optimistic. Fix them as you go. That’s how a board gets good. Not from a perfect first setup, but from using it on real work and updating what doesn’t fit.
If you want to see how an agency-specific board typically comes together, here’s a worked example with stages, task types, and team structure built out for client projects.
Now open the board and add the first task.
Thanks for following along. Here’s to a board that actually gets used.
Let’s redefine project management with FluentBoards!

Follow:


Get Tips, Tricks, & Updates
We won’t send you spam.


Leave a Reply