

Calendar View for Project Management: How to Plan Projects Efficiently


Your project is running.
But somewhere between the planning session and today, things started slipping quietly.
Deadlines exist but nobody can see them all at once. Workload piles up on certain days without anyone noticing.
And by the time someone flags the conflict, it is already too late to adjust without pressure.
Think about how you use a personal calendar. You do not just write appointments down, you look at the week to see if it is realistic and move things before it starts.
Well, calendar view does exactly that for your project.
So let us walk through how it works.
What Is Calendar View in Project Management?
Calendar view is a time-based layout that displays your project tasks on a calendar grid according to their due dates.
Every task your team has planned shows up on the date it is due. You are not moving cards across stages or scanning rows in a list. You are reading your project the way you read a calendar, by day, by week, by month.
And here is what makes it genuinely useful. Calendar view is not a separate tool. It is the same board you already work in, just seen through a time lens.
Switch from Kanban to calendar in one click and your entire workflow appears on a date grid instantly. Switch back just as fast. Nothing changes about your project. Only how you are reading it.
Why Project Planning Breaks Down Without a Time View
Most project problems are not task problems.
- The tasks exist.
- The work is assigned.
- The deadlines are set somewhere.
The problem is that nobody can see how everything lands in time until it is already too late to adjust.
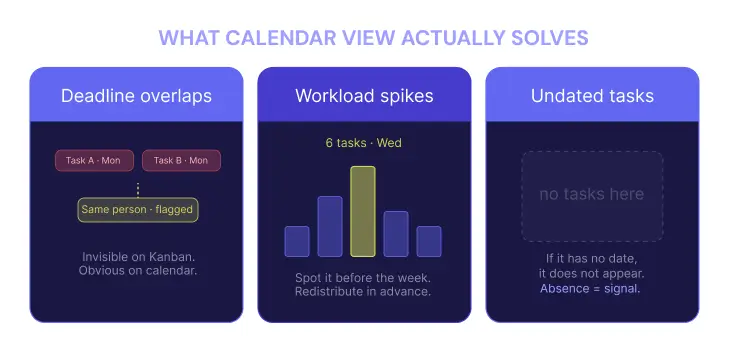
Deadline overlaps go unnoticed: Two tasks. Same due date. Same person. On the Kanban board they sit in different columns and nobody flags it. The crunch arrives on Friday and the team finds out the hard way.
“What is due this week?” takes too long to answer: Without a time view, this means opening cards one by one and building a picture in your head. It should take five seconds. It takes five minutes.
Tasks with no due date float forever: On a board, an undated task blends in. Calendar view makes the problem visible — if a task has no date, it does not appear. That absence is the signal.
Workload spikes are invisible until they hit: Six tasks in one week. Three assigned to the same person. On the board that looks like normal work in progress. On the calendar, it stacks visually. You see it before the week begins, not after someone burns out.
According to PMI, schedule overruns are among the top three reasons projects fail.
Most are not caused by bad execution. They are caused by planning that never had a time view.
How to Plan Your Projects Using Calendar View Step by Step
Here is how to use calendar view to plan and manage your project schedule efficiently.
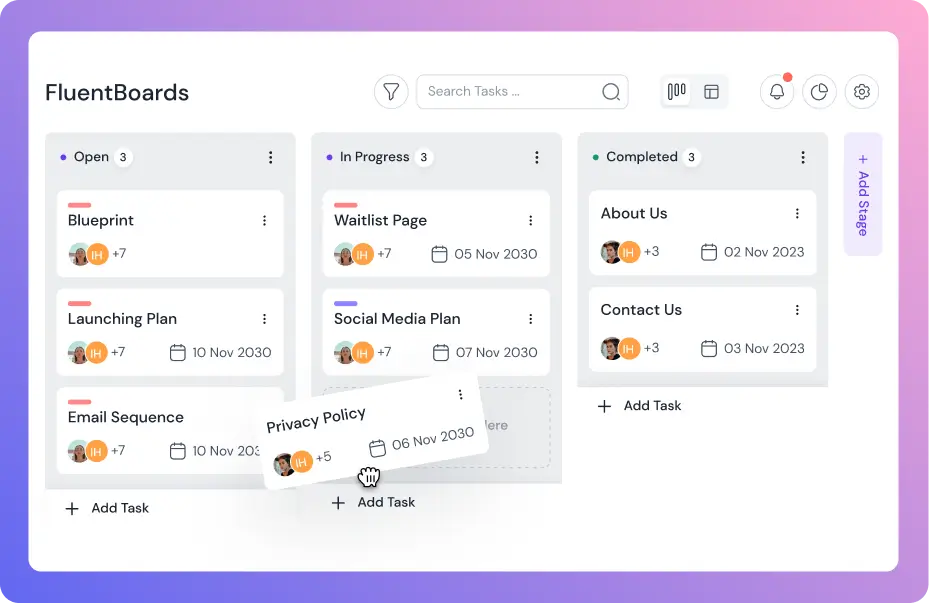
We use FluentBoards throughout these steps. It is a project management plugin for WordPress that brings your entire project workflow inside your dashboard.
Step 1: Switch to calendar view on your board
Your board is already running. Tasks are in their stages. The workflow is moving.
Click the view toggle at the top right and select Calendar.
One click. The layout shifts immediately. Your tasks reorganize from columns into a date grid. Every task with a due date appears on the date it is due. Your project plan is now visible as a calendar.
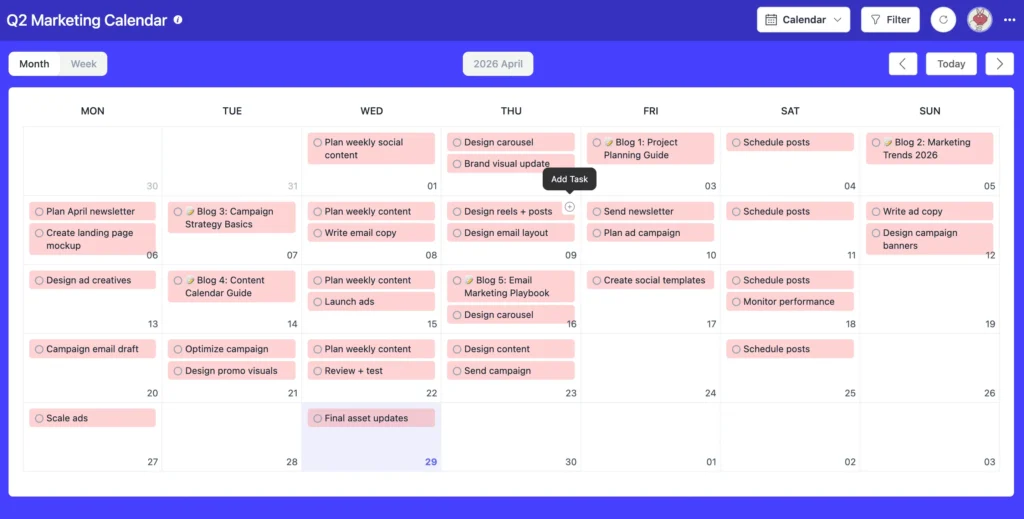
What this solves: The “I have to open every card to know what is due when” problem. The entire project schedule is now readable in one look.
Step 2: Read your project plan at a glance
Now look at what the calendar is already showing you before you touch anything.
Busy days stand out because they carry more tasks. Empty days are immediately obvious. Weeks where work is piling up are visible before anyone feels the pressure.
So before your first planning session of the week you already know:
- Which days have multiple tasks due at the same time
- Which weeks are overloaded and which are light
- Which project milestones are approaching this month
- Where the schedule has gaps that could absorb a shifted deadline
Your project plan is already telling you where it needs attention. You just needed a view that could show it.
What this solves: The “I had no idea we had five things due on the same day” problem. The schedule speaks for itself.
Step 3: Filter your schedule to focus on what matters
As the project grows, the calendar fills up. Filtering lets you cut the noise and focus on exactly what you need to plan around.
Click the Filter button at the top right. From there filter by:
- Assignee to see one team member’s full schedule before adding more to their plate
- Stages to focus on tasks in a specific part of the workflow
- Task Status to separate open work from what is already closed
- Due Date to surface what is overdue, due today, or missing a date entirely
- Priority to find what is urgent and still open
Combine them before a weekly planning session to see exactly what each person is carrying before assigning anything new.
What this solves: The “I do not know if this person has capacity before I assign” problem. Two filter clicks and you have the answer.
Step 4: Add tasks directly from the calendar
New deliverable added. A task that needs to land on a specific date.
Click the plus icon on any date in the calendar. A task creation panel opens with the date already pre-filled. Add the title, select the stage, save.
The task appears on the correct date instantly. Planning and task creation happen in the same view without switching back to the board.
What this solves: The “I have to leave the calendar just to add a task” problem. Everything stays in one place.
Step 5: Move tasks when the plan needs adjusting
Plans shift. A task runs long. A dependency moves. A date needs to change.
In calendar view, adjusting the schedule is immediate. Click the three dot menu on any task and update the date directly. Or record a short video of dragging a task to a new date to show how the schedule updates instantly.
What this solves: The “I have to open the card, find the date field, change it, and come back” problem. Date adjustments happen right on the calendar.
Step 6: Click into any task for the full detail
The calendar shows the schedule. But some tasks need more than a title on a date.
Click any task on the calendar. The full card opens right beside the calendar without pulling you away from the schedule view.
Inside you can update the deadline, confirm the assignee, check priority, add subtasks, leave planning notes in comments, and log time against estimates.
Close the card. You are back on the calendar exactly where you left off.
What this solves: The “I can see the deadline but not the detail” problem. Full task context is one click away without leaving the calendar.
Also read: Table view for project management
Common Mistakes to Avoid When Planning with a Project Calendar
A project calendar is only as useful as the data behind it. These habits quietly break calendar planning even when the tool is right.
- Not setting due dates on every task makes the calendar incomplete. Tasks without dates do not appear and the schedule looks lighter than it actually is.
- Only using month view means missing the daily detail week view provides. Month view shows the big picture. Week view catches the overloaded Tuesday nobody planned for.
- Setting dates once and never revisiting them turns the calendar into a historical record instead of a live planning tool. Plans shift. Dates need to follow.
- Using the calendar only after problems appear instead of before they form. Open it at the start of the week, not the end of it.
- Ignoring empty days. Light days and open weeks are planning assets. When a deadline needs to move, an empty slot on the calendar is exactly where it belongs.
- Adding new tasks without checking the calendar first. That is how workload piles up silently until someone raises it in a standup.
Level up your project management game inside WordPress – where limitless possibilities come at an unbeatable price!
Calendar View vs Other Views: When Does Each One Serve You Best?
All four views show the same project. But each one answers a different question.
| Aspect | Calendar View | List View | Table View | Kanban View |
|---|---|---|---|---|
| Best for | Planning and deadline visibility | Sequential task execution | Data analysis and tracking | Workflow visualization |
| Shows | Tasks on a visual date grid | Tasks grouped by phase | All task details in a structured grid | Tasks moving across stages |
| Use when | You need to see what is due and when | You need clarity on what comes next | You need to filter, sort, and analyze | You need to see work in progress |
| Strength | Schedule visibility and conflict spotting | Sequential clarity | Data control and bulk actions | Visual flow and bottleneck spotting |
Use calendar view when you are planning, scheduling, or checking how work is distributed across time.
Switch to list view when your team needs to execute and know what comes next. Switch to table view when you need to analyze task data across multiple fields. Switch to Kanban view when you want to see how work moves through workflow stages.
None of them replaces the others. Together they give your project complete visibility from every angle.
Read: List view for project management
A Plan You Can See Is a Plan You Can Keep
Most deadline problems are not planning failures.
They are visibility failures.
The dates were set. The tasks existed. The team was ready. But nobody could see the full schedule at once, so conflicts formed quietly and pressure built until launch week revealed everything that should have been caught in week one.
Calendar view fixes that. It takes your project plan out of individual cards and places it on a grid where you can read it, check it, adjust it, and act on it before problems form.
Open the calendar. Read the plan. Stay ahead of it.
Thanks for reading this far. Wishing you all the best on your project management journey!
Let’s redefine project management with FluentBoards!

Follow:
Get Tips, Tricks, & Updates
We won’t send you spam.


Leave a Reply