

Web Design Project Management: A WordPress Workflow From Brief to Launch


The homepage design was approved in week three. The developer was booked for week four.
Then week six arrived, and the build still had not started.
The problem was not design or development. Nobody had the copy for the services pages, and the client was still “pulling it together this weekend.”
That is where web design project management matters.
Web design project management is the process of planning, running, and delivering a website project from the first brief to launch, while scheduling the client’s inputs just as carefully as your own work.
Because most website projects do not fall behind during design or development. They fall behind while waiting for content, feedback, approvals, and other client inputs.
This part of our agency project management guide shows how to build a WordPress workflow around those exact waiting points.
What Web Design Project Management Covers
Web design project management covers everything between a signed proposal and a live website: defining the pages, collecting content, reviewing designs, building, testing, launching, and handing the site over.
The goal is simple: deliver the site on the agreed date, within the agreed hours, without a last-minute scramble.
WordPress projects add a few things that generic project management guides often skip.
- First, development usually happens on a staging site, so you need a clear point where the project moves to the live domain.
- Second, plugin and theme choices come with licenses, renewals, and update responsibilities, so someone needs to own those decisions.
- Third, content entry is real work. Ten pages of copy and images still need to be added, formatted, checked, and approved. That is why content should have its own stage instead of being buried inside “development.”
Most agency website projects still follow a simple stage-by-stage process, with client approvals between each stage and some back and forth along the way.
That is enough theory. The rest of this guide focuses on the workflow itself.
The Web Design Workflow, Stage by Stage
A WordPress web design workflow has eight stages: discovery and brief, sitemap and content plan, design and review rounds, content collection, development on staging, QA, launch, and handoff.
For each one, you need to know the deliverable, who owns it, and which client input can block it.
Here’s what each stage looks like on a typical 10-page site.
Discovery and brief
Discovery turns the signed scope into a shared understanding of goals, audience, brand, and the pages that matter most.
The deliverable is a written brief that the client has read and agreed to, ideally built from a creative brief template so the client answers in their own words.
The owner is your project lead. The client input that blocks it is access to the old site, analytics and brand files, plus one person who can speak for the business.
Sitemap and content plan
This stage decides which pages exist, how they connect, and what goes on each one.
The deliverable is an approved sitemap and a content plan listing every page, who writes it, and when it’s due, like “Services overview: client writes, due end of week 6.”
The owner is your strategist or project lead. The blocking input is a decision from the client on the page list, which often means settling internal debates about what the business actually offers.
Design and review rounds
Design usually starts with the homepage and one inner-page template, then expands to the rest of the site.
The deliverable is a set of approved desktop and mobile designs for each template. Your designer owns this stage, but progress depends on the client providing consolidated feedback within the agreed turnaround time.
That feedback should come from the one approver named in your scope and stay within the number of review rounds you agreed at the start. Without those limits, design can quietly eat into the rest of the project timeline.
Content collection
Content collection should run alongside design, not wait until design is finished.
The deliverable is everything needed for each page: final copy, images, logos, and any downloadable files, all in the format you requested.
Your project lead owns the follow-up, but the client owns the actual delivery. That is exactly why content needs a clear deadline and a clear consequence if it arrives late, which we cover later in this guide.
Development on staging
Development turns the approved designs into a working website on staging, using the agreed theme or page builder and plugins.
The deliverable is a complete staging site with every page built and populated. Your developer owns this stage, but they need two things before they can move properly: approved designs and final content.
If either is missing, the developer ends up building with placeholders and then coming back to rebuild parts of the site later. That creates extra work and quietly pushes the timeline back.
QA
QA checks the staging site against the approved designs and the acceptance criteria in your scope, including browsers, mobile, forms, speed, and broken links.
The deliverable is a staging site with no critical issues left open. Ideally, this stage is owned by someone who did not build the pages, because a fresh set of eyes is more likely to catch what the developer may have missed.
The client’s role is to review the fully populated site and send their feedback in one consolidated list.
Launch
Launch moves the site from staging to the live domain, then checks that everything still works as expected.
That means confirming forms reach the right inbox, redirects work, analytics are tracking, and backups are running properly.
The deliverable is a live website with written client sign-off. Your developer owns the technical launch, while the project lead runs through the launch checklist.
The main blockers are usually final client approval and access to anything needed for launch, such as the domain registrar.
Handoff
Handoff closes the project and makes sure the client can take over with confidence.
That includes moving logins into the client’s own accounts, sharing a short recorded walkthrough, listing the plugins in use and who owns each license, and making it clear where your support ends.
The deliverable is a complete handoff packet that the client confirms they have received. Your project lead owns this stage.
The client’s part is simple but easy to forget: someone needs to be available for the final walkthrough and training before the project is officially closed.
Build the Website Project Plan
A website project plan maps each stage to dates, a milestone, an owner, and the client input it depends on. It’s the one page you and the client both look at when someone asks, “Are we on track?”
Here’s an example plan for a 10-page WordPress site over 12 weeks. Your durations will differ, but the shape holds for most builds.
| Stage | Weeks | Milestone | Owner | Client input: it depends on |
| Discovery and brief | 1 | Brief agreed | Project lead | Site, analytics and brand access |
| Sitemap and content plan | 2 | Sitemap approved | Strategist | Final page list |
| Design and review rounds | 3 to 4 | Designs approved | Designer | Feedback within 5 working days per round |
| Content collection | 3 to 6 | All content received | Client, chased by project lead | Copy and images for every page |
| Development on staging | 5 to 9 | All pages built | Developer | Approved designs and final content |
| QA and client review | 10 to 11 | No critical issues open | Tester | One consolidated list of feedback |
| Launch | 12 | Live and signed off | Developer | Written sign-off, domain access |
| Handoff | 12 | Handoff packet received | Project lead | A person available for training |
Two things make this plan work. Every date that depends on the client says so, so a late review moves the date instead of squeezing your team. And content collection overlaps design, so copy is ready by the time development starts. Put the same dates in your statement of work, and the plan and the contract will never disagree.
Stop Client Delays Before They Stop the Project
Client delays stop web design projects more often than anything your team does, and you can prevent most of them with three rules agreed before work starts. Each rule turns a vague expectation into a date or a number both sides can see.
Content deadlines with consequences
Give every piece of content a due date in the content plan, and write down what happens when it’s late: “If content arrives after the end of week 6, the launch date moves by the same number of working days.”
That one sentence changes the conversation. A missed content deadline stops being your problem to absorb and becomes the client’s decision about their own launch date.
Limit review rounds in writing
Agree how many rounds of revisions each design includes, what counts as a round and what an extra round costs, and put it in your statement of work.
Two rounds on each design template is a common choice, but the number matters less than the fact that it’s written down. If the number isn’t written down, it’s unlimited.
One feedback channel
Feedback that arrives by email, phone, text, and a comment on a shared file can’t be tracked, and the contradictions between them cost you a round. Agree on one channel and one approver at kickoff, and turn every piece of feedback into a task the moment it arrives.
Our guide to the client approval process shows how to run reviews so nothing gets lost between messages.
Pro Tip: Send every review request with a date, not a duration. “Please send homepage feedback by Thursday, November 12” gets a reply. “Let us know what you think” gets one in two weeks.
Give the Client a Live View
Clients chase you less when they can see progress themselves. A live view of the project answers “where are we?” before the client has to email, and it puts their own pending items in front of them.
FluentBoards gives you two ways to do it.
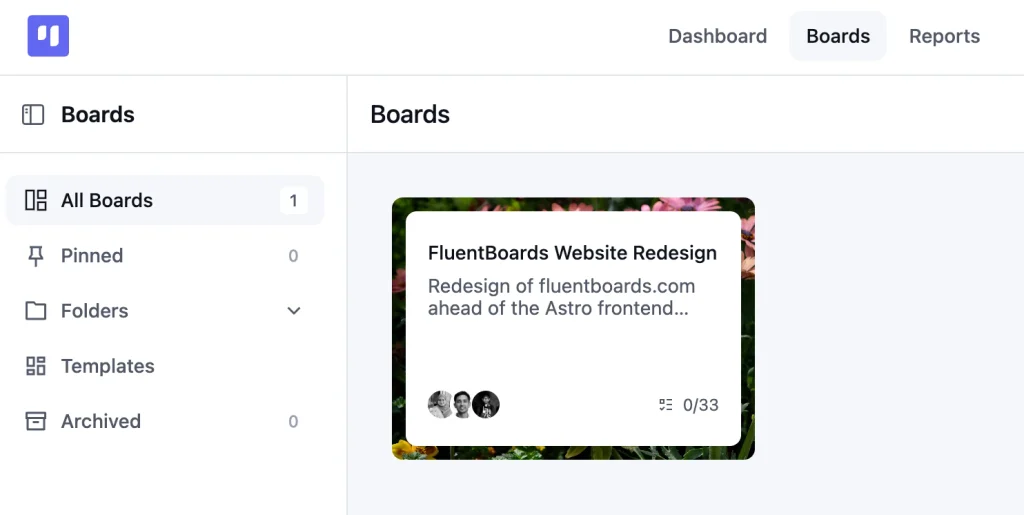
The Front Portal shows each client only their boards and doesn’t give them access to the website backend. Give the client the Viewer role if they should only follow along, or the Member role if they should comment on tasks, upload files, and move cards, which suits a client who sends content through the board.
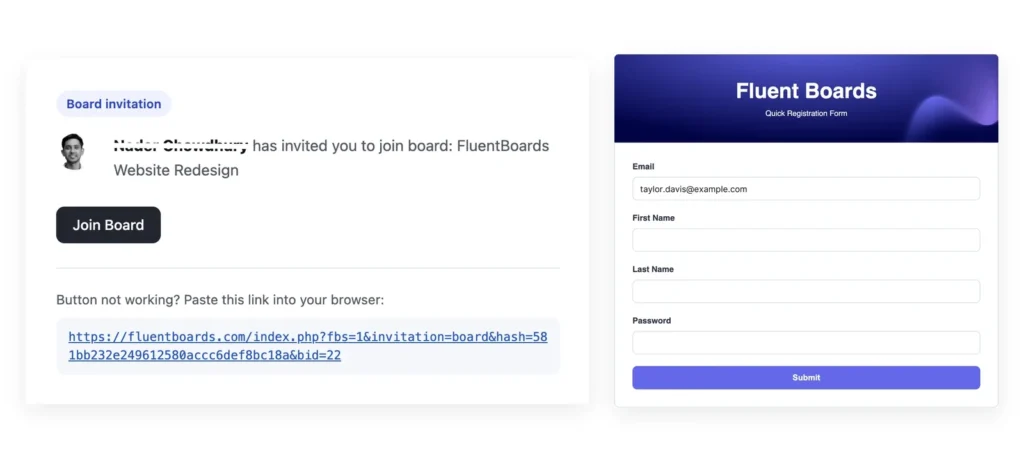
Clients need a WordPress login, which FluentBoards creates when you invite them by email, and email invites default to Member, so switch anyone who should only watch to Viewer. Our guide to setting up a WordPress client portal covers it step by step.
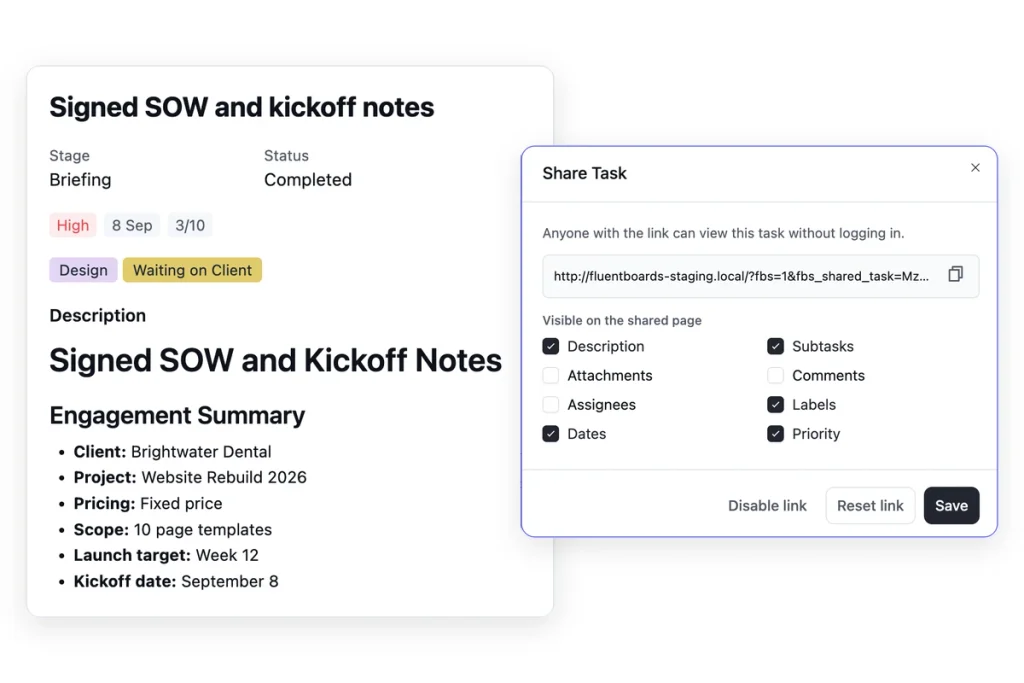
For a single review, like one homepage design, you don’t need a portal at all. You can share any task by link. The client opens a read-only view of that one task, with no login, and you choose what it shows, like the description and attachments, but not internal comments. And you can revoke the link once the review is done.
Set Up the Board
A website build runs best on a board whose stages match the workflow above, so a card’s position tells everyone what’s done and what’s waiting. Set it up once, then reuse it for every build.
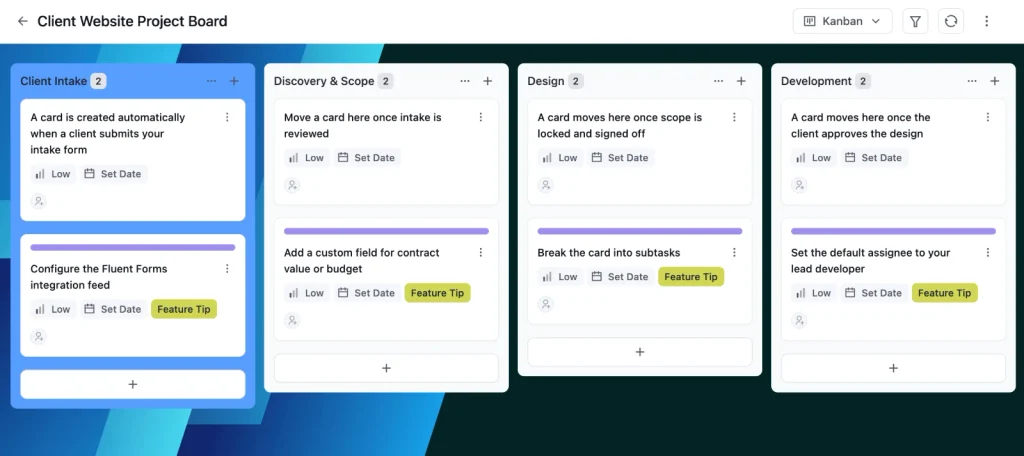
Start with stages for each part of the workflow: Discovery, Sitemap and Content Plan, Design, Content Collection, Development, QA, Client Review, and Launch. Use labels for pages or templates, like “Homepage,” “Location Page,” and “Contact,” plus a “Waiting on Client” label for anything blocked by the client.
Attach design files and content documents to the tasks they belong to, so nobody hunts through email for the latest version. Labels and attachments are part of the Free plan.
FluentBoards adds the parts that save the most time on repeat builds:
- Stage default assignees: route every task that enters QA to your tester automatically, so nothing waits for someone to notice it.
- Task templates: save repeat tasks once, like “Build page from approved design” or “Set up contact form,” with your standard checklist inside, and reuse them on every project.
- Subtasks and subtask groups: break a page into checkable steps, like layout, content entry, mobile check, and form test, grouped by stage.
- Gantt view with dependencies: link design approval to development with a finish-to-start dependency, so the timeline shows exactly what a late approval pushes back. Our walkthrough of the Gantt view shows how to set it up.
Common Web Design Project Mistakes
Most website projects that go wrong make the same handful of mistakes, and almost all of them are about the client’s side of the work. These are the ones worth checking against your next build.
- Treating content as part of development. If content has no stage and no due date, the developer finds out it’s missing on the day they need it.
- Unlimited review rounds by omission. A design that goes through six rounds wasn’t a bad design. It was a scope with no limit.
- Starting development before designs are approved. Building from “nearly final” designs means building twice. Wait for the sign-off.
- QA by the person who built it. Developers test the paths they built. A second person tests the paths visitors take.
- Plugins bought in the agency’s name. Two years later, you’re paying a client’s renewal or their site stops updating when you cancel.
- No handoff. “The site’s live” isn’t a handoff. Logins, training, and a support boundary are.
Frequently Asked Questions
These are the questions freelancers and agency leads ask most about running website builds.
What are the stages of a web design project?
A web design project usually runs through eight stages: discovery and brief, sitemap and content plan, design and review rounds, content collection, development on staging, QA, launch and handoff. Content collection runs alongside design, so the copy is ready when development starts.
How long does a website project take?
It depends on the number of page templates, custom features, and, above all, how quickly the client supplies content and feedback. Plan each stage with its client inputs, like the 12-week plan for a 10-page site above, and tie every date to the input it depends on. Client delays move timelines far more than build effort does.
How many revision rounds should a web design project include?
There’s no industry standard. Many agencies include two rounds per design template, but what matters is that the number, what counts as a round and the cost of extra rounds are written into your scope before design starts.
What is the best project management tool for web designers?
The best tool is one your team and your client will both actually use, with stages that match your workflow and a way for clients to see progress. If your sites are built on WordPress, a project board inside WordPress keeps the project next to the work, without another login for anyone.
Start Your Next Build from a Board, not a Blank Page
Your next website project will run into the same waiting points as the last one: content, feedback, and approvals. The difference is whether they’re already on the board with dates and owners, or whether you discover them in week six.
Before your next kickoff, write the content deadlines and review rounds into the scope, set up a board with a stage for every part of the workflow, and put each client input on it as a task with a due date. Then start the build from the free Client Website Project template, so the stages, labels, and starter tasks are in place on day one.
That’s all for today. Let’s redefine project management.
Let’s redefine project management with FluentBoards!

Follow:


Get Tips, Tricks, & Updates
We won’t send you spam.




Add your first comment to this post