


Project Management Time Tracking in FluentBoards: From Guesswork to Real Data


You finish a project and the client is happy. Now you sit down to write the invoice.
You open your notes, try to reconstruct the week, and realize you’re guessing. The design phase felt like 12 hours. Revisions? Maybe 3, maybe 6. You file the invoice on best estimates and move on.
Two weeks later, the debrief shows the actual total was 31 hours more than you charged.
That’s not a billing mistake. That’s a tracking problem.
FluentBoards’ Time Tracking solves this at the task level. Team members log hours directly against the work they did, and the Timesheet report has the real numbers at month-end. Not a reconstruction. A record.
This guide shows you how.
What FluentBoards Time Tracking Actually Does
Before the steps, a quick orientation. Time Tracking in FluentBoards works on two levels, and understanding both upfront will change how you read the data later.
At the task level: Once an admin enables Time Tracking, each task gets a dedicated time logging section in its detail view. Team members set an estimated time for the task, then log actual time against it manually. Each entry captures the date, the duration, an optional note, and the name of the person who logged it.
At the Timesheet level: All task-level time entries roll up into the Reports → Timesheet view. This is where you see the full picture: hours logged per day, broken down by task or by team member, across any board and any date range. There’s an Export button here for billing. The Timesheet is where the data becomes an invoice.
These two levels work together. The task is where you capture time. The Timesheet is where you use it.
How to Set Up and Use Time Tracking (Step by Step)
The feature is off by default. An admin turns it on in the board settings, then team members log time directly on tasks. The Timesheet report in Reports pulls everything together.
The four steps below walk through the full workflow.
Step 1: Enable Time Tracking (Admin only)
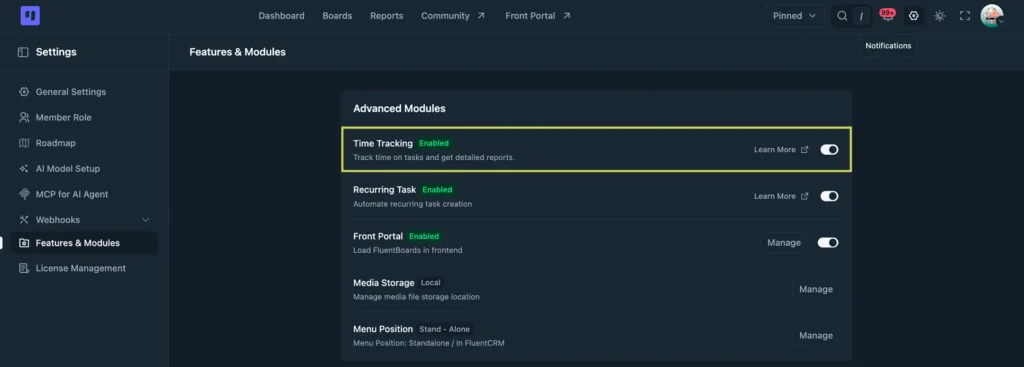
Time Tracking is not active until an admin turns it on, and it’s a site-wide switch, not something you enable per board. Go to Settings (the gear icon in the top bar) → Features & Modules, and turn on the Time Tracking toggle under Advanced Modules.
Once enabled, every task on every board will show a Time Tracking section in its detail panel. Members can start logging immediately.
Step 2: Set an estimated time on a task
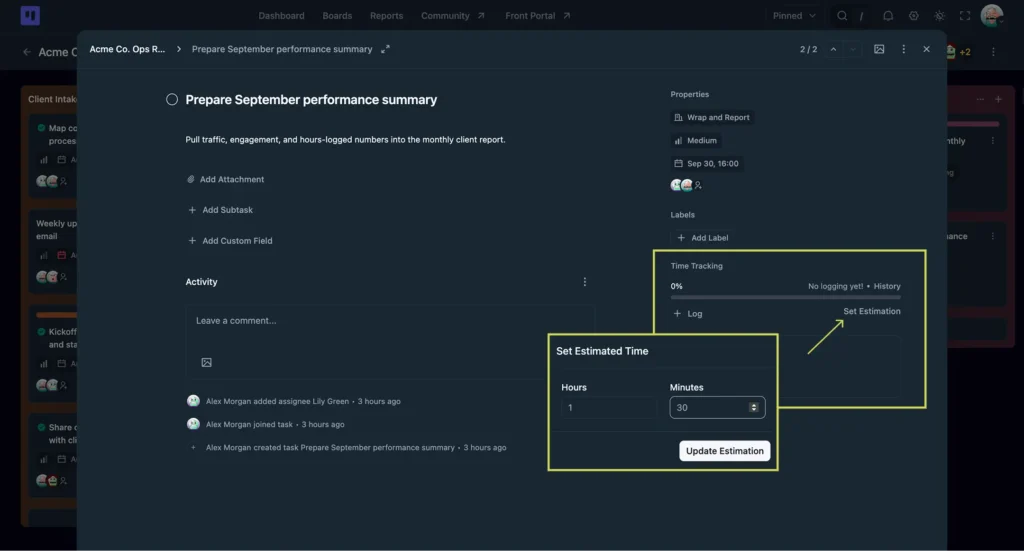
With Time Tracking enabled, open any task, find the Time Tracking section in the detail panel, and click Set Estimation. A small popup opens with Hours and Minutes fields, so enter your estimate and click Update Estimation.
The estimate does nothing mechanical, since it won’t block the task or trigger an alert. Its value is comparative: once actual time is logged against it, you can see how far off you were.
Do this for every task that has a deadline or a billing implication. The comparison data is the most useful thing this feature produces.
Step 3: Log time manually
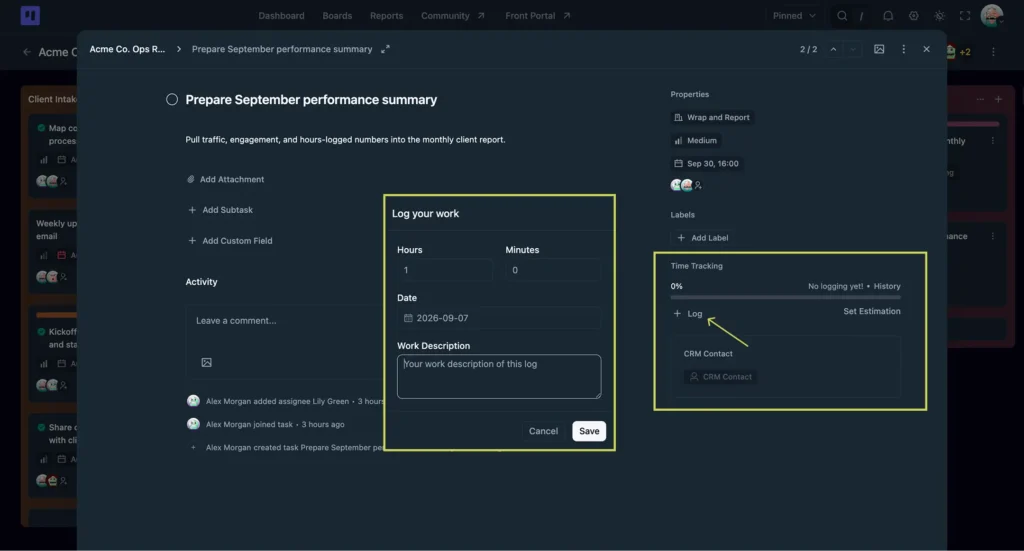
This is how time gets recorded. Open a task and find the Time Tracking section, then click + Log. A “Log your work” popup opens where you enter four things:
- Hours
- Minutes
- Date, which defaults to today
- Work Description, a note describing what you did
Click Save and the entry appears in the task’s time log immediately, attributed to your account, with a confirmation toast reading “You have successfully submitted your working time.”
Every team member logs their own time this way, so if three people worked on a task across the week, all three log their entries separately and all of them show up in the same task log, along with a running total and a percentage bar comparing logged time to your estimate.
There is no automatic timer, so time entry is entirely manual. The discipline of logging at the end of each work session, or each day, is what makes the data reliable.
Step 4: View the time log per task
Once entries exist, the Time Tracking section shows a percentage bar comparing logged time against your estimate, the total logged so far, and a History link.
Click History to open the full Work Logs popup. A running total sits at the top, then every entry listed with:
- The team member’s avatar and name
- The date and duration
- The note they left
- An exact “Created At” timestamp
A “⋮” menu on each entry lets you edit or delete it later.
This is the per-task comparison point. Here, the task’s at 62%, 4 hours logged against a 6h 30m estimate from two people, a healthy mid-task pace check. If a task passes 100% with real work still left, that’s your early sign the estimate was too low. Check this regularly, not just at project end.
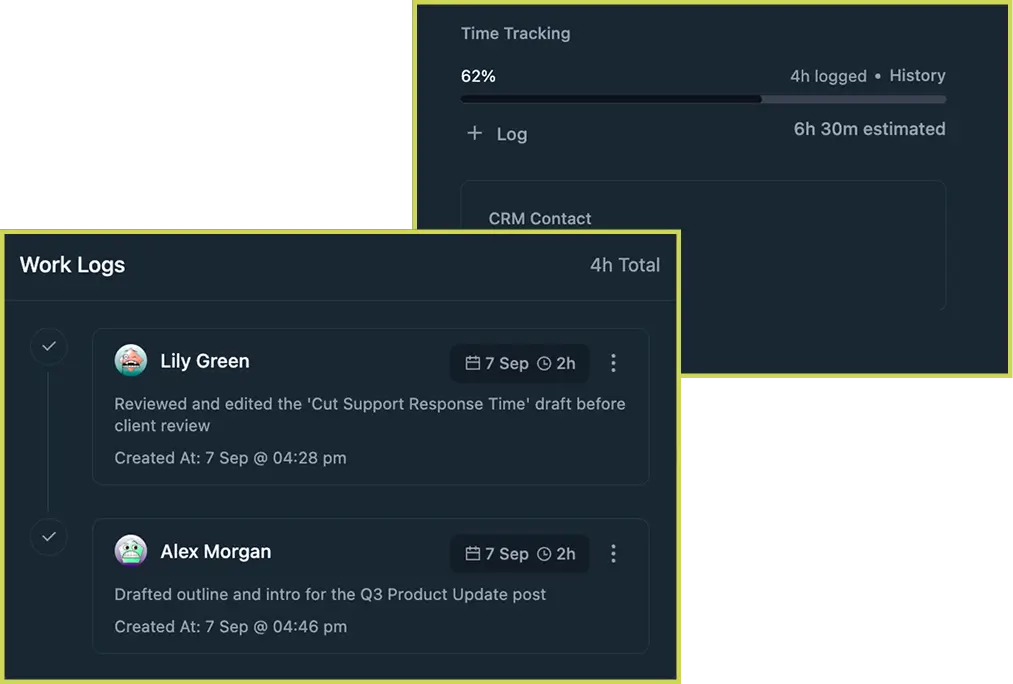
It’s also where collaboration becomes visible instead of assumed. When more than one person touches a task, the Work Logs list shows exactly who did what and when, not just a total number with no story behind it. You can see that Lily reviewed the draft and Alex wrote the outline, two separate contributions on the same task, both accounted for.
Real use case: You log 2 hours at the end of a busy Friday, going from memory. Monday you check your calendar and it was closer to 2 hours 30, since a call ran long. Open History and correct the original entry yourself, and your Timesheet stays accurate for billing with no duplicate entries for anyone to untangle later.
The Timesheet Report: Where the Data Becomes Useful
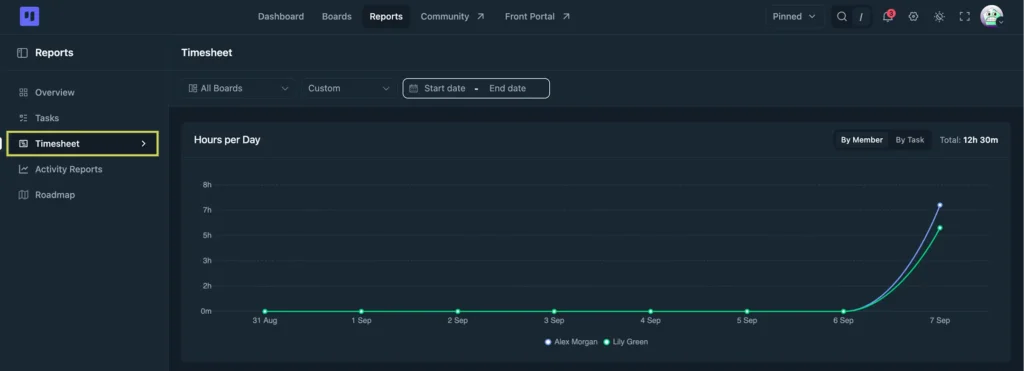
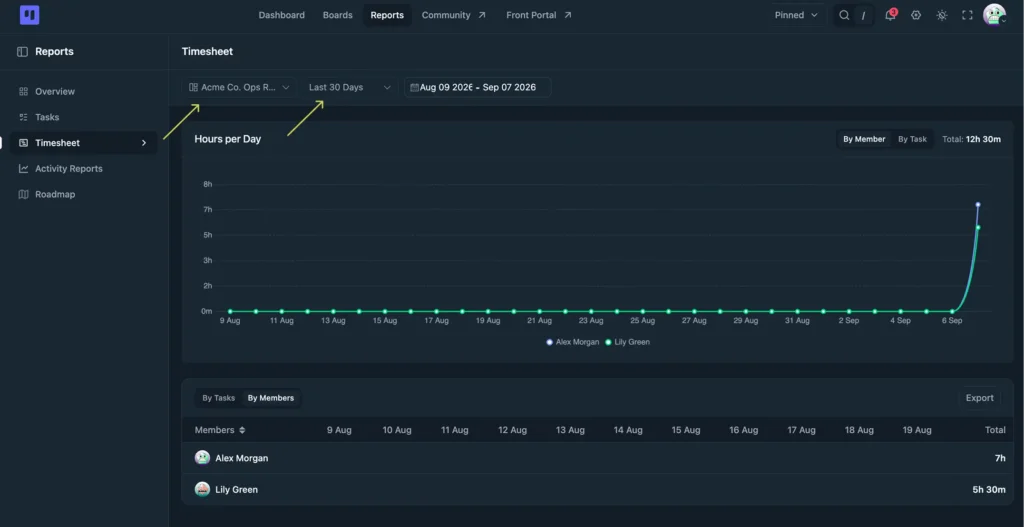
The Timesheet is where all that task-level logging pays off. Go to Reports → Timesheet from the top navigation, a dedicated reporting view that aggregates every time entry across your boards into one place.
Filters at the top let you select a specific board, or All Boards, and a date range:
- Last 7 Days, the default
- Last 30 Days
- Last 90 Days
- Custom
The Hours per Day section gives you a quick summary of total hours logged, with a toggle between By Member for who logged what across the period, and By Task for what consumed the most hours.
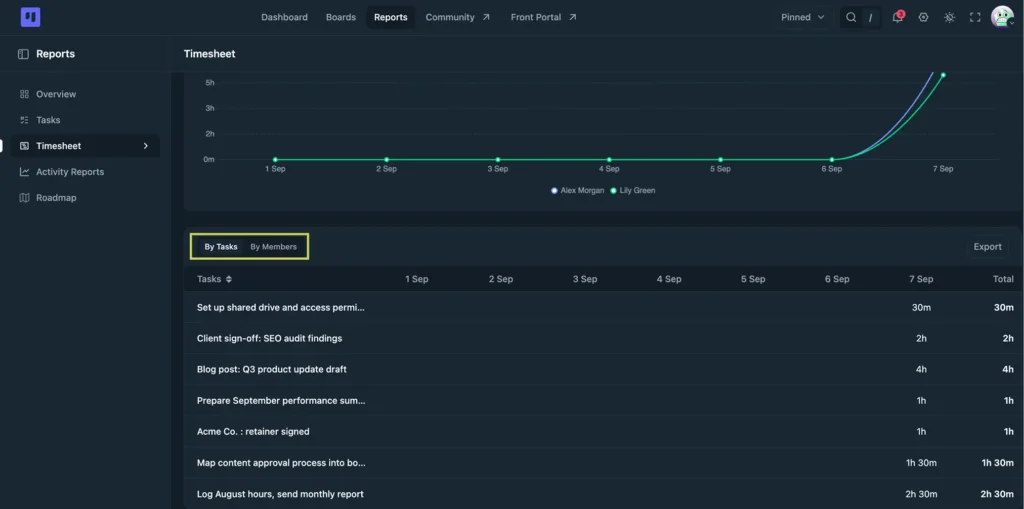
Below that sits the detailed table, with two tabs depending on what you need:
- By Tasks puts each task on a row with daily columns and a Total on the right, so you can see at a glance which work ate the most time
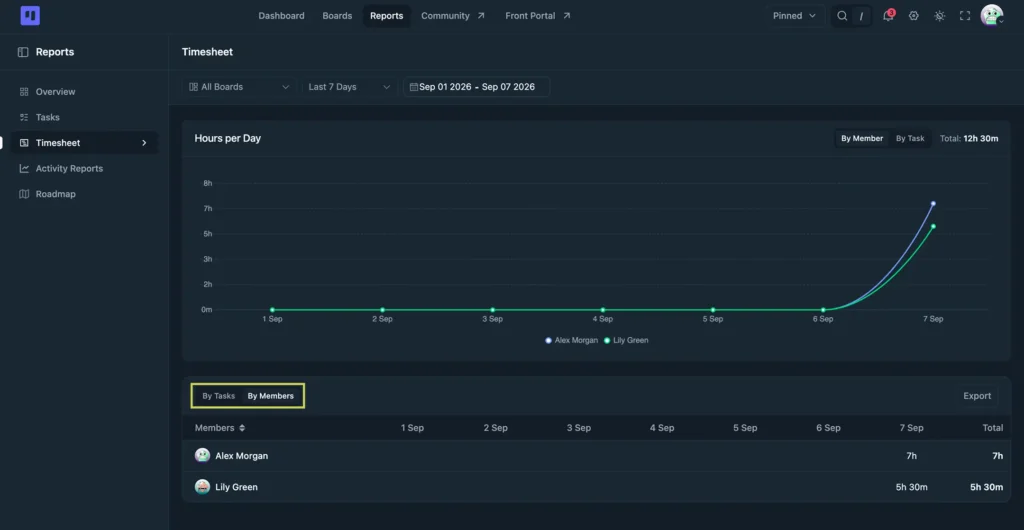
- By Members flips it, giving each team member a row so you can read individual workloads day by day
The Export button at the top right downloads whichever view you’re looking at, which is what you send to clients or use to build invoices.
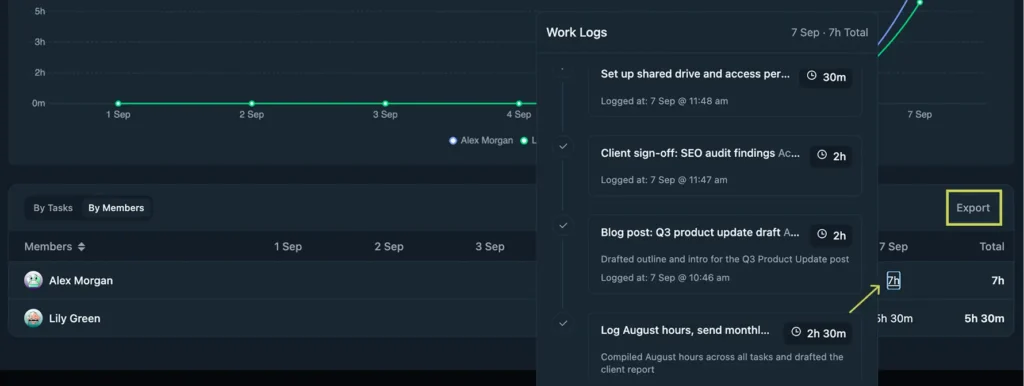
Tip: In By Members, click any person’s daily total to open their Work Logs for that day. You’ll see each entry with the task, the duration, and the note they wrote. Worth a look before you export, so you know exactly what the client is about to read.
What You Can Actually Do With the Time Data
The Timesheet only earns its place if you act on what it shows. Four things worth doing once entries are coming in consistently.
Run a real billing check
You’re managing a monthly retainer with a capped number of hours and a team of three, the kind of arrangement set up during client onboarding where the cap is agreed at the start. At month-end you need to know whether you stayed inside it.
Open Reports, go to Timesheet, set the date range to the billing period, filter to the client’s board, and switch to By Members. Each person’s daily hours and running total are right there, so the combined figure either sits under the cap or it doesn’t, and either way you have the detail to back up the conversation that follows.
Compare that to asking three people how many hours they think they spent on the account and hoping the answers line up.
Spot the scoping gap
Pull up the Timesheet for a recently finished project and switch to By Tasks. That view ranks tasks by hours logged, so the heaviest work rises to the top straight away.
The estimates live on the tasks themselves rather than in the Timesheet, so take the tasks at the top of that list and open each one’s Time Tracking section to see what you planned against what it actually took. Two steps rather than one screen, but it’s the pairing that tells you something.
One overrun is noise. A pattern is information, whether it’s the design reviews that always stretch, the client revision rounds, or one person who consistently underestimates.
That pattern feeds directly into how you scope the next project. If your landing page copy tasks always log double the estimate, your proposals are underpriced. And when the same phases run long across several projects, it’s often an early signal of scope creep, where work grows past the original brief without the timeline or budget moving with it.
Pair that with your project management KPIs and you have what you need for a proper debrief.
Export for invoicing
Filter the Timesheet to the board and billing period you need, then click Export. The download is a CSV with columns for board, task, member, log date, billable hours, and notes.
Heads up: Every logged entry counts as billable, and there’s no toggle in the “Log your work” popup to mark one as internal. The export column is named Billable Hours regardless, so an internal meeting or a correction logged on the clock will show up in that file unless you edit it out before sending.
Drop it into your invoice template or your accounting software and the client gets a line-by-line account of what was worked on and when, rather than a total they have to take on trust. For retainer clients that monthly export becomes the billing artefact in its own right, and for project work it’s the justification for the final number.
See the full team workload at a glance
Time Tracking isn’t only for solo freelancers. Once the whole team is logging, By Members turns the Timesheet into a workload view, showing who’s carrying the most hours and whether the spread makes sense.
On a full agency project board running several clients at once, that per-member breakdown is one of the fastest ways to spot someone heading for burnout while there’s still time to do something about it, which makes it a practical part of managing a project team across simultaneous projects.
Who Can Access Time Tracking?
Admins turn Time Tracking on for the whole site from Settings → Features & Modules → Advanced Modules. It’s a global switch, not per-board.
Board access runs on three roles, set per board from Settings → Member Role:
- Viewer can look but not log
- Member can log their own time, and edit or delete only their own entries
- Manager and Admin can edit or delete any entry on the board, not just their own
The Time Tracking section also shows up in the Front Portal client view exactly as it does on the board. If you’re sharing a board with a client, assume they’ll see the same time data.
Building the Logging Habit
Time Tracking is only as accurate as what your team puts in, and the Timesheet can’t fill in entries nobody made. Someone logging from memory once a week produces softer data than someone logging at the end of each session.
The practical fix is folding it into the daily wrap-up: open your tasks at the end of the day and log what you worked on. The My Tasks dashboard is a good place to do it, since it shows everything assigned to you across every board, so you can run down what you touched today and log against each one before you close the browser.
The teams who get the most out of Time Tracking treat it as a daily habit rather than a monthly admin job.
Step into the Future of Project Management!
Frequently Asked Questions and Troubleshooting
A few things teams ask most often when they first switch Time Tracking on.
Can I edit or delete a time entry after it’s been submitted?
Yes. Open the task’s History popup, find the entry, and use the “⋮” menu next to it. Members can edit or delete any entry on a board they belong to.
Can multiple team members log time on the same task?
Yes. Each team member logs their own entries separately, and all of them appear in the shared time log for that task, each attributed to the correct person.
The Timesheet shows less time than I expected. What’s wrong?
Two things to check. First, confirm Time Tracking was enabled before the date range you’re looking at, since entries can only exist for periods when the feature was active. Second, confirm your team actually logged entries for that period, because the Timesheet reflects logged data only.
Can I filter the Timesheet to a single team member?
The Timesheet’s own filters are board and date range only. The By Members view shows everyone’s hours in the table, and you read each person’s row independently rather than filtering down to one name. For a full individual audit, use the Profile Overview in My Tasks.
Does Time Tracking work on mobile?
Yes. It works on both mobile and desktop.
Start Logging Real Hours Today
Setup is a one-time admin job. Switch Time Tracking on, ask your team to log at the end of each day, and the Timesheet handles the rest, which makes the next invoice the last one you write from memory.
The thing to try first: enable it on one active board, have everyone log for a single week, then pull the Timesheet at the end of it and switch between By Tasks and By Members. The gap between where the hours went and where you thought they were going is the whole reason the feature exists.
For a broader picture beyond time, the Reports section holds Overview, Tasks, Activity Reports, and Roadmap alongside the Timesheet. If you want to see everything that changed on a project rather than just the hours, every task movement, comment, and update, Activity Reports is the tab for that.
Thanks for reading. Enable Time Tracking on your busiest board this week and see what the first honest invoice looks like.
Let’s redefine project management with FluentBoards!

Follow:


Get Tips, Tricks, & Updates
We won’t send you spam.




Leave a Reply