

How to Connect MCP in FluentBoards (Step-by-Step Guide)


Running projects on WordPress with FluentBoards usually means starting from scratch every single time: a new board, new stages, new tasks, all built by hand, again and again.
What if that part didn’t need you at all?
FluentBoards now connects through MCP, so you can manage boards and tasks directly from the AI you already use, right from where you already are, without switching tools or context.
This guide walks through exactly how to connect FluentBoards to Claude, and where that same setup applies to OpenAI Codex, Cursor, or any other MCP-compatible tool. We’ll cover what can go wrong along the way, and how to actually use it once it’s live.
Let’s dive in.
What Is MCP, and What It Actually Changes for You
MCP stands for Model Context Protocol. The easiest way to think about it is as a universal adapter between AI assistants and the tools you already use. Instead of every AI needing its own custom-built integration for every app, MCP gives them a shared language.
Once FluentBoards speaks that language, any MCP-compatible AI client, Claude, an OpenAI-based coding tool, Cursor, and others, can connect to it, read your board data, and make changes on your behalf.
Here’s the part that actually matters day to day. It always acts using your own WordPress login.
Nothing about MCP gives an AI more access than you already have. It’s simply a faster way to use the access you already have.
Everything FluentBoards MCP Can Do
FluentBoards’ MCP connection (powered by an adapter plugin called FluentHub) exposes 29 tools across ten domains. Here’s the full map.
| Tool | What it does |
| Get FluentBoards Context | Discovery call the AI makes once per session: your permissions, site setup, and safety rules. |
| List Boards | Every board you have access to, with search, board type, archived filter, sorting, and pagination. |
| Get Board | Full board details, including stages, labels, members, and optionally task summaries. |
| Create Board | Create a new board with optional custom stages, labels, members, CRM contact, and Pro folder placement. |
| List Tasks | Filter tasks by search, stage, status, priority, assignee, labels, due date, archived state, sorting, and pagination. |
| Get Task | Full task details including stage, labels, assignees, watchers, comments, and recent activity. |
| Create Task | Add a new task to any board stage using native task creation logic. |
| Update Task | Change title, description, status, priority, dates, assignees, CRM contact, and settings. Supports partial updates. |
| Move Task | Move a task to another stage or board with explicit positioning. |
| Archive or Restore Task | Archive a task, or bring it back. |
| Add Comment | Leave a private or public note on a task. |
| List Labels | List board labels, optionally limited to labels already used by tasks. |
| Save Label | Create a board label or update an existing one. |
| Delete Label | Delete a board label and detach it from every task that uses it. |
| Add Task Label | Attach one or more existing board labels to a task by ID or title. |
| Remove Task Label | Remove one or more labels from a task while keeping the board label itself. |
| List My Tasks | List tasks across boards grouped by assigned, mentioned, upcoming, due today, overdue, completed, or no due date. |
| Search Tasks | Search task titles across visible boards, including exact ID lookup and archived term search. |
| Save Stage | Create a stage or update an existing one. |
| Archive Stage | Archive or restore a stage. Archived stages keep their tasks. |
| Assign Task | Add, remove, or sync task assignees. Assignees also become task watchers. |
| Create Subtask Group | Organize subtasks under a task. |
| Create Subtask | Add a subtask inside an existing group. |
| Get Subtasks | List a task’s subtask groups and subtasks, with assignees included. |
| Update Subtask | Edit a subtask’s fields, or move it to another group or position. |
| Delete Subtask | Permanently delete a subtask. Cannot be undone. |
| Assign Subtask | Add, remove, or sync who’s assigned to a subtask. |
| Add Task Assignee | Add one or more people to a task without removing existing assignees. |
| Remove Task Assignee | Remove one or more people from a task. |
Here’s what each domain covers and why it matters:
Discovery
Get FluentBoards Context – the AI calls this first each session. It learns your permissions, site metadata, available enums, safety levels, and usage guidance. This is what stops the AI from guessing about what it can and cannot do.
Boards
List Boards – see every board you have access to, with search, board type, archived filter, sorting, and pagination.
Get Board – pull full board details including stages, labels, members, and optionally task summaries. Useful for grounding the AI before it makes changes.
Create Board – create a new board with optional custom stages, labels, members, CRM contact, and Pro folder placement. Member IDs are validated before creation and roadmap boards get default stages when none are specified.
Tasks
List Tasks – filter tasks in a board by search, stage, status, priority, assignee, labels, due date, archived state, sorting, and pagination.
Get Task – full task details including board, stage, labels, assignees, watchers, comments, and recent activity.
Create Task – create a task in a board stage using the same product-side logic as regular task creation, including default watcher and assignee behavior.
Update Task – update title, description, status, priority, dates, assignees, CRM contact, and settings. Supports partial updates so unchanged fields stay untouched.
Move Task – move a task to another stage or board with explicit positioning by position number or neighboring task IDs. No manual drag-and-drop needed.
Archive or Restore Task – archive a task or bring it back. Reversible.
Comments
Add Comment – add a private or public comment to a task. Fires native comment hooks and notifications, keeping collaboration history inside the task.
Labels
List Labels – list board labels, optionally limited to labels already used by tasks.
Save Label – create a board label or update an existing one. Create and update are consolidated into one tool.
Delete Label – delete a board label and detach it from every task that uses it.
Add Task Label – attach one or more existing board labels to a task by ID or title. Capped at 50 items per batch.
Remove Task Label – remove one or more labels from a task while keeping the board label itself.
Personal Tasks
List My Tasks – list tasks across all boards grouped by dashboard categories: assigned, mentioned, upcoming, due today, overdue, completed, or no due date. The same “my work” view users already know from the dashboard.
Search
Search Tasks – search task titles across visible boards, including exact ID lookup (id:123) and archived term search. Minimum search length enforced for normal text queries.
Stages
Save Stage – create a stage or update an existing one. Create and update are one tool.
Archive Stage – archive or restore a stage. Archived stages keep their tasks, so nothing is lost.
Subtasks
Create Subtask Group – organize subtasks under a task by grouping them, so checklists don’t turn into one long flat list.
Create Subtask – add a subtask inside an existing group.
Get Subtasks – list a task’s subtask groups and subtasks, with assignees included, so the AI can report progress accurately.
Update Subtask – edit a subtask’s fields, or move it to another group or position.
Delete Subtask – permanently delete a subtask. Cannot be undone.
Assignment
Assign Task – add, remove, or sync task assignees. Assignees also become task watchers. Supports sync mode to replace the entire assignee list, including clearing all assignees with an empty list.
Assign Subtask – add, remove, or sync who’s assigned to a subtask, the same way Assign Task works at the task level.
Add Task Assignee – add one or more people to a task without removing anyone already assigned.
Remove Task Assignee – remove one or more people from a task.
Which AI Tools You Can Connect
On the settings page, FluentBoards lets you generate a ready-made connection snippet for five different clients:
- Claude Desktop, a JSON snippet you paste into its config file
- Claude Code, a single terminal command
- OpenAI Codex, a config snippet for OpenAI’s coding agent
- Cursor, a snippet for Cursor’s own MCP settings
- Other, the raw endpoint URL and auth header, for any generic MCP-compatible HTTP client
One Thing to Check First: Node.js and npx
Before you touch any FluentBoards settings, there’s one small thing worth checking on your computer: Node.js.
FluentBoards’ MCP connection doesn’t run inside WordPress alone. Your AI client needs a small helper program running in the background to actually talk to your site. That helper is launched by a command called npx, and npx comes bundled with Node.js.
Think of it like this: your AI client has your FluentBoards login and address, but it needs npx to actually place the call. Without it, the connection has all the right information and no way to use it.
How to Check If You Already Have It
Open Terminal (on a Mac, press Cmd+Space, type Terminal, hit Enter). Type node -v and press Enter, then do the same with npx -v. If both print back a version number, you’re already set; skip ahead to Step 1 below.
How to Install It If You Don’t
- Go to nodejs.org and download the LTS version
- Run the installer – it sets up everything automatically
- Restart your computer before continuing
After installing: fully quit and reopen both Terminal and Claude Desktop before trying to connect. A restart is what makes your computer actually recognize the new command.
This is a one-time setup. Once Node.js is installed, you won’t need to think about it again for any future MCP connection, not just this one.
How to Connect FluentBoards to Claude Desktop (Step by Step)
Step 1: Find the Setting
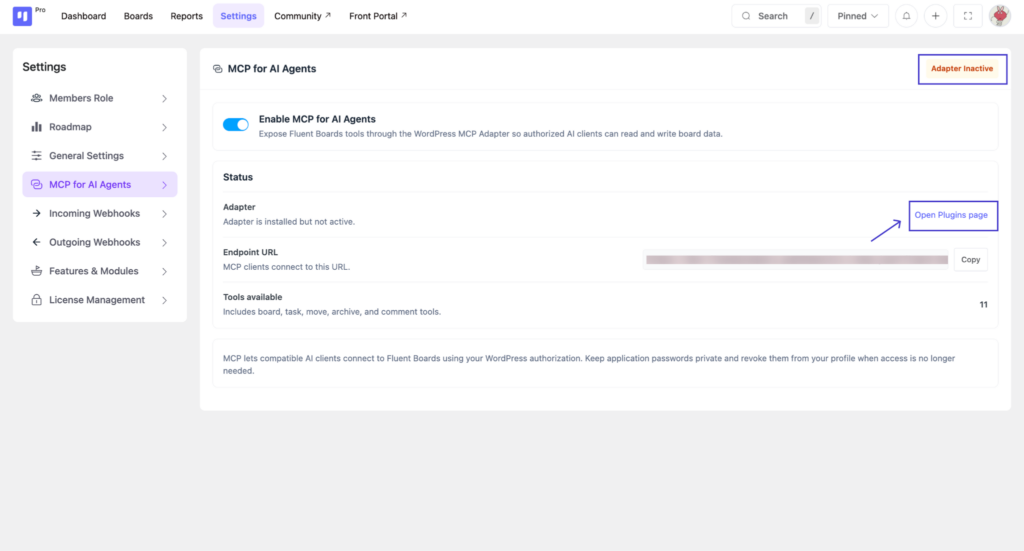
In your WordPress admin, go to Fluent Boards → Settings → MCP for AI Agents. If you’ve never touched this before, you’ll likely see a status badge like the one below. The toggle is on, but the adapter itself isn’t active yet.
Step 2: Install & Activate the Adapter (FluentHub)
If the settings page already shows “Connected,” skip this step.
FluentHub is the shared adapter that connects FluentBoards (and other Fluent plugins) to your AI tool through a single endpoint. It is not listed in the WordPress plugin directory, so download it directly here: Download FluentHub.

Once downloaded, go to Plugins – Add New – Upload Plugin, upload the zip file, and click Activate.
Step 3: Confirm It’s Connected
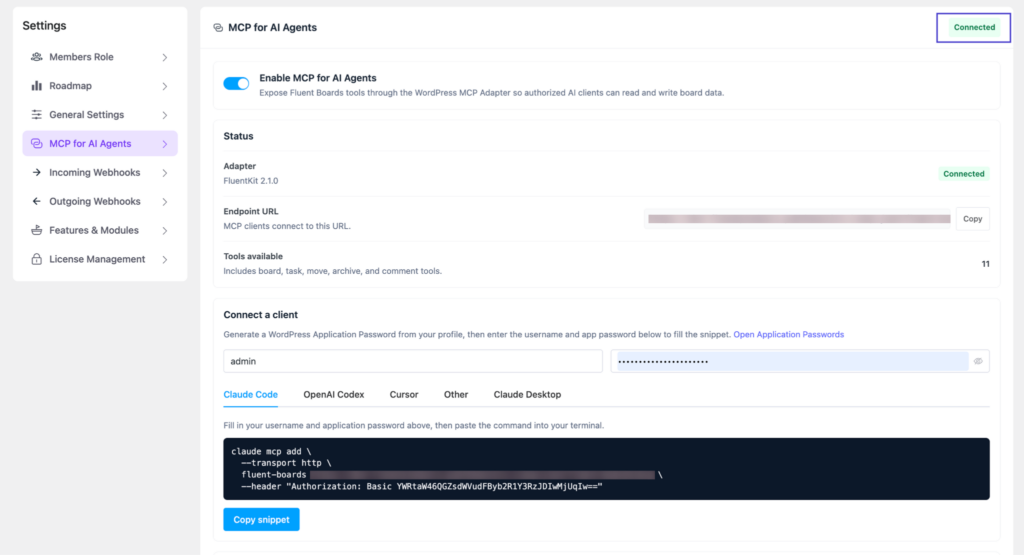
Head back to the same MCP for AI Agents page. The status should now say Connected, with the adapter name, your endpoint URL, and the tool count.
Step 4: Create a Dedicated Application Password
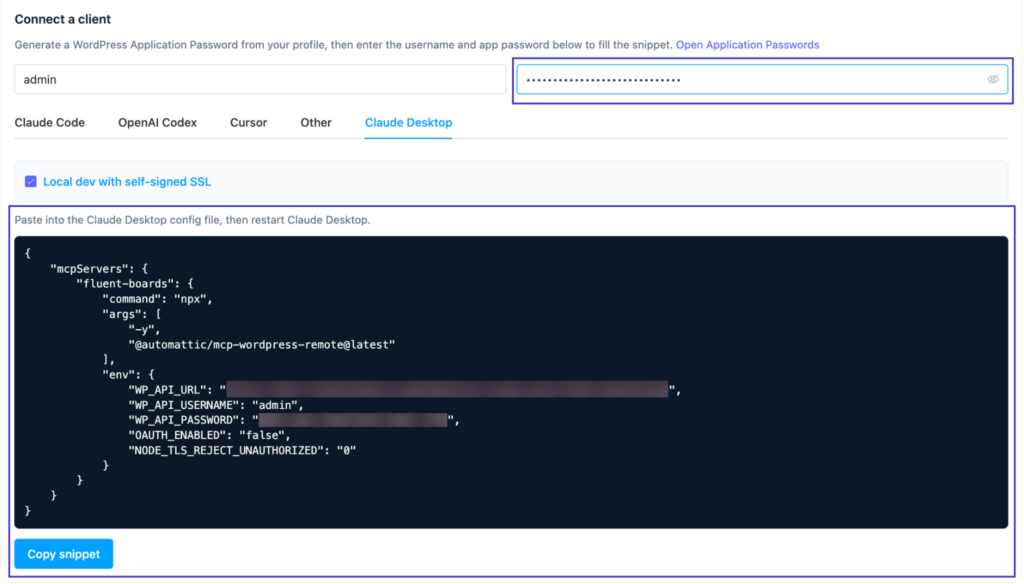
Don’t reuse your real WordPress password here. Instead, generate a WordPress Application Password specifically for this connection, so you can revoke AI access later without touching your actual login.
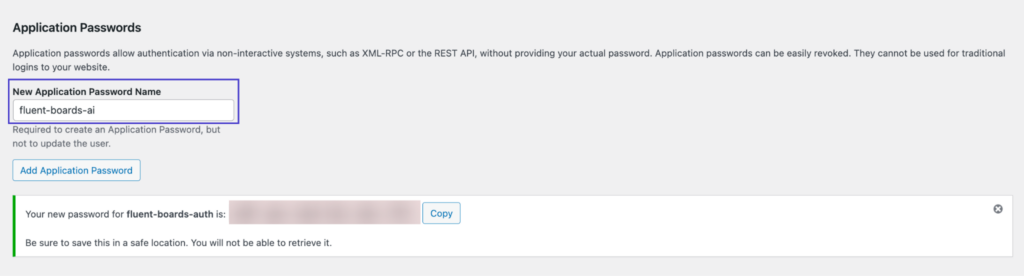
Copy the generated password immediately. WordPress only shows it once, and there’s no way to view it again afterward.
Step 5: Copy the Ready-Made Snippet
Back on the MCP settings page, enter your username and the application password you just created, then click the Claude Desktop tab and hit Copy snippet.
Step 6: Add the Snippet to Claude Desktop
The easy way (recommended if you’re not a developer):
Open Claude Desktop or Claude Code in any folder and paste this into the chat:
“Add this MCP server to my Claude Desktop config, and install Node.js or npx first if either is missing: [paste your snippet here]“
Your AI assistant will find the right file on your computer, merge the snippet in correctly, and confirm when it’s done. No manual file editing needed.
The manual way:
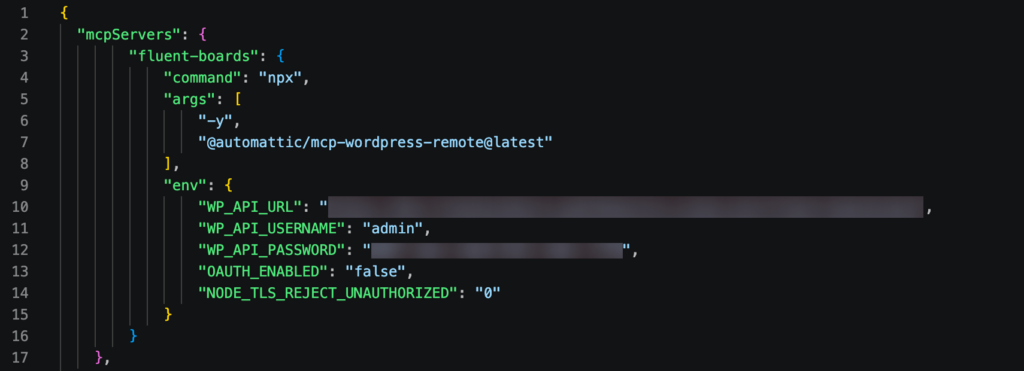
Go to Settings → Developer → Edit Config.
This opens the file claude_desktop_config.json.
Two things to watch out for:
- Make sure you’re editing claude_desktop_config.json specifically, not some other settings file. It’s an easy mix-up if you have multiple JSON files open at once.
- If the file already has content (say, from another MCP server), don’t replace the whole thing. Your snippet belongs inside the existing “mcpServers” section, alongside whatever’s already listed, not instead of it.
Either way, save the file, fully quit Claude Desktop (not just close the window), and reopen it.
Step 7: Confirm the Connection
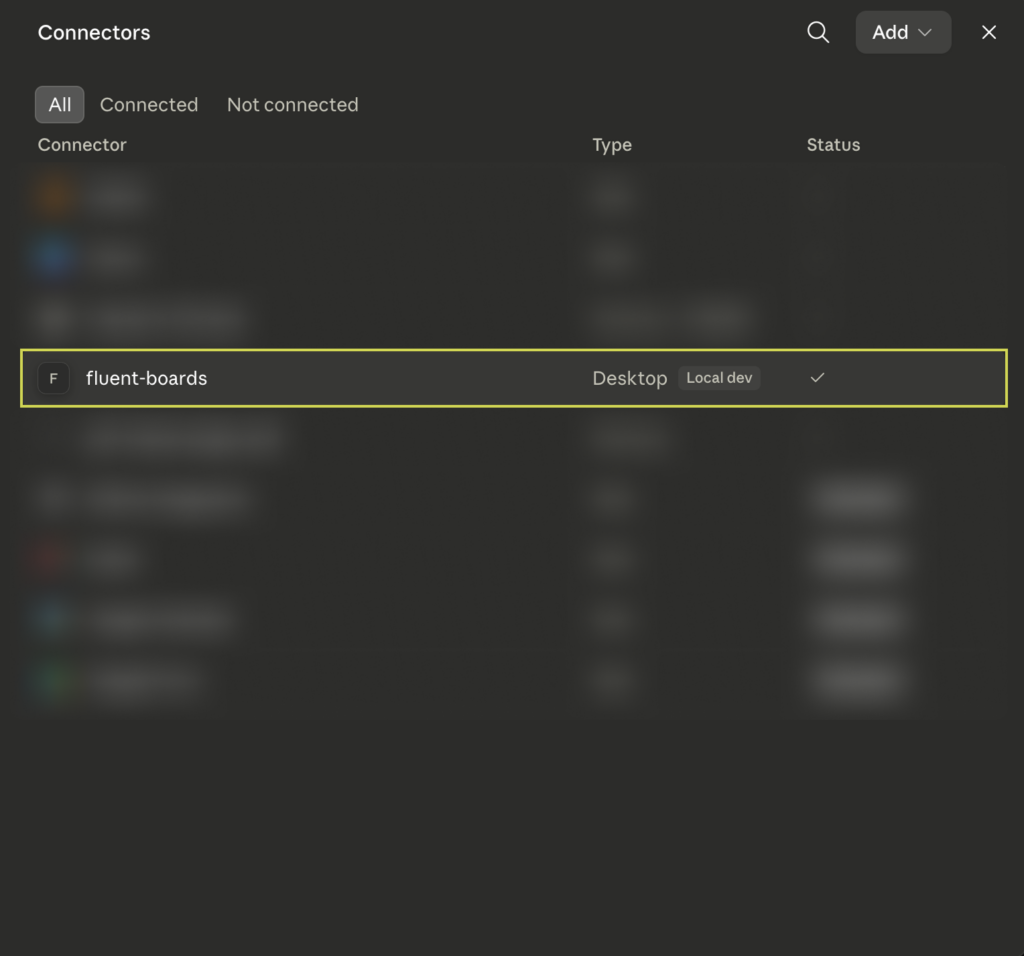
Open your AI tool’s own connector or MCP settings and look for fluent-boards in the list. A checkmark or a Connected status means the two are talking. If it’s missing, check your JSON is valid and that you fully quit and reopened the app. A wrong password won’t hide it from the list, it only fails once you try to use it.
Step 8: Test it with a Real Prompt
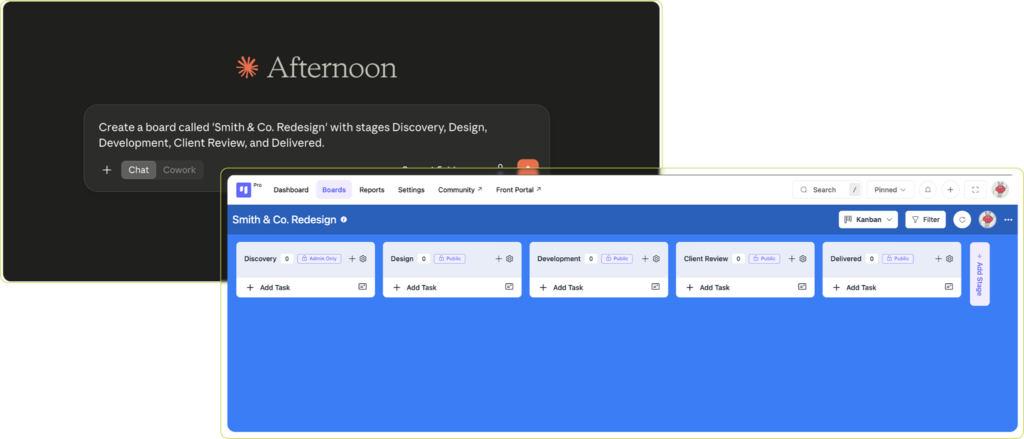
Open a new chat and ask it to do something real. Not just “is this working,” but an actual action, so you can see live data come back.
Common gotcha: If the server shows “connected” or “running” but nothing actually happens when you ask it to do something, open Settings → Developer → your server → View Logs and check the environment variables. The single most common cause is leaving a placeholder value (like “your-application-password-here”) in the password field instead of your real one. The process launches fine, but every request then fails silently on authentication.
How to Connect FluentBoards to OpenAI Codex
The steps above are written for Claude Desktop, but the same WordPress setup (Steps 1–5) applies to every tool. Only the last few steps where you paste the snippet change.
Click the OpenAI Codex tab on the FluentBoards settings page, enter your username and application password, then hit Copy snippet.
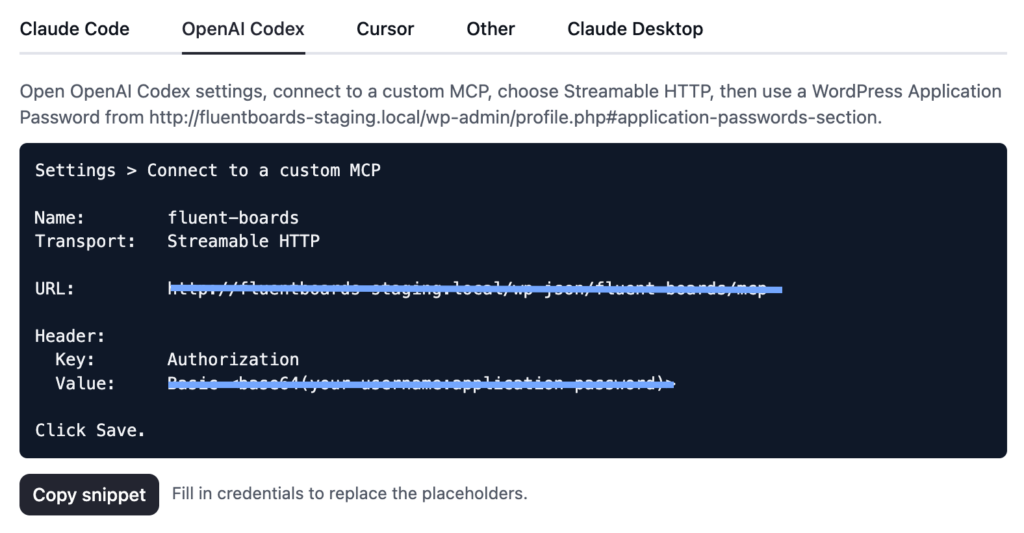
The snippet includes everything pre-filled, including the encoded authorization header.
Open the ChatGPT desktop app and go to Settings → Plugins → MCPs → + Add server and fill in the details from the snippet:
- Name: fluent-boards
- Transport: Streamable HTTP
- URL: your endpoint URL
- Header Key: Authorization
- Header Value: the Basic … string from the snippet
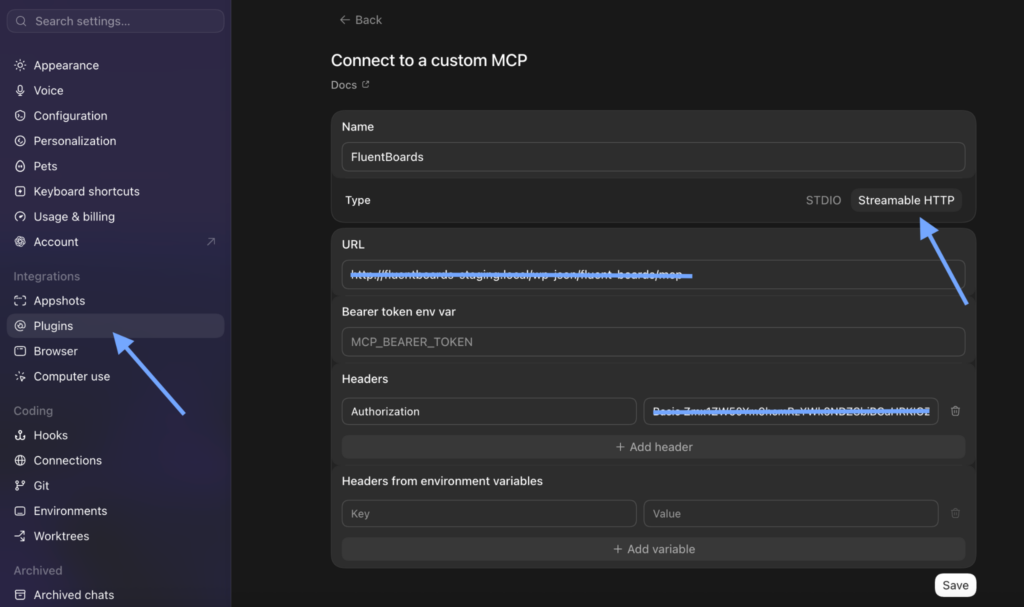
Click Save, and everything will be ready to run from your ChatGPT app!
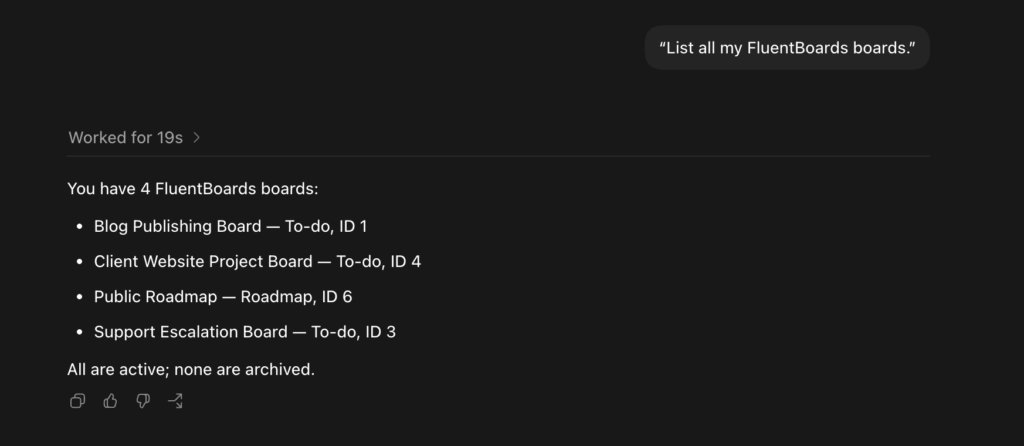
The Node.js and npx requirement from the “One Thing to Check First” section applies to OpenAI Codex too.
What You Can Actually Ask It To Do
Once it’s connected, the real value isn’t the novelty. It’s the boring, repetitive parts of running projects that quietly eat your week. A few concrete examples, framed the way you’d actually think about them:
Catching What’s Overdue
Instead of opening every board to check what’s overdue,
Ask: “What tasks are overdue across all my boards?”
Why it matters: Catching what’s overdue takes one prompt instead of clicking through every board.
Setting Up a New Client Board
Instead of manually rebuilding the same board structure for every new client,
Ask: “Create a board called ‘Retainer Radar’ with stages New Request, In Progress, Client Review, Delivered This Month.”
Why it matters: A setup that used to take twenty minutes of clicking now takes one sentence.
Turning Meeting Notes Into Tasks
Instead of retyping messy meeting notes into individual tasks,
Ask: “Create a task for each of these action items on the Q3 Launch board.”
Why it matters: Action items go straight from the meeting into tasks, instead of sitting in a notes doc nobody reopens.
Writing the Status Update for You
Instead of opening a client’s board to write a status update by hand,
Ask: “Summarize progress on the Smith & Co. Redesign board: what’s done, in progress, and blocked.”
Why it matters: Clients get an answer in seconds instead of you writing one from scratch.
Cleaning Up Finished Work
Instead of leaving completed tasks cluttering a board for weeks,
Ask: “Archive everything marked Done on the E-Commerce Redesign board.”
Why it matters: Boards stay clean without you doing the cleanup yourself.
Standing Up a Team Board From Scratch
Instead of building a fresh internal board for a marketing team from scratch,
Ask: “Create a board called ‘FluentCRM Campaigns’ with stages Planning, Drafting, Ready to Send, Sent.”
Why it matters: A new team gets a working board before their first meeting even starts.
Bottom line: None of these are exotic use cases. The work itself doesn’t change, only how long it takes. Setup and cleanup that used to eat ten or fifteen minutes now takes one sentence and a few seconds of waiting.
Is This Safe? What the AI Can Access, and How to Revoke It
Every connection authenticates as you, using the application password you generated in Step 4. That means it inherits your existing WordPress permissions and nothing more. If your account can’t delete a board, the AI acting on your behalf can’t either.
Worth knowing: Claude Desktop asks you to approve a new tool the first time it’s used in a conversation, unless you’ve set it to “always allow.” Nothing runs silently in the background. You see the request before anything actually gets created, moved, or archived.
This also works cleanly for teams. Each person connects with their own application password and their own WordPress login, so access always matches whatever that individual account can already see. Nobody needs to share one login just to use MCP.
Revoking access takes seconds. Open your WordPress profile, go to Application Passwords, and delete the entry you created for this connection. That cuts off access instantly without touching your normal login.
A few good habits once this is running:
- Treat the application password like any other credential. Don’t share it or paste it into public places.
- If you stop using a particular AI tool, revoke its application password rather than leaving it active.
- Consider connecting through a non-admin WordPress account, so the AI only ever has the permissions you actually want it to have.
FAQ & Troubleshooting
A few quick answers to what people usually ask once they’ve got this connected, or while they’re getting stuck along the way.
Which AI Tools Work with FluentBoards MCP?
Claude, Cursor, and OpenAI Codex all get a ready-made snippet in the Connect a Client panel. Anything else that speaks MCP connects through the Other tab, using the same username and application password.
Do I Need to Know How to Code to Set This Up?
No. Every step happens through WordPress screens and copy-paste. If you’d rather not edit a config file manually, just ask Claude Desktop or Claude Code to do it for you. Paste the snippet in chat, and it’ll handle the file editing. The one exception is Claude Code, which also accepts a single terminal command from the Claude Code tab if you prefer that route.
What Happens If I Lose or Forget My Application Password?
Nothing to worry about. Generate a new one from the same Application Passwords screen. WordPress only shows the password once, so if you didn’t save it, delete that entry and create a fresh one.
Will This Slow Down My Site If I’m Not Using It?
No. MCP does nothing until you switch on Enable MCP for AI Agents. Before that, the server isn’t even running.
It Still Says “Adapter Inactive.” What do I do?
Go back to Step 2 above. This means the FluentHub plugin either isn’t installed or isn’t active yet. Activating it (or reactivating it, if it was somehow switched off) resolves this.
It Shows “Connected” or “Running,” But Nothing Actually Happens
This is almost always the placeholder-password issue described in Step 8: Test it with a real prompt. Check your config’s environment variables and confirm the real application password is in there, not example text. A “running” status only confirms the local process started; it says nothing about whether it can actually log in.
Is My Board Data Shared with the AI Provider, or Used to Train It?
That depends on which AI tool and plan you’re using. Claude, for example, doesn’t use your conversations to train its models by default on Team plans and above. Check the privacy policy of whichever client you connect for the specifics that apply to your account.
What If the AI Makes a Change I Didn’t Want?
Ask it to undo the change in the same conversation. Most edits are as easy to reverse as they were to make. For tasks specifically, Archive isn’t permanent either; you can restore an archived task any time. Worst case, you can always fix it manually in FluentBoards, same as any other change.
Can I Connect More Than One WordPress Site to the Same AI Tool?
Yes, but each site needs its own connection. Generate an application password and copy a fresh snippet from that site’s MCP settings page, then add it alongside the ones you already have. Connecting one site doesn’t pull in any others automatically, so you always know exactly which boards the AI can reach.
Does This Work with ChatGPT?
Yes, through the ChatGPT desktop app’s MCP settings, which share configuration with Codex CLI and the Codex IDE extension. Follow the OpenAI Codex section above and add it as a Streamable HTTP server with the authorization header from the snippet.
What doesn’t work is ChatGPT’s published Plugins directory. That surface expects OAuth and a public HTTPS endpoint, so it’s a separate route.
Why Can’t I Use This from a Browser, Or on My Phone?
The Claude Desktop setup uses a local config file, so it only exists on the one computer where you set it up. It can’t reach a browser tab or a separate hosted workspace, only the Claude Desktop app installed on that machine. In your account’s full connectors list, this shows up tagged “Desktop,” scoped to that one computer, unlike cross-device “Web” connectors.
Start Talking to Your Boards Today
That’s the whole path: activate the adapter, confirm the connection, generate a dedicated password, copy the snippet, paste it in, and ask it something real. Once it’s live, the AI isn’t guessing about your projects. It’s reading and acting on the same board data you’d see if you opened it yourself. Go connect it, ask it a real question, and see your own data come back.
Try one of the prompts from earlier on a real board of yours. That’s the fastest way to know whether this actually fits how you work, faster than reading about it.
FluentBoards MCP is still early. Twenty-nine tools today, likely more as the team learns what people actually ask their AI to do.
Let’s redefine project management with FluentBoards!

Follow:


Get Tips, Tricks, & Updates
We won’t send you spam.


Leave a Reply