

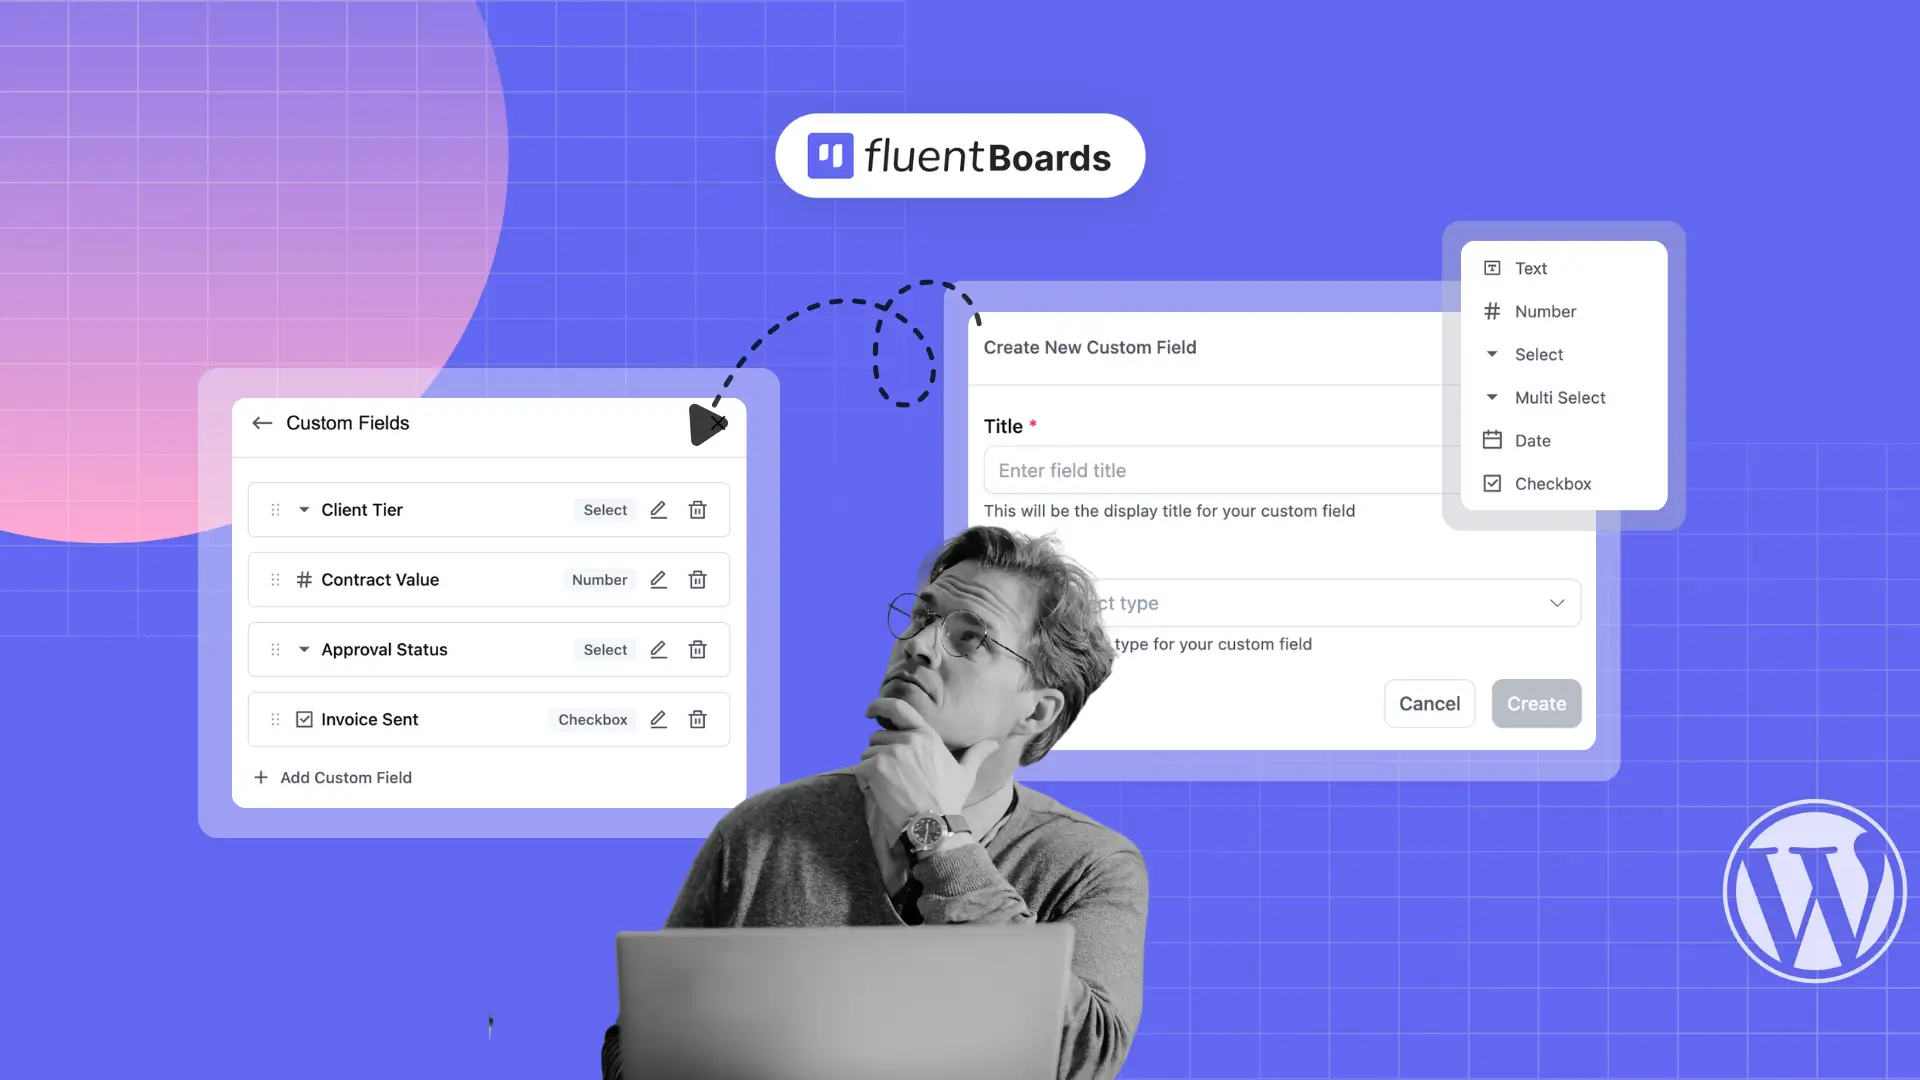
How to Organize Your Tasks With Custom Fields in FluentBoards


A new client task lands on your board with an assignee, a due date, a priority, and a label. You know exactly when it’s due and who owns it.
But can you answer these questions from the task alone?
- What’s the contract worth?
- Has the client approved the brief?
- Which package are they on?
Probably not. That information lives in a spreadsheet, an email thread, or someone’s head, so the task knows the deadline but not the business behind it.
Custom fields close that gap by letting you add the details your team actually needs to every task. Here’s how to set them up and put them to work.
What Custom Fields Actually Change for You
Default task fields cover the logistics of the work. Custom fields cover the work itself.
Every board comes with an assignee, due date, priority, and labels because every team needs them. But most teams also track details that no default field can predict:
- Agencies track contract value
- Content teams track target keywords
- Dev teams track sprint numbers
That’s why FluentBoards lets you create your own fields for each board.
Once you add a field to a board, it appears on every task in that board. Your team fills it in once, and the value stays with the task as it moves through stages, into clones and templates, and out in exports.
New to how tasks work in FluentBoards? Learn what a task holds first, since this post builds on it.
The 6 Custom Field Types in FluentBoards
FluentBoards gives you six field types, so pick the one that matches the kind of answer you expect.
| Field type | What it stores | Example |
| Text | Free-form text | Client name, brief URL |
| Number | A numeric value | Contract value, estimated hours |
| Select | One option from a list you define | Approval status: Pending, Approved, Rejected |
| Multi Select | Several options from a list you define | Deliverables: Logo, Website, Social Kit |
| Date | A calendar date | Contract signed on, content go-live |
| Checkbox | A single yes or no tick | Invoice sent, NDA signed |
Text and number: for specific values
Use Text when the answer is unique to each task, like a client name or a link to the brief. Use Number when the answer is a quantity, like a contract value or estimated hours.
Using Number for “Contract Value” keeps your data clean, so nobody types “$5k” in one task and “5000 USD” in another.
Select and multi select: for controlled answers
These are the most useful types for teams because they remove guesswork. You define the options once, and everyone picks from the same list. Select allows one answer, like “Client Tier: Gold,” while Multi Select allows several, like “Departments: Design, Dev.” You can reorder the options and rename them in place.
Date and checkbox: for milestones and yes or no checks
Date covers any date that isn’t the task’s own start or due date, like the day the contract was signed.
Checkbox is the fastest field to fill in, which makes it ideal for small steps that get forgotten, like “Invoice sent,” “Assets received,” or “Client signed off.”
How to Create Custom Fields in FluentBoards (Step by Step)
Custom fields are created per board. You can add them from the board menu when you’re setting up several fields at once, or from inside a task when you realize mid-task that you need one.
Step 1: Create a new field
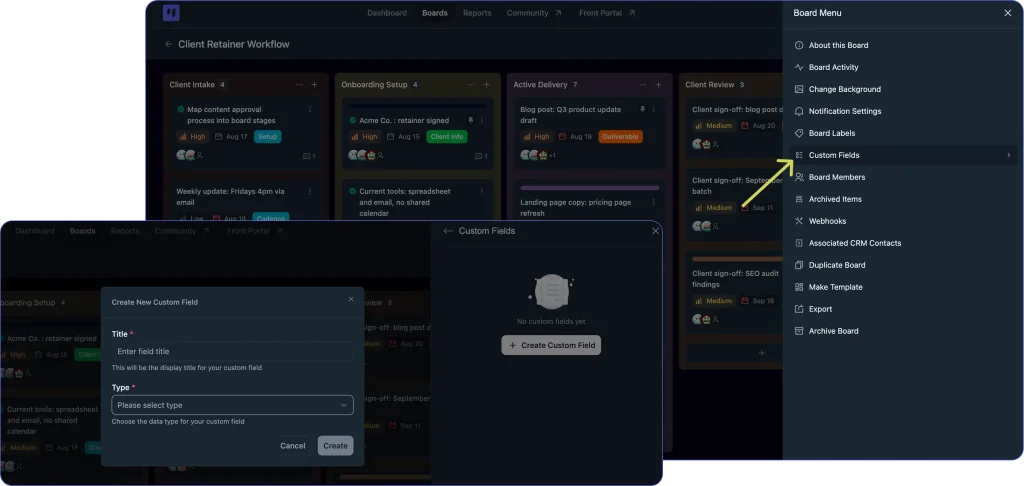
Open the board you want to add fields to, then open its board menu and click Custom Fields. A panel opens, titled “Custom Fields.” On a board with no fields yet and you’ll see Create Custom Field button. Click it.
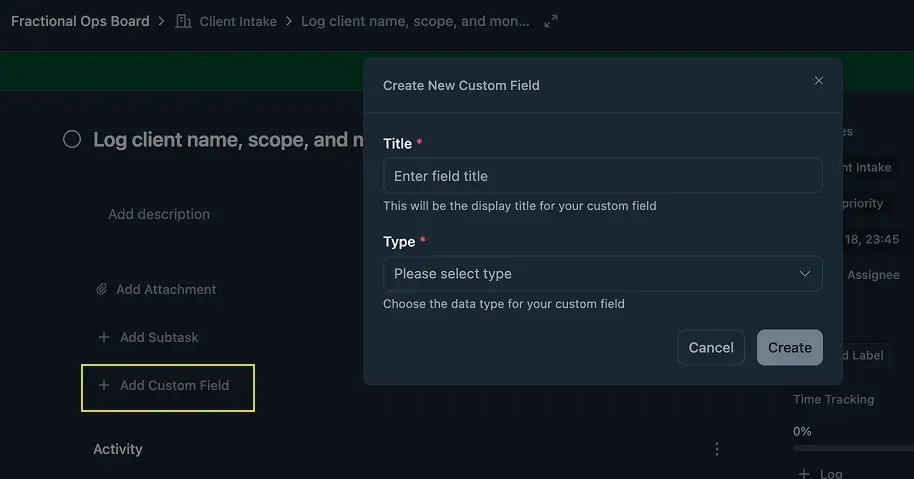
Not every field gets planned up front, though. Sometimes a client sends an extra request while you’re working on their task, and you need a way to mark it as in scope or out of scope right there.
For those moments, choose Add Custom Field in the task’s Custom Field section. It opens the same Create New Custom Field form, so you can follow the next steps without leaving the task.
Step 2: Name the Field and Choose Its Type
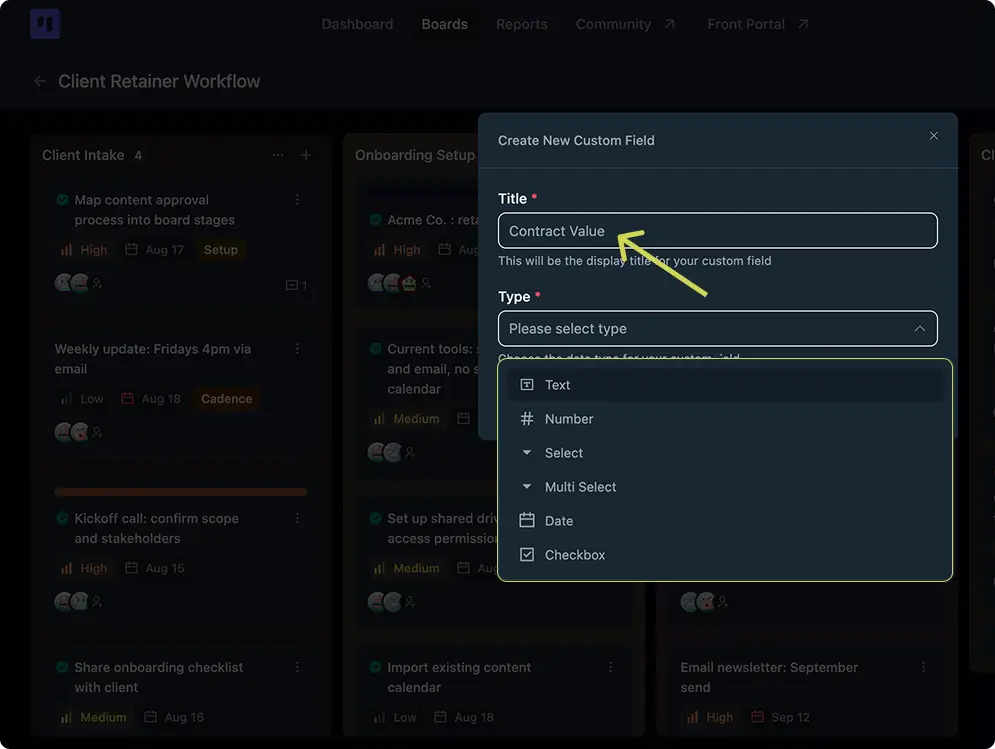
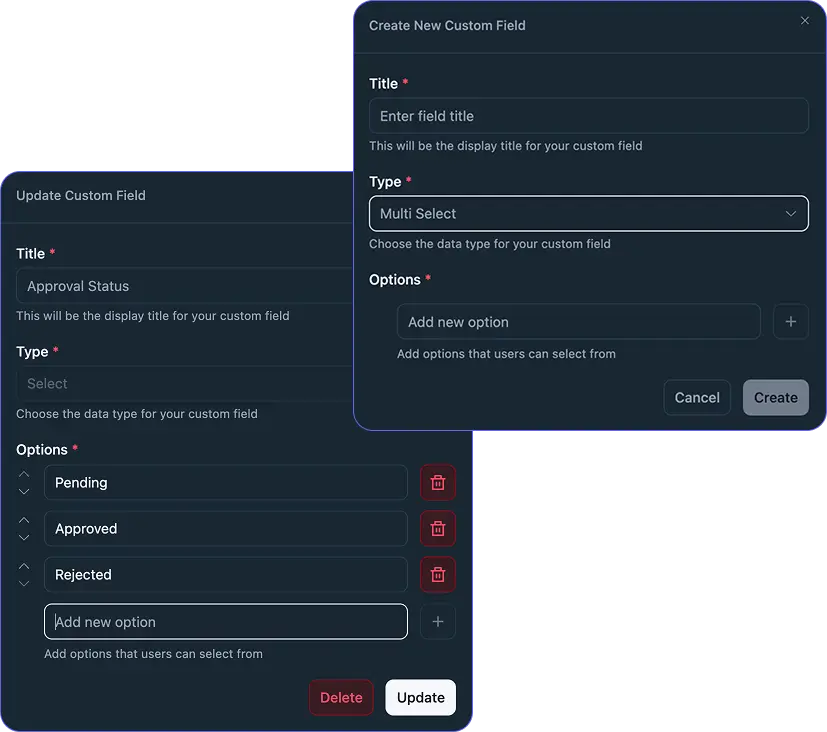
Enter a Title. This is the label your team sees on every task, so make it obvious: “Contract Value,” not “CV.” Then pick a Type from the dropdown.
Field types are locked in at creation, so pick carefully. Need “Contract Value” as a Number instead of Text later? Create a new field with the right type and retire the old one.
Step 3: Add options (select and multi select only)
If you chose Select or Multi Select:
- Type each option and press Enter
- Use the arrows to reorder them, since this is the order your team sees
- Make sure there’s at least one option, or the field won’t save
Step 4: Save and reorder
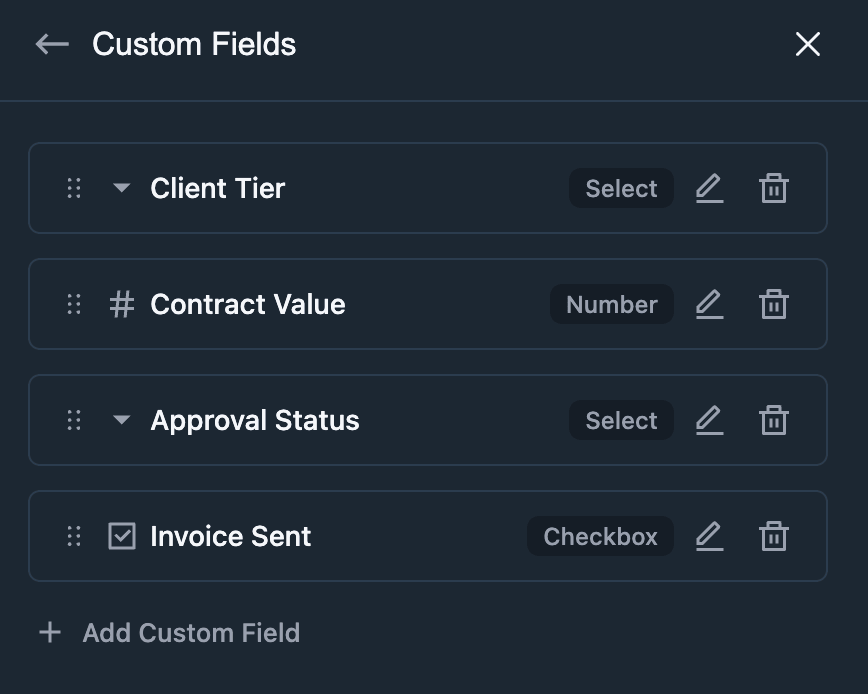
Save the field, and it appears on every task in the board. To add more fields, choose Add Custom Field at the bottom of the list. Then drag each field by the handle on its left to set the order, with the fields your team checks most often at the top.
Note: A board can’t have two fields with the same title and the same type, which keeps duplicate “Status” fields from piling up.
Each saved field shows up as a row in the panel with:
- Its name and type
- Edit and delete icons
- A small arrow on Select and Multi Select fields that opens the field’s options right in the panel
Step 5: Fill in values on a task
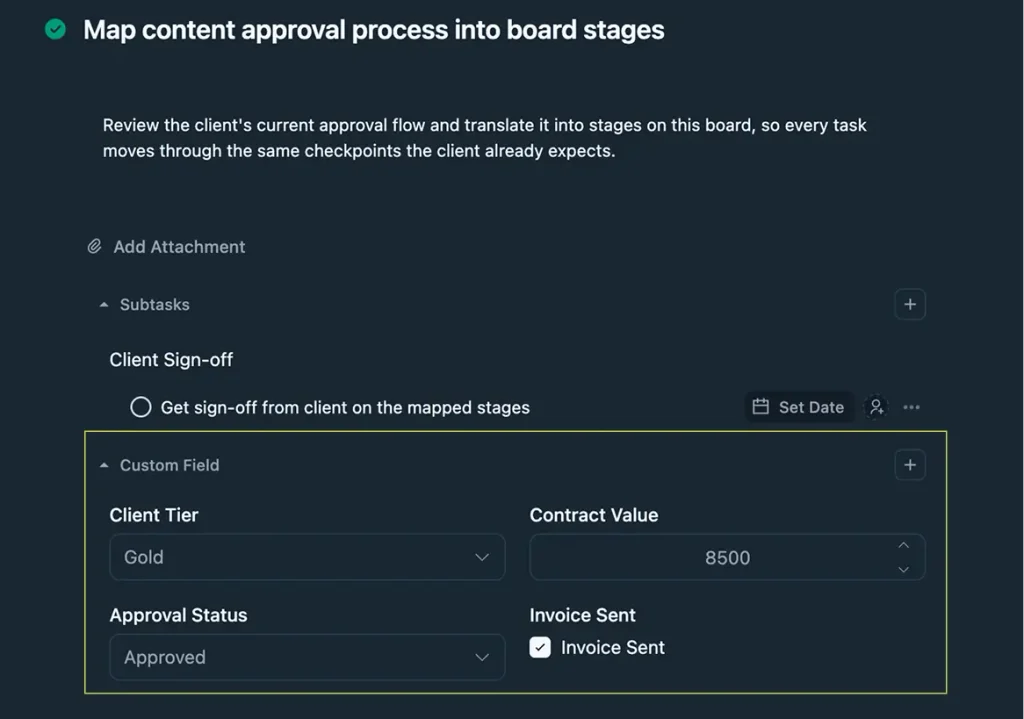
Open any task and scroll to the Custom Field section, which sits between Subtasks and the Activity feed. Fill in each value. These are the same fields you manage from the board menu, shown right inside the task so you never have to leave it.
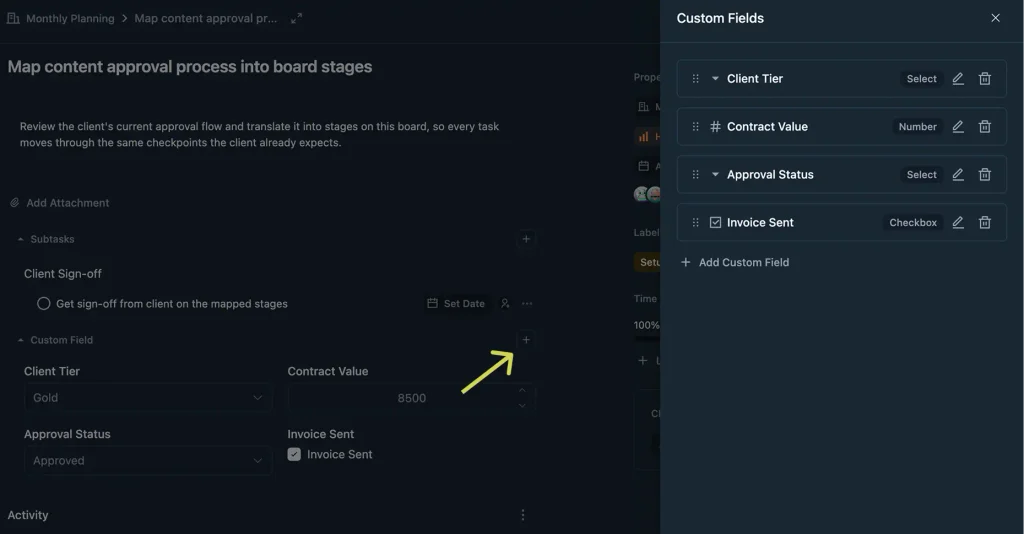
Tip: You can manage your fields without leaving the task. Use the + next to the Custom Field header to open the Custom Fields panel, where you can add, edit, or delete fields. Any field you add there appears on every task in the board.
Every change is saved in the task’s activity with the old and new value. When “Approval Status” moves from Pending to Approved, you’ll see who changed it and when.
How to Filter Tasks by Custom Field
Here’s where custom fields start paying off at the board level. Open the board’s Filters panel (the funnel icon next to the view switcher) and scroll to the bottom. You’ll see a Custom Fields section listing every field on the board, plus a No Custom Field option.
This filter works off whether a field has a value, not what that value is. One checkbox per field is all you need for a fast data-quality check across the whole board.
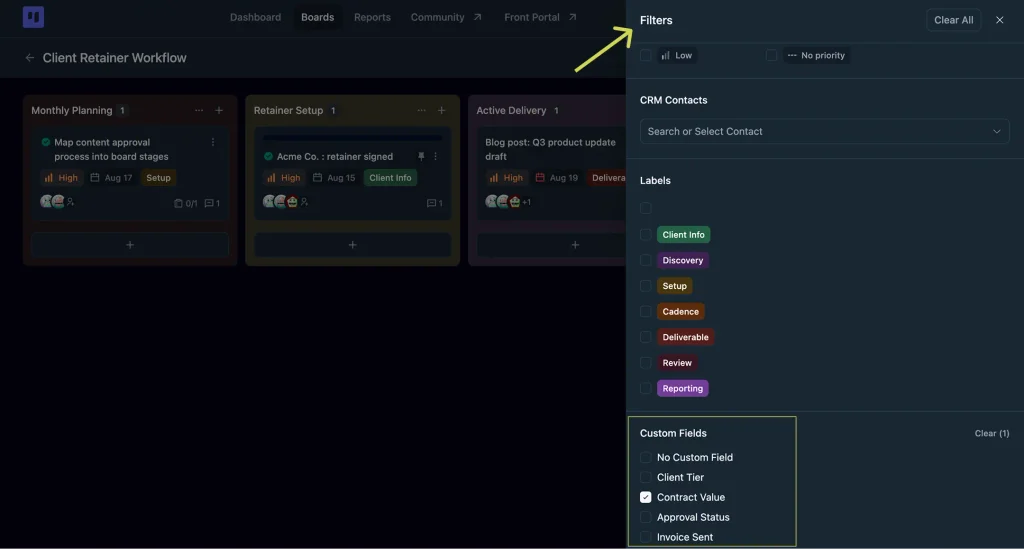
Select “No Custom Field” and you instantly see every task nobody has filled in. On a client board, those are the tasks missing budget, tier, or approval info.
Select any other field and you see only tasks that have a value there. Pick Contract Value and you see only tasks with a budget recorded. Everything else is work you’re doing without knowing its value. The same works for whichever field matters most to you: Approval Status to find what still needs sign-off, Client Tier to see who’s unclassified.
Run this check every Monday. It takes 30 seconds and tells you exactly which tasks need chasing before they become billing surprises.
What You Can Actually Do With Custom Fields
Here’s how teams put custom fields to work day to day, from client records to ready-made templates.
Turn client tasks into complete client records
Say an agency takes on a new website project. Without custom fields, the budget sits in the proposal PDF and the approval status sits in an email.
Add Contract Value (Number), Client Tier (Select), and Approval Status (Select), and every task carries its own business context. Now anyone on the team can open the task and see what it’s worth and whether it’s cleared to start.
Read: set up client onboarding for keeping details from getting lost between sale and delivery
Track change requests before they become scope creep
Scope creep rarely arrives as one big ask. It shows up as a string of small requests that nobody writes down, and custom fields give each of those requests a proper record.
Add a few fields to your change request tasks, such as Requested Via (Select), Scope Status (Select with In scope, Out of scope, and Needs review), Extra Hours (Number), and Quote Sent (Checkbox). Every request then shows where it came from, whether it fits the agreement, and what it will cost before anyone starts the work.
Keep using a label like “Change Request” so these tasks stand out on the board, and let the fields hold the details.
To set up the full intake and review process, see how to stop agency scope creep
Keep data intact when you clone or move boards
Cloning a task within the same board copies its custom field values. Exporting a board as JSON and importing it into another FluentBoards site keeps the fields and their values too, so your client data comes with you when you move a board from staging to production.
Build a task taxonomy with labels and custom fields
Labels and custom fields do different jobs, so use both:
- Labels are broad, visual categories you want to see at a glance on the card, like Marketing, Dev, or Design
- Custom fields hold specific data you look up when you open the task, like Sprint 14, Gold tier, or “delivered as Figma file”
A content team, for example, might label tasks by channel (Blog, Email, Social) and add custom fields for Target Keyword (Text), Word Count (Number), and Publish Date (Date). The label shows what kind of work it is from across the Kanban board, and the fields show exactly what “done” looks like once you open the task.
Who Can Create and Edit Custom Fields?
Board members can create, edit, reorder, and delete custom fields on that board, and fill in values on tasks. Viewers can see custom field values but can’t create fields or change them.
That matters on client-facing boards. If you want a client to see approval status without being able to change it, give them the Viewer role. You can manage board member roles from the board or from Settings.
Custom Fields: Free vs. Pro
| Capability | Free | Pro |
| Create custom fields (all 6 types) | No | Included |
| Fill in custom field values on tasks | No | Included |
| Filter tasks by custom field | No | Included |
| Custom fields preserved in clone and import/export | No | Included |
See what else Pro unlocks: free vs Pro comparison
Frequently Asked Questions About Custom Fields
Quick answers to the questions teams ask most when setting up custom fields.
Are custom fields shared across boards?
No, custom fields are created per board. To use the same fields on another board, create them on that board too.
Can I change a field from Text to Number?
No, the type is locked after you create the field. Delete it and create a new one with the right type, but keep in mind that deleting a field removes its existing values.
Why can’t I save my Select field?
Select and Multi Select fields need at least one option. Add an option, then save.
Why can’t I add a field with a name I’ve already used?
A board can’t have two fields with the same title and the same type. Rename the new field, or check whether the existing one already does the job.
Do custom fields show up as columns in Table View?
Not currently. Custom field values live in the task details, and you can use the board filter to find tasks with or without a specific field.
Set Up Your First Custom Field Today
Start small with one board and one field:
- Create Approval Status as a Select field with Pending, Approved, and Rejected
- Fill it in on this week’s tasks
- Open the filter and choose No Custom Field
You’ll see how many tasks your team has been running without that answer. If you run client work, that number is usually higher than you’d like.
To see how this fits into a full agency workflow, see FluentBoards for agencies.
Thanks for reading. Your next client board is a good place to add that first field.
Let’s redefine project management with FluentBoards!

Follow:


Get Tips, Tricks, & Updates
We won’t send you spam.



Leave a Reply